SEAT BELT REAR CENTER SEAT OUTER BELT ASSEMBLY(for 60/40 Split Slide Walk-in Seat Type LH Side) INSTALLATION
CAUTION / NOTICE / HINT
- CAUTION:
-
Wear protective gloves. Sharp areas on the parts may injure your hands.
- HINT:
- ·
Use the same procedure for RHD and LHD vehicles.
·The procedure listed below is for LHD vehicles.
·A bolt without a torque specification is shown in the standard bolt chart (See page General>SPECIFICATIONS>STANDARD BOLT>SPECIFIED TORQUE FOR STANDARD BOLTS).
PROCEDURE

 73320A
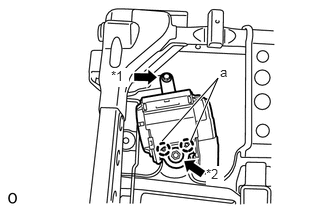
1.INSTALL NO. 1 SEAT 3 POINT TYPE BELT ASSEMBLY LH
- NOTICE:
-
When installing the retractor, make sure the claws of the vehicle (labeled "a" in the illustration) only contact the installation areas of the retractor.
Align the claws with the seat belt positioning holes and install the retractor of the seat belt with the nut and bolt as shown in the illustration.
- HINT:
-
First install the bolt, and then install the nut.
- Torque:
- for bolt : 7.5 N*m (76 kgf*cm, 66 in.*lbf)
- for nut : 42 N*m (428 kgf*cm, 31 ft.*lbf)
| *1 | Bolt |
| *2 | Nut |
73187A
2.INSTALL REAR SEAT SHOULDER BELT GUIDE
3.INSTALL SEATBACK COVER WITH PAD
71931B
4.INSTALL REAR NO. 1 SEAT HEADREST SUPPORT ASSEMBLY
71890A
5.INSTALL REAR SEATBACK BOARD CARPET ASSEMBLY LH
72996A
6.INSTALL REAR SEATBACK COVER
73373
7.INSTALL REAR SEAT SHOULDER BELT COVER
73178A
8.INSTALL SEAT BELT ANCHOR COVER CAP
72058A
9.INSTALL REAR SEAT LOCK CONTROL LEVER SUB-ASSEMBLY LH
72572C
10.INSTALL RECLINING ADJUSTER KNOB CAP LH
73390C
11.INSTALL REAR NO. 1 SEAT INNER BELT ASSEMBLY LH
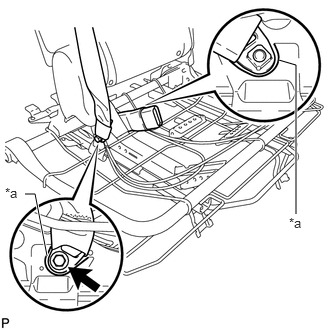
Install the inner belt and connect the 3 point type belt anchor with the bolt.
- Torque:
- 42 N*m (428 kgf*cm, 31 ft.*lbf)
- NOTICE:
-
Do not allow the anchor part of the anchor plate sub-assembly to overlap the protruding parts of the seatback frame.
| *a | Protruding Part |
12.INSTALL CENTER SEATBACK ASSEMBLY
13.INSTALL SEAT CUSHION COVER WITH PAD
72616A
14.INSTALL REAR SEATBACK LOCK STRIKER COVER LH
71826B
15.INSTALL REAR SEAT CUSHION MOULDING LH
71395B
16.INSTALL CENTER SEAT HINGE COVER RH
72526A
17.INSTALL RECLINING ADJUSTER RELEASE HANDLE LH
71846A
18.INSTALL REAR SEAT UPPER RECLINING COVER LH
19.INSTALL REAR NO. 1 SEAT ASSEMBLY LH
Install the rear No. 1 seat assembly LH (See page Vehicle Interior>SEAT>REAR NO. 1 SEAT ASSEMBLY (for 60/40 Split Slide Walk-in Seat Type LH Side)>INSTALLATION).