WINDOW / GLASS BACK DOOR GLASS(w/ Back Door Tire Carrier) REMOVAL
PROCEDURE

 67939B
1.REMOVE BACK DOOR CENTER GARNISH
67938A
2.REMOVE BACK DOOR SIDE GARNISH LH
67937B
3.REMOVE BACK DOOR SIDE GARNISH RH
67761A
4.REMOVE BACK DOOR TRIM COVER
75202B
5.REMOVE UPPER TOOL BOX PANEL SUB-ASSEMBLY
09120A
6.REMOVE TOOL CASE
69783B
7.REMOVE BACK DOOR INSIDE HANDLE BEZEL (for Face to Face Seat Type)
64780A
8.REMOVE BACK DOOR TRIM PANEL ASSEMBLY
69205F
9.REMOVE BACK DOOR INSIDE HANDLE SUB-ASSEMBLY (for Face to Face Seat Type)
64772B
10.REMOVE SPARE WHEEL COVER PAD
64771
11.REMOVE SPARE WHEEL COVER
12.REMOVE SPARE TIRE
64773A
13.REMOVE NO. 2 SPARE WHEEL COVER
76893E
14.REMOVE REAR SPOILER COVER RH
76085
15.REMOVE REAR SPOILER SUB-ASSEMBLY
85241A
16.REMOVE REAR WIPER ARM
85110R
17.REMOVE REAR WIPER MOTOR ASSEMBLY
67381A
18.REMOVE NO. 1 BACK WINDOW WIPER MOTOR BRACKET
75573C
19.REMOVE BACK WINDOW OUTSIDE MOULDING
Using a knife, cut off the 2 outside mouldings as shown in the illustration.
- NOTICE:
- ·
Do not damage the vehicle body with the knife.
·If the vehicle body is damaged, repair the damaged portion by applying an anti-rust coating after removing the back window glass assembly.
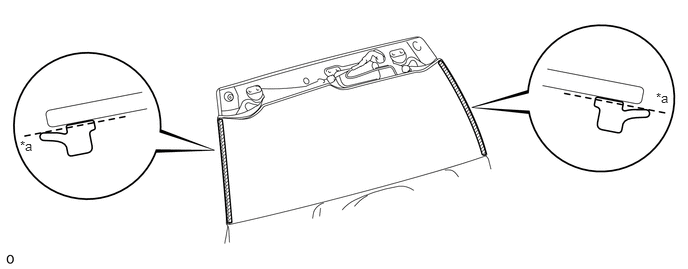
| *1 | Cut | - | - |
Remove the remaining outside moulding from the back door glass.
68131
20.REMOVE BACK DOOR GLASS
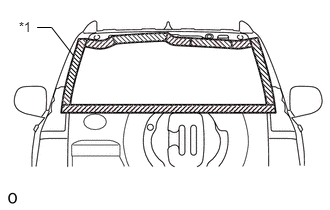
Apply protective tape to the outer surface of the vehicle body to prevent scratches.
- NOTICE:
-
When separating the back window glass from the vehicle, be careful not to damage the vehicle paint or interior/exterior ornaments.
| *1 | Protective Tape |
Disconnect the connectors.
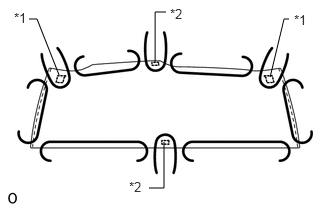
From the interior, insert a piano wire between the vehicle body and glass as shown in the illustration.
| *1 | Clip |
| *2 | Adhesive Dam |
Tie objects that can serve as handles (for example, wooden blocks) to both wire ends.
Cut off the adhesive by pulling the piano wire around the back window glass.
- NOTICE:
- ·
When separating the glass from the vehicle, be careful not to damage the vehicle paint or interior/exterior ornaments.
·Leave as much adhesive on the vehicle body as possible when removing the back window glass.
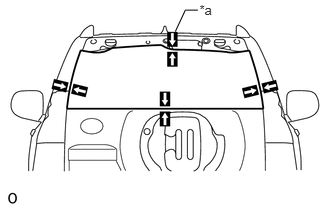
Place matchmarks over the glass and vehicle body at the locations indicated in the illustration.
- HINT:
-
Matchmarks do not need to be placed if the glass is not going to be reused.
| *a | Matchmark |
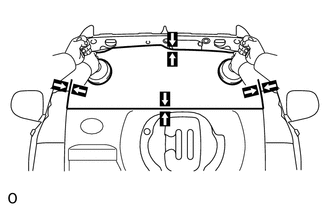
Using suction cups, remove the back door glass.
- NOTICE:
-
Be careful not to drop the back door glass.
64828
21.REMOVE BACK WINDOW GLASS CLIP LH
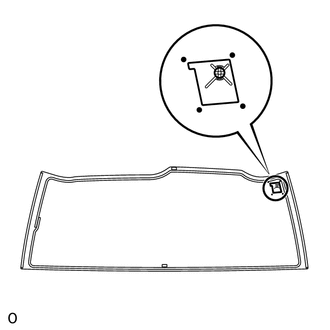
Using a scraper, remove the clip.
- NOTICE:
- ·
Be careful not to damage the back door glass.
·Be sure to replace the clip with new one.
64827A
22.REMOVE BACK WINDOW GLASS CLIP RH
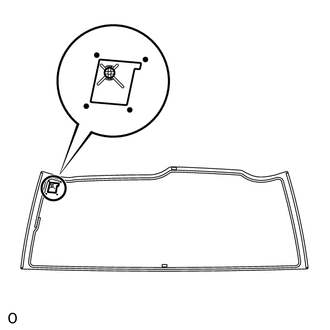
Using a scraper, remove the clip.
- NOTICE:
- ·
Be careful not to damage the back door glass.
·Be sure to replace the clip with new one.
68294B
23.REMOVE BACK DOOR GLASS ADHESIVE DAM
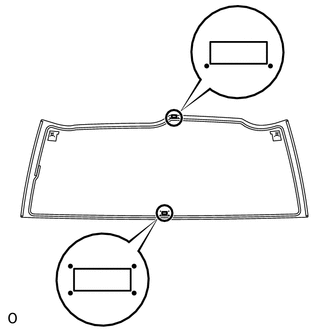
Using a scraper, remove the 2 dams.
- NOTICE:
- ·
Be careful not to damage the back door glass.
·Be sure to replace the 2 dams with new ones.
75573H
24.REMOVE BACK WINDOW UPPER OUTSIDE MOULDING
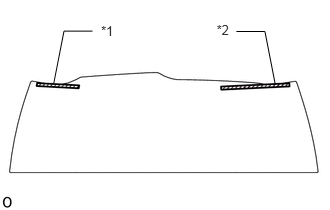
Using a scraper, remove the outside moulding LH and RH.
- NOTICE:
- ·
Be careful not to damage the back door glass.
·Be sure to replace the mouldings with new ones.
| *1 | Back Window Upper Outside Moulding LH |
| *2 | Back Window Upper Outside Moulding RH |