1GD-FTV ENGINE CONTROL ECD SYSTEM(w/ Urea SCR System) P0112 Intake Air Temperature Circuit Low Input P0113 Intake Air Temperature Circuit High Input
DESCRIPTION
The intake air temperature sensor is built into the mass air flow meter sub-assembly and detects the intake air temperature.
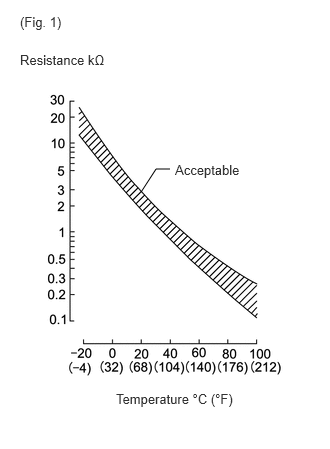
A thermistor built into the sensor changes its resistance value according to the intake air temperature.
The lower the intake air temperature, the higher the thermistor resistance value. The higher the intake air temperature, the lower the thermistor resistance value (See Fig. 1).
The intake air temperature sensor is connected to the ECM.
The 5 V power source voltage from the ECM is applied to the intake air temperature sensor from terminal THA via resistor R.
Resistor R and the intake air temperature sensor are connected in series. When the resistance value of the intake air temperature sensor changes in accordance with the intake air temperature, the voltage at terminal THA also changes. Based on this signal, the ECM increases the fuel injection volume to improve driveability with a cold engine.
| DTC Detection Drive Pattern | DTC Detection Condition | Trouble Area |
|---|---|---|
| Engine switch on (IG) for 1 second or more | Short in the intake air temperature sensor for 0.5 seconds (1 trip detection logic). | ·
Short in intake air temperature sensor circuit ·
Intake air temperature sensor (built into mass air flow meter sub-assembly) ·
ECM |
| DTC Detection Drive Pattern | DTC Detection Condition | Trouble Area |
|---|---|---|
| Engine switch on (IG) for 1 second or more | Open in the intake air temperature sensor for 0.5 seconds (1 trip detection logic). | ·
Open in intake air temperature sensor circuit ·
Intake air temperature sensor (built into mass air flow meter sub-assembly) ·
ECM |
| DTC No. | Data List |
|---|---|
| P0112
P0113 |
Intake Air |
- HINT:
- ·
If DTC P0112 and/or P0113 is stored, the following symptoms may appear:
-Misfire
-Combustion noise
-Black smoke
-White smoke
-Lack of power
·When DTC P0112 or P0113 is stored, check the intake air temperature by entering the following menus: Powertrain / Engine and ECT / Data List / Intake Air.
Reference GTS Displayed Malfunction -40°C (-40°F) Open circuit 140°C (284°F) or higher Short circuit
WIRING DIAGRAM
Refer to DTC P0100 (See page Engine / Hybrid System>1GD-FTV (ENGINE CONTROL)>ECD SYSTEM (w/ Urea SCR System)>P0100).
CAUTION / NOTICE / HINT
- NOTICE:
-
After replacing the ECM, the new ECM needs registration (See page Engine / Hybrid System>1GD-FTV (ENGINE CONTROL)>ECD SYSTEM (w/ Urea SCR System)>REGISTRATION) and initialization (See page Engine / Hybrid System>1GD-FTV (ENGINE CONTROL)>ECD SYSTEM (w/ Urea SCR System)>INITIALIZATION).
- HINT:
-
Read freeze frame data using the GTS. Freeze frame data records the engine condition when malfunctions are detected. When troubleshooting, freeze frame data can help determine if the vehicle was moving or stationary, if the engine was warmed up or not, and other data from the time the malfunction occurred.
PROCEDURE
Connect the GTS to the DLC3.
Turn the engine switch on (IG) and turn the GTS on.
Enter the following menus: Powertrain / Engine and ECT / Data List / Intake Air.
Read the value.
- OK:
Same as actual intake air temperature
| Result | Proceed to |
|---|---|
| -40°C (-40°F) | A |
| 140°C (284°F) or higher | B |
| OK (same as actual intake air temperature) | C |
- HINT:
- ·
If there is an open circuit, the GTS indicates -40°C (-40°F).
·If there is a short circuit, the GTS indicates 140°C (284°F) or higher.
A
B
C
Disconnect the mass air flow meter sub-assembly connector.
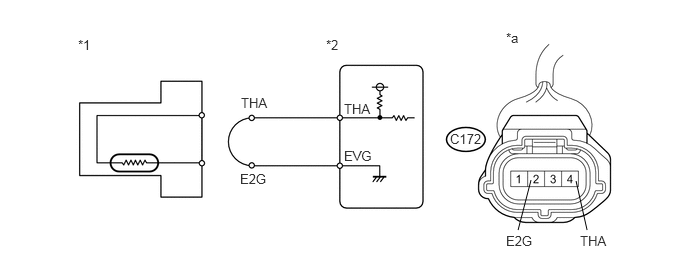
Connect terminals 4 (THA) and 2 (E2G) of the mass air flow meter sub-assembly wire harness side connector.
Connect the GTS to the DLC3.
Turn the engine switch on (IG) and turn the GTS on.
Enter the following menus: Powertrain / Engine and ECT / Data List / Intake Air.
Read the value.
- OK:
140°C (284°F) or higher
| *1 | Mass Air Flow Meter Sub-assembly |
| *2 | ECM |
| *a | Front view of wire harness connector
(to Mass Air Flow Meter Sub-assembly) |
Reconnect the mass air flow meter sub-assembly connector.
OK
NG
Replace the mass air flow meter sub-assembly (See page Engine / Hybrid System>1GD-FTV (ENGINE CONTROL)>MASS AIR FLOW METER>REMOVAL).
NEXT
Disconnect the mass air flow meter sub-assembly connector.
Disconnect the ECM connector.
Measure the resistance according to the value(s) in the table below.
- Standard Resistance:
Tester Connection Condition Specified Condition C172-4 (THA) - C150-32 (THA) Always Below 1 Ω C172-2 (E2G) - C150-24 (EVG) Always Below 1 Ω
Reconnect the mass air flow meter sub-assembly connector.
Reconnect the ECM connector.
OK
NG
Replace the ECM (See page Engine / Hybrid System>1GD-FTV (ENGINE CONTROL)>ECM>REMOVAL).
NEXT
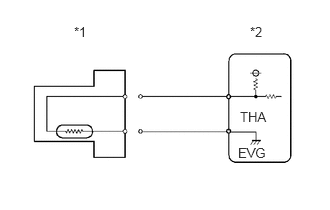
Disconnect the mass air flow meter sub-assembly connector.
Connect the GTS to the DLC3.
Turn the engine switch on (IG) and turn the GTS on.
Enter the following menus: Powertrain / Engine and ECT / Data List / Intake Air.
Read the value.
- OK:
-40°C (-40°F)
| *1 | Mass Air Flow Meter Sub-assembly |
| *2 | ECM |
Reconnect the mass air flow meter sub-assembly connector.
OK
NG
Replace the mass air flow meter sub-assembly (See page Engine / Hybrid System>1GD-FTV (ENGINE CONTROL)>ECM>REMOVAL).
NEXT
Disconnect the mass air flow meter sub-assembly connector.
Disconnect the ECM connector.
Measure the resistance according to the value(s) in the table below.
- Standard Resistance:
Tester Connection Condition Specified Condition C172-4 (THA) or C150-32 (THA) - Body ground and other terminals Always 10 kΩ or higher
Reconnect the mass air flow meter sub-assembly connector.
Reconnect the ECM connector.
OK
NG
Replace the ECM (See page Engine / Hybrid System>1GD-FTV (ENGINE CONTROL)>ECM>REMOVAL).
NEXT
Repair or replace the harness or connector.
NEXT
Connect the GTS to the DLC3.
Clear the DTCs (See page Engine / Hybrid System>1GD-FTV (ENGINE CONTROL)>ECD SYSTEM (w/ Urea SCR System)>DTC CHECK / CLEAR).
Turn the engine switch on (IG) for 1 second or more.
Enter the following menus: Powertrain / Engine and ECT / Trouble Codes.
Confirm that the DTC is not output again.
NEXT