DRIVE SHAFT / PROPELLER SHAFT FRONT DRIVE SHAFT ASSEMBLY REASSEMBLY
PROCEDURE

 41336E
1.INSTALL FRONT DRIVE SHAFT DUST COVER
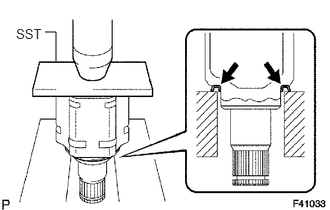
Using SST and a press, install a new dust cover.
- SST
- 09527-10011
43412B
2.INSTALL SHAFT SNAP RING
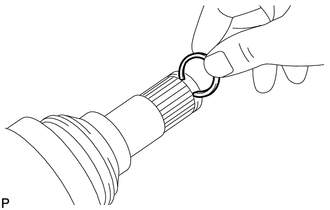
Install a new snap ring.
3.INSTALL OUTBOARD JOINT BOOT
- HINT:
-
 2.537,1.055 2.752,1.225 0.215,0.170 10 *1 2.05,0.848 2.363,1.166 false 2.363,1.166 2.464,1.166 false
-
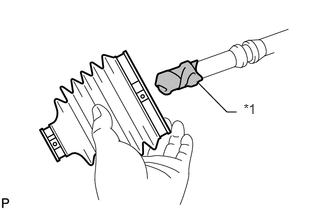
Before installing the boot, wrap vinyl tape around the spline of the shaft to prevent damage to the boot.
| *1 | Vinyl Tape |
Temporarily install a new outboard joint boot with 2 new clamps to the outboard joint shaft.
Pack the outboard joint and boot with grease from the boot kit.
- Standard grease capacity:
168 to 178 g (5.93 to 6.27 oz.)
43447F
4.INSTALL FRONT NO. 2 AXLE OUTBOARD JOINT BOOT CLAMP
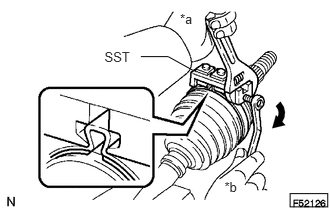
Hold the drive shaft lightly in a vise between aluminum plates.
- NOTICE:
-
Do not overtighten the vise.
Place SST onto the front No. 2 axle outboard joint boot clamp.
- SST
- 09521-24010
| *a | Hold |
| *b | Turn |
Tighten SST so that the No. 2 front axle outboard joint boot clamp is pinched.
- NOTICE:
-
Do not overtighten SST.
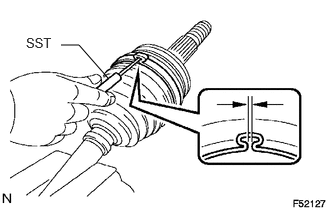
Using SST, measure the clearance of the No. 2 front axle out board joint boot clamp.
- SST
- 09240-00020
- Standard clearance:
2.1 mm (0.0827 in.) or less
- NOTICE:
-
If the measured value is more than the specified value, retighten the clamp.
43447E
5.INSTALL FRONT NO. 1 AXLE OUTBOARD JOINT BOOT CLAMP
Hold the drive shaft lightly in a vise between aluminum plates.
- NOTICE:
-
Do not overtighten the vise.
Secure the outboard joint boot clamp to the boot.
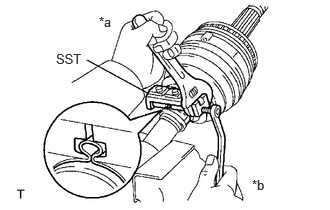
Place SST onto the outboard joint boot clamp.
- SST
- 09521-24010
| *a | Hold |
| *b | Turn |
Tighten SST so that the front axle outboard joint boot clamp is pinched.
- NOTICE:
-
Do not overtighten SST.
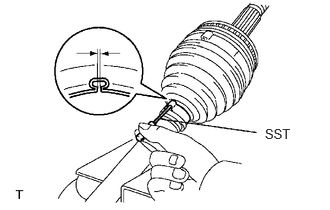
Using SST, measure the clearance of the front axle outboard joint boot clamp.
- SST
- 09240-00020
- Standard clearance:
1.3 mm (0.0512 in.) or less
- NOTICE:
-
If the measured value is more than the specified value, retighten the clamp.
6.INSTALL INBOARD JOINT BOOT
Temporarily install a new inboard joint boot to the outboard joint shaft.
43403B
7.INSTALL FRONT AXLE INBOARD JOINT ASSEMBLY
Install new parts to the outboard joint shaft in the following order.
| 1. | Front axle inboard joint boot clamp |
| 2. | Front axle inboard joint boot |
| 3. | Front No. 2 axle inboard joint boot clamp |
Secure the outboard joint shaft in a vise between aluminum plates.
- NOTICE:
-
Do not overtighten the vise.
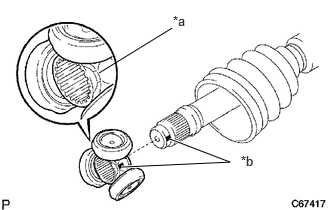
Align the matchmarks and install the tripod joint to the outboard joint shaft.
- NOTICE:
-
Position tripod so that the beveled side of the tripod faces toward the inboard joint.
| *a | Beveled |
| *b | Matchmark |
Align the matchmarks and install the tripod to the inboard joint.
Using a brass bar and hammer, tap the tripod onto the drive shaft.
- NOTICE:
- ·
Do not hit the roller portion.
·Keep the tripod joint free of foreign matter.
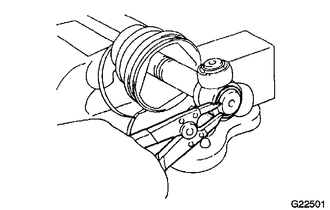
Using a snap ring expander, install a new snap ring.
Pack the inboard joint assembly and boot with grease from the boot kit.
- Standard grease capacity:
239 to 249 g (8.43 to 8.78 oz.)
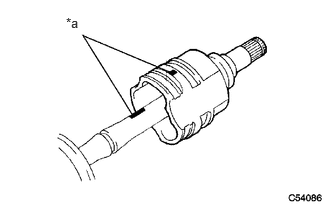
Align the matchmarks and install the inboard joint onto the outboard joint shaft.
| *a | Matchmark |
43448F
8.INSTALL FRONT NO. 1 AXLE INBOARD JOINT BOOT CLAMP
Hold the drive shaft lightly in a vise between aluminum plates.
- NOTICE:
-
Do not overtighten the vise.
Secure the inboard joint boot clamp to the boot.
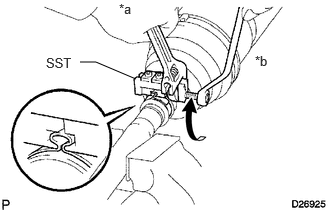
Place SST onto the inboard joint boot clamp.
- SST
- 09521-24010
| *a | Hold |
| *b | Turn |
Tighten SST so that the front axle inboard joint boot clamp is pinched.
- NOTICE:
-
Do not overtighten SST.
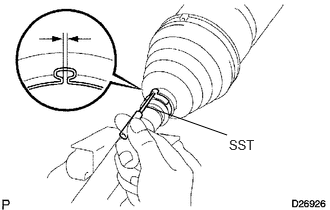
Using SST, measure the clearance of the front axle inboard joint boot clamp.
- SST
- 09240-00020
- Standard clearance:
1.3 mm (0.0512 in.) or less
- NOTICE:
-
If the measured value is greater than the specified value, retighten the clamp.
43448G
9.INSTALL FRONT NO. 2 AXLE INBOARD JOINT BOOT CLAMP
Hold the inboard joint shaft assembly in a vise between aluminum plates.
- NOTICE:
-
Do not overtighten the vise.
Temporarily install the front No. 2 axle inboard joint boot clamp in the groove of the front axle inboard joint boot.
- HINT:
- ·
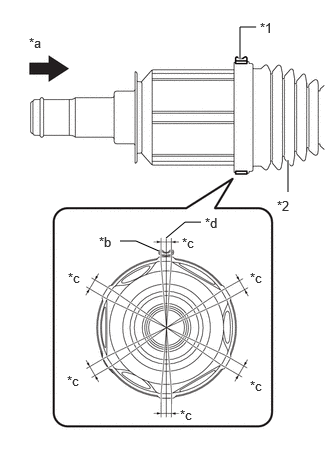 2.667,0.281 2.5,0.281 2.5,0.281 2.5,0.615 true 3,1.667 3,2 true 1.25,2.51 1.417,2.51 1.417,2.51 1.656,2.615 true 2.094,2.313 1.927,2.313 1.927,2.313 1.729,2.479 true 2.708,0.208 3.021,0.365 0.313,0.156 10 false *1 2.885,2.063 3.198,2.219 0.313,0.156 10 false *2 1.031,2.438 1.344,2.594 0.313,0.156 10 false *b 1.896,2.448 2.208,2.604 0.313,0.156 10 false *c 2.604,3.938 2.917,4.094 0.313,0.156 10 false *c 0.698,3.885 1.01,4.042 0.313,0.156 10 false *c 0.302,0.365 0.615,0.521 0.313,0.156 10 false *a 2.604,2.813 2.917,2.969 0.313,0.156 10 false *c 1.875,4.24 2.188,4.396 0.313,0.156 10 false *c 0.708,2.813 1.021,2.969 0.313,0.156 10 false *c 2.135,2.24 2.448,2.396 0.313,0.156 10 false *d
When temporarily installing the front No. 2 axle inboard joint boot clamp in the groove of the front axle inboard joint boot, check that the protrusion (staking portion) of the front No. 2 axle inboard joint boot clamp is within one of the 6 ranges shown in the illustration.
·Check that the center of the mountain part (center of the caulking part) of the inboard joint boot clamp LH No. 2 is within 3.5 mm (0.138 in.) to the left and right from the center of the boot rib.
Text in Illustration *1 Front No. 2 Axle Inboard Joint Boot Clamp *2 Front Axle Inboard Joint Boot *a Viewpoint *b Protrusion Center (Staking Portion Center) *c Installation Range *d Boot Rib Center
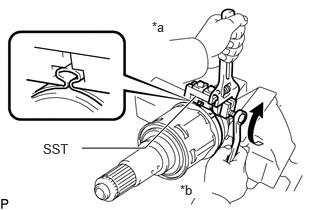
Place SST onto the No. 2 front axle inboard joint boot clamp.
- SST
- 09521-24010
| *a | Hold |
| *b | Turn |
Tighten SST so that the No. 2 front axle inboard joint boot clamp is pinched.
- NOTICE:
-
Do not overtighten SST.
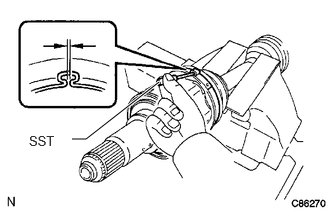
Using SST, measure the clearance of the No. 2 front axle inboard joint boot clamp.
- SST
- 09240-00020
- Standard clearance:
2.1 mm (0.0827 in.) or less
- NOTICE:
-
If the measured value is greater than the specified value, retighten the clamp.