EXTERIOR PANELS / TRIM ROOF RACK REASSEMBLY
CAUTION / NOTICE / HINT
- HINT:
- ·
Use the same procedure for the RH and LH sides.
·The procedure listed below is for the LH side.
·A bolt without a torque specification is shown in the standard bolt chart (See page General>SPECIFICATIONS>STANDARD BOLT>SPECIFIED TORQUE FOR STANDARD BOLTS).
PROCEDURE

 63489
1.INSTALL REAR ROOF RACK LEG CUSHION LH (for Type A)
Attach the 4 claws to install the rear roof rack cushion LH.
63487A
2.INSTALL FRONT ROOF RACK LEG CUSHION LH (for Type A)
Attach the 4 claws to install the front roof rack cushion LH.
63485A
3.INSTALL CENTER ROOF RACK LEG CUSHION LH (for Type A)
Attach the 2 claws to install the center roof rack cushion LH.
63489
4.INSTALL REAR ROOF RACK LEG CUSHION LH (for Type B)
- HINT:
-
When installing the rear roof rack leg cushion LH, heat the roof rack LH surface using a heat light.
- Standard:
Item Temperature Roof Rack LH 20 to 30°C (68 to 86°F)
- NOTICE:
-
Do not heat the roof rack LH excessively.
Clean the roof rack LH surface.
Using a heat light, heat the roof rack LH surface.
Remove the double-sided tape from the roof rack LH surface.
Wipe off any tape adhesive residue with cleaner.
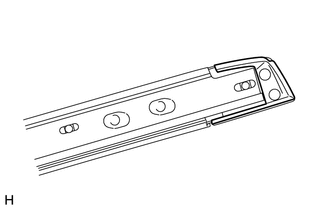
Install a new rear roof rack leg cushion LH.
Remove the peeling paper from the face of a new rear roof rack leg cushion LH.
- HINT:
-
After removing the peeling paper, keep the exposed adhesive free from foreign matter.
Install the rear roof rack leg cushion LH as shown in the illustration.
- HINT:
-
Press the rear roof rack leg cushion LH firmly to install it.
63487A
5.INSTALL FRONT ROOF RACK LEG CUSHION LH (for Type B)
- HINT:
-
When installing the front roof rack leg cushion LH, heat the roof rack LH surface using a heat light.
- Standard:
Item Temperature Roof Rack LH 20 to 30°C (68 to 86°F)
- NOTICE:
-
Do not heat the roof rack LH excessively.
Clean the roof rack LH surface.
Using a heat light, heat the roof rack LH surface.
Remove the double-sided tape from the roof rack LH surface.
Wipe off any tape adhesive residue with cleaner.
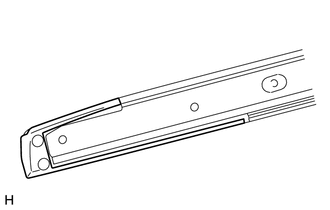
Install a new front roof rack leg cushion LH.
Remove the peeling paper from the face of a new front roof rack leg cushion LH.
- HINT:
-
After removing the peeling paper, keep the exposed adhesive free from foreign matter.
Install the front roof rack leg cushion LH as shown in the illustration.
- HINT:
-
Press the front roof rack leg cushion LH firmly to install it.
63445
6.INSTALL NO. 2 ROOF CARRIER PROTECTOR (for Type B)
- HINT:
-
When installing the No. 2 roof carrier protector, heat the roof rack LH surface using a heat light.
- Standard:
Item Temperature Roof Rack LH 20 to 30°C (68 to 86°F)
- NOTICE:
-
Do not heat the roof rack LH excessively.
Clean the roof rack LH surface.
Using a heat light, heat the roof rack LH surface.
Remove the double-sided tape from the roof rack LH surface.
Wipe off any tape adhesive residue with cleaner.
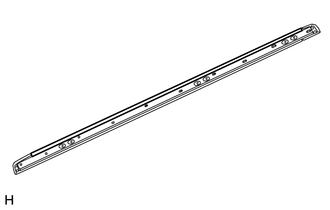
Install a new No. 2 roof carrier protector.
Remove the peeling paper from the face of a new No. 2 roof carrier protector.
- HINT:
-
After removing the peeling paper, keep the exposed adhesive free from foreign matter.
Install the No. 2 roof carrier protector as shown in the illustration.
- HINT:
-
Press the No. 2 roof carrier protector firmly to install it.