5L-E FUEL FUEL SUB TANK REMOVAL
CAUTION / NOTICE / HINT
The necessary procedures (adjustment, calibration, initialization, or registration) that must be performed after parts are removed, installed, or replaced during the fuel sub tank sub-assembly removal/installation are shown below.
| Replaced Part or Performed Procedure | Necessary Procedure | Effect/Inoperative Function when Necessary Procedure not Performed | Link |
|---|---|---|---|
| Battery terminal is disconnected/reconnected | Correction of steering angle neutral point | Multi-terrain monitor system | ( ) |
- HINT:
-
When the cable is disconnected/reconnected to the battery terminal, systems temporarily stop operating. However, each system has a function that completes learning the first time the system is used.
- ·
Learning completes when vehicle is driven
Effect/Inoperative Function When Necessary Procedures are not Performed Necessary Procedures Link Lane departure alert system Drive the vehicle straight ahead at 40 km/h (25 mph) or more for 10 seconds or more. ( )
Pre-collision system Lighting system (EXT) (for LED Headlight) Stop and start system Drive the vehicle until stop and start control is permitted (approximately 5 to 60 minutes) ( )
Vehicle stability control system (for Hydraulic brake booster) Drive the vehicle straight ahead at 40 km/h (25 mph) or more for at least 10 seconds. ( )
PROCEDURE

 1. PRECAUTION
- NOTICE:
-
After turning the ignition switch off, waiting time may be required before disconnecting the cable from the battery terminal.
-
Click hereGeneral>INTRODUCTION>REPAIR INSTRUCTION>PRECAUTION
2.DISCONNECT CABLE FROM NEGATIVE BATTERY TERMINAL
77606C
3.REMOVE NO. 2 FUEL TANK PROTECTOR
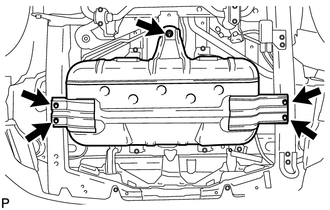
Remove the 5 bolts and No. 2 fuel tank protector.
4.DISCONNECT FUEL HOSE
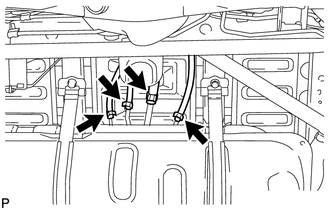
Disconnect the fuel evaporation hose, fuel breather hose and 2 fuel hoses.
77213B
5.DISCONNECT FUEL TANK TO FILLER PIPE HOSE
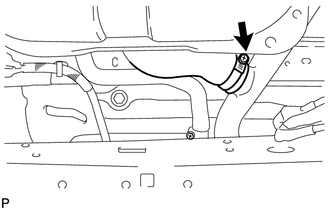
Disconnect the fuel tank to filler pipe hose from the filler pipe.
77269A
6.DISCONNECT FUEL TANK BREATHER HOSE
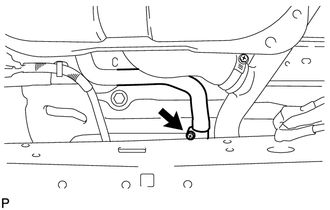
Disconnect the fuel tank breather hose from the filler pipe.
77100Z
7.REMOVE FUEL SUB TANK SUB-ASSEMBLY
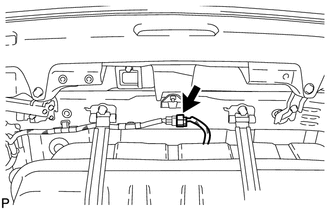
Disconnect the fuel sender gauge connector.
Set a transmission jack underneath the fuel sub tank.
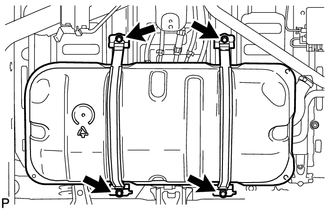
Remove the 4 bolts and disconnect the 2 fuel tank bands.
Remove the fuel sub tank.
77010
8.REMOVE FUEL TANK VENT TUBE ASSEMBLY
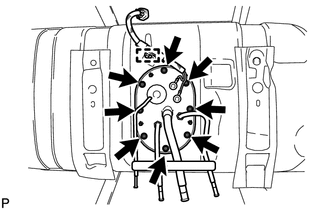
Detach the wire harness clamp.
Remove the 8 screws and fuel tank vent tube.
- NOTICE:
-
Be careful not to bend the arm of the fuel sender gauge.
Remove the gasket from the fuel tank vent tube.
77213B
9.REMOVE FUEL TANK TO FILLER PIPE HOSE
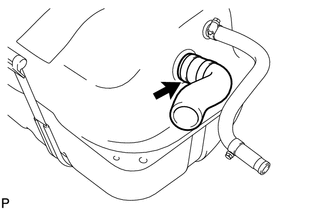
Remove the fuel tank to filler pipe hose from the fuel sub tank.
77269A
10.REMOVE FUEL TANK BREATHER HOSE
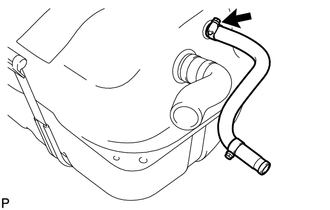
Remove the fuel tank breather hose from the fuel sub tank.