P0037 Oxygen Sensor Heater Control Circuit Low (Bank 1 Sensor 2)
Diagnostic trouble codes · Vehicles built from Jan 2012
Also covers:
- P0038 Oxygen Sensor Heater Control Circuit High (Bank 1 Sensor 2)
- P0057 Oxygen Sensor Heater Control Circuit Low (Bank 2 Sensor 2)
- P0058 Oxygen Sensor Heater Control Circuit High (Bank 2 Sensor 2)
- P102D O2 Sensor Heater Circuit Performance Bank 1 Sensor 2 Stuck ON
- P105D O2 Sensor Heater Circuit Performance Bank 2 Sensor 2 Stuck ON
Versions by build date: Sep 2011 – Dec 2011 from Jan 2012
DESCRIPTION
- Refer to DTC P0137 (Click here).
- HINT:
- When any of these DTCs is stored, the ECM enters fail-safe mode. The ECM turns off the Heated Oxygen (HO2) Sensor heater in fail-safe mode. Fail-safe mode continues until the engine switch is turned off.
- The ECM provides a pulse width modulated control circuit to adjust the current through the heater. The HO2 sensor heater circuit uses a relay on the +B side of the circuit.
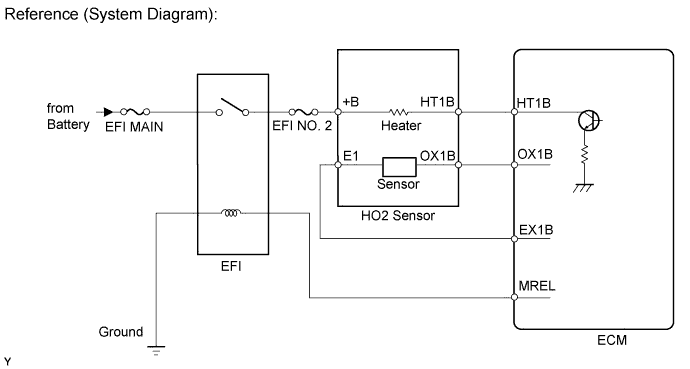

- When any of these DTCs is stored, the ECM enters fail-safe mode. The ECM turns off the Heated Oxygen (HO2) Sensor heater in fail-safe mode. Fail-safe mode continues until the engine switch is turned off.
| DTC Code |
DTC Detection Condition |
Trouble Area |
| P0037 P0057 |
The Heated Oxygen (HO2) sensor heater current is below 0.3 A (1 trip detection logic) |
|
| P0038 P0058 |
The Heated Oxygen (HO2) sensor heater current is higher than 2 A (1 trip detection logic) |
|
| P102D P105D |
The heater current is higher than the specified value while the heater is not operating. (1 trip detection logic) |
ECM |
MONITOR DESCRIPTION
The sensing portion of the Heated Oxygen (HO2) sensor has a zirconia element which is used to detect the oxygen concentration in the exhaust gas. If the zirconia element is at the appropriate temperature, and the difference between the oxygen concentrations surrounding the inside and outside surfaces of the sensor is large, the zirconia element generates voltage signals. In order to increase the oxygen concentration detecting capacity of the zirconia element, the ECM supplements the heat from the exhaust with heat from a heating element inside the sensor.- Heated oxygen sensor heater range check (P0037, P0038, P0057, P0058, P102D and P105D):
The ECM monitors the current applied to the heated oxygen sensor heater to check the heater for malfunctions.
If the heater current is outside the normal range, the signal transmitted by the heated oxygen sensor becomes inaccurate. When the current in the heated oxygen sensor heater is outside the normal operating range, the ECM interprets this as a malfunction in the sensor heater and stores a DTC.
WIRING DIAGRAM
Refer to DTC P0137 (Click here).CONFIRMATION DRIVING PATTERN
These DTCs are stored when the engine idles for 110 seconds or more.INSPECTION PROCEDURE
- HINT:
- Sensor 2 refers to the sensor mounted behind the Three-Way Catalytic Converter (TWC) and located far from the engine assembly.
- Read freeze frame data using the GTS. Freeze frame data records the engine condition when malfunctions are detected. When troubleshooting, freeze frame data can help determine if the vehicle was moving or stationary, if the engine was warmed up or not, if the air-fuel ratio was lean or rich, and other data from the time the malfunction occurred.
- Bank 1 refers to the bank that includes the No. 1 cylinder*.
*: The No. 1 cylinder is the cylinder which is farthest from the transmission.
- Bank 2 refers to the bank that does not include the No. 1 cylinder.
- Sensor 1 refers to the sensor closest to the engine assembly.
- Sensor 2 refers to the sensor farthest away from the engine assembly.
- Sensor 2 refers to the sensor mounted behind the Three-Way Catalytic Converter (TWC) and located far from the engine assembly.
| 1. INSPECT HEATED OXYGEN SENSOR (HEATER RESISTANCE) |

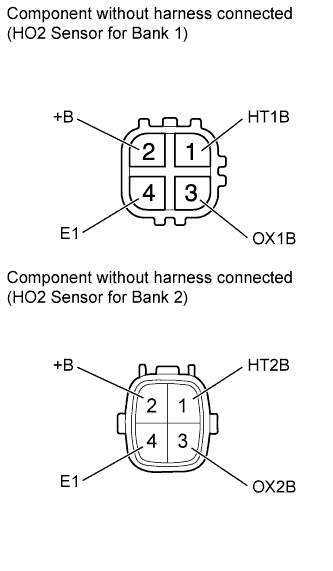 |
Disconnect the C20 or C56 heated oxygen (HO2) sensor connector.
Measure the resistance according to the value(s) in the table below.
- Standard Resistance:
Tester Connection
Condition
Specified Condition
1 (HT1B) - 2 (+B)
20°C (68°F)
11 to 16 Ω
1 (HT1B) - 4 (E1)
Always
10 kΩ or higher
1 (HT2B) - 2 (+B)
20°C (68°F)
11 to 16 Ω
1 (HT2B) - 4 (E1)
Always
10 kΩ or higher
|
|
||||

| OK | |
 |
| 2. CHECK TERMINAL VOLTAGE (+B OF HO2 SENSOR) |
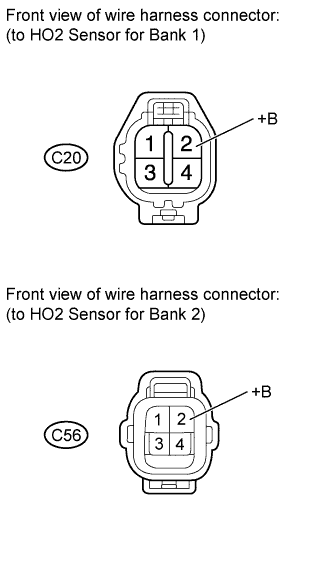 |
Disconnect the C20 or C56 HO2 sensor connector.
Measure the voltage according to the value(s) in the table below.
- Standard Voltage:
Tester Connection
Switch Condition
Specified Condition
C20-2 (+B) - Body ground
Engine switch on (IG)
11 to 14 V
C56-2 (+B) - Body ground
Engine switch on (IG)
11 to 14 V
Result Result
Proceed to
NG
A
OK
B
|
|
||||

| A | |
|
| 3. INSPECT INTEGRATION RELAY (EFI) |
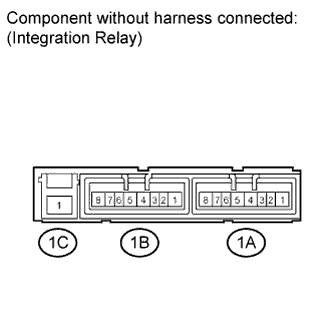 |
Remove the integration relay from the engine room relay block.
Inspect the EFI MAIN fuse.
Remove the EFI MAIN fuse from the integration relay.
Measure the resistance according to the value(s) in the table below.
- Standard Resistance:
Tester Connection
Condition
Specified Condition
EFI MAIN fuse
Always
Below 1 Ω
Reinstall the EFI MAIN fuse.
Inspect the EFI relay.
Measure the resistance according to the value(s) in the table below.
- Standard Resistance:
Tester Connection
Condition
Specified Condition
1C-1 - 1B-4
No battery voltage applied to terminals 1B-2 and 1B-3
10 kΩ or higher
Battery voltage applied to terminals 1B-2 and 1B-3
Below 1 Ω
|
|
||||
| OK | |
|
| 4. CHECK HARNESS AND CONNECTOR (HO2 SENSOR - INTEGRATION RELAY) |
Check the EFI NO. 2 fuse.
Remove the EFI NO. 2 fuse from the engine room relay block.
Measure the resistance according to the value(s) in the table below.
- Standard Resistance:
Tester Connection
Condition
Specified Condition
EFI NO. 2 fuse
Always
Below 1 Ω
Reinstall the EFI NO. 2 fuse.
Disconnect the C20 or C56 HO2 sensor connector.
Remove the integration relay from the engine room relay block.
Measure the resistance according to the value(s) in the table below.
- Standard Resistance:
Tester Connection
Condition
Specified Condition
C20-2 (+B) - 1B-4
Always
Below 1 Ω
C56-2 (+B) - 1B-4
Always
Below 1 Ω
C20-2 (+B) or 1B-4 - Body ground
Always
10 kΩ or higher
C56-2 (+B) or 1B-4 - Body ground
Always
10 kΩ or higher
|
|
||||
| OK | ||
 |
||
| ||
| 5. CHECK HARNESS AND CONNECTOR (HO2 SENSOR - ECM) |
Disconnect the C20 or C56 HO2 sensor connector.
Disconnect the C45 ECM connector.
Measure the resistance according to the value(s) in the table below.
- Standard Resistance:
Tester Connection
Condition
Specified Condition
C20-1 (HT1B) - C45-45 (HT1B)
Always
Below 1 Ω
C56-1 (HT2B) - C45-44 (HT2B)
Always
Below 1 Ω
C20-1 (HT1B) or C45-45 (HT1B) - Body ground
Always
10 kΩ or higher
C56-1 (HT2B) or C45-44 (HT2B) - Body ground
Always
10 kΩ or higher
|
|
||||
| OK | |
|
| 6. CHECK WHETHER DTC OUTPUT RECURS |
Connect the GTS to the DLC3.
Turn the engine switch on (IG).
Turn the tester on.
Clear DTCs (Click here).
Start the engine.
Allow the engine to idle for 2 minutes or more.
Enter the following menus: Powertrain / Engine and ECT / DTC.
Read DTCs.
Result Result
Proceed to
No DTC is output
A
P0037, P0038, P0057, P0058, P102D and/or P105D are output
B
|
|
||||
| A | ||
|
||
| ||