INSTALLATION
Removal / installation · Vehicles built Sep 2011 – Dec 2011
Versions by build date: Sep 2011 – Dec 2011 from Jan 2012
| 1. INSTALL FUEL PRESSURE REGULATOR ASSEMBLY |

Apply a light coat of spindle oil or gasoline to a new O-ring and install it onto the fuel pressure regulator.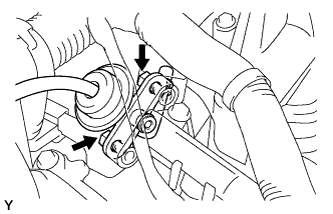

Install the fuel pressure regulator with the 2 bolts.
- Torque:
- 9.0 N*m{ 92 kgf*cm , 80 in.*lbf }
Connect the vacuum hose.
| 2. CONNECT NO. 2 FUEL PIPE SUB-ASSEMBLY |
Push the tube connector into the pipe until the tube connector makes a "click" sound.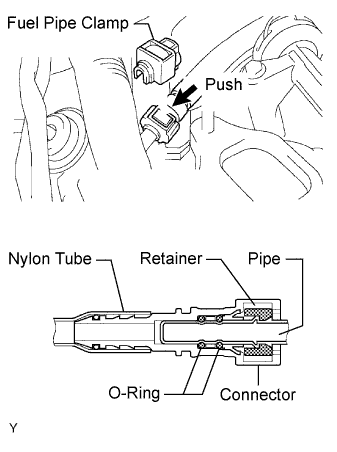
- NOTICE:
- Check if there is any damage or foreign objects on the connected part of the fuel pipe.
- After connecting, check that the pipe and connector are securely connected by pulling them.
- Check if there is any damage or foreign objects on the connected part of the fuel pipe.
Install the fuel pipe clamp.
| 3. INSTALL INTAKE AIR SURGE TANK |
- NOTICE:
- Do not apply oil to the bolts and nuts listed below: :
Oil Application Prohibited Bolt/Nut
Bolt for surge tank and intake manifold
Nut for surge tank and intake manifold
Install a new gasket to the intake air surge tank.
Using an 8 mm hexagon wrench, install the intake air surge tank with the 4 bolts and 2 nuts in the order shown in the illustration.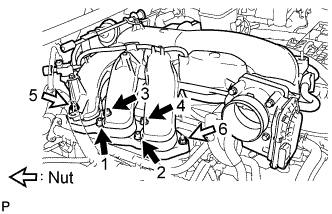
- Torque:
- 28 N*m{ 286 kgf*cm , 21 ft.*lbf }
Install the No. 2 surge tank stay with the 2 bolts.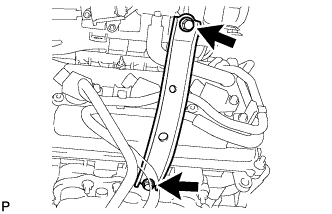
- Torque:
- 21 N*m{ 214 kgf*cm , 15 ft.*lbf }
for Manual Transmission: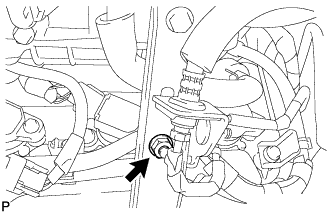
Install the bracket to the No. 2 surge tank stay with the nut.
- Torque:
- 20 N*m{ 204 kgf*cm , 15 ft.*lbf }
Install the No. 1 surge tank stay with the 2 bolts.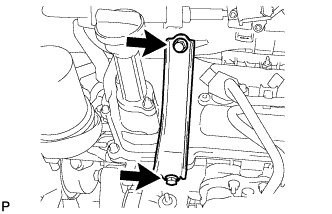
- Torque:
- 21 N*m{ 214 kgf*cm , 15 ft.*lbf }
Install the oil baffle plate with the bolt.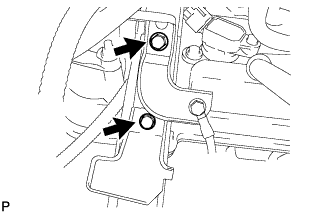
- Torque:
- 9.0 N*m{ 92 kgf*cm , 80 in.*lbf }
Install the bracket to the No. 1 surge tank stay with the bolt.
- Torque:
- 8.0 N*m{ 82 kgf*cm , 71 in.*lbf }
Attach the wire harness clamp.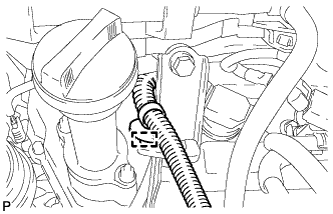
Install the throttle body bracket with the 2 bolts.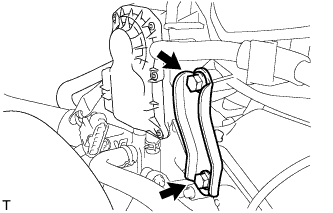
- Torque:
- 21 N*m{ 214 kgf*cm , 15 ft.*lbf }
Connect the vacuum switching valve (for ACIS) connector.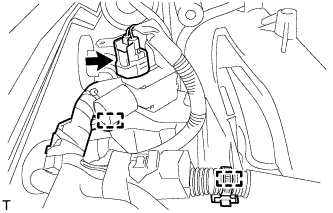
Attach the 2 wire harness clamps.
Connect the No. 1 ventilation hose.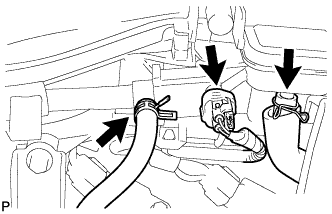
Connect the purge VSV connector.
Connect the purge line hose.
- HINT:
- Connect the hose so that the direction of the hose clamp is as indicated in the illustration.
Connect the No. 4 and No. 5 water by-pass hose.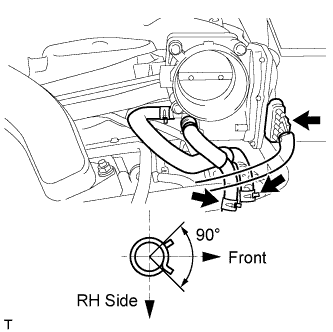
- HINT:
- Connect the hoses so that the direction of the hose clamps is as shown in the illustration.
Connect the throttle body connector.
| 4. INSTALL AIR CLEANER ASSEMBLY |
Install the air cleaner assembly with the 2 bolts.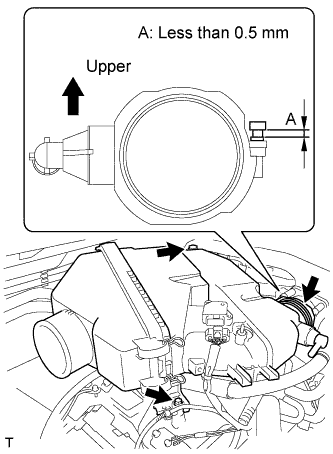
- Torque:
- 8.0 N*m{ 82 kgf*cm , 71 in.*lbf }
Tighten the hose clamp.
- HINT:
- Tighten the hose clamp until it reaches the specified protrusion height labeled A shown in the illustration.
- Standard protrusion height:
- Less than 0.5 mm (0.0197 in.)
Connect the MAF meter connector.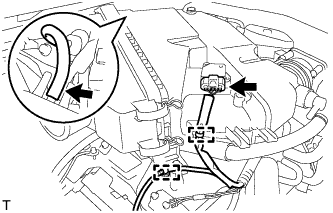
Attach the 2 wire harness clamps.
Connect the vacuum hose.
Attach the hose clamp.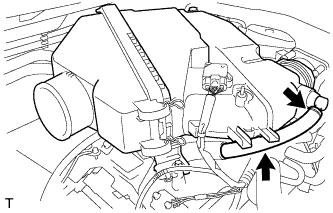
Connect the No. 2 ventilation hose.
| 5. INSTALL NO. 2 AIR CLEANER HOSE |
Align the protrusion of the pre-cleaner with the groove of the No. 2 air cleaner hose as shown in the illustration.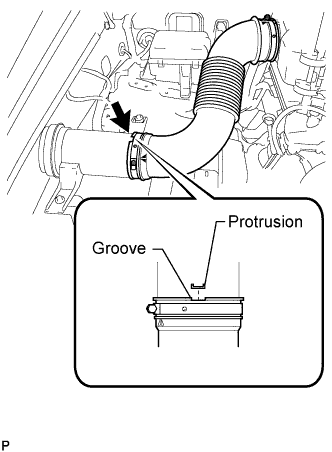
Tighten the 2 hose clamps.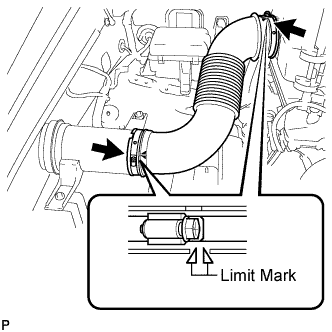
- Torque:
- 4.0 N*m{ 41 kgf*cm , 35 in.*lbf }
- HINT:
- Tighten the clamp until the end of the clamp band is within both limit marks.
| 6. CONNECT CABLE TO NEGATIVE BATTERY TERMINAL |
- NOTICE:
- When disconnecting the cable, some systems need to be initialized after the cable is reconnected (Click here).
| 7. ADD ENGINE COOLANT |
Add engine coolant.
- Standard Capacity:
Item
Specified condition
for Automatic transmission
w/o Rear Heater
11.2 liters (11.8 US qts, 9.9 Imp. qts)
w/ Rear Heater
14.4 liters (15.2 US qts, 12.7 Imp. qts)
for Manual transmission
w/o Rear Heater
12.0 liters (12.7 US qts, 10.6 Imp. qts)
w/ Rear Heater
14.6 liters (15.4 US qts, 12.8 Imp. qts)
- NOTICE:
- Do not substitute plain water for engine coolant.
- HINT:
- TOYOTA vehicles are filled with TOYOTA SLLC at the factory. In order to avoid damage to the engine cooling system and other technical problems, only use TOYOTA SLLC or similar high quality ethylene glycol based non-silicate, non-amine, non-nitrite, non-borate coolant with long-life hybrid organic acid technology (coolant with long-life hybrid organic acid technology consists of a combination of low phosphates and organic acids).
Slowly pour coolant into the radiator reservoir until it reaches the F line.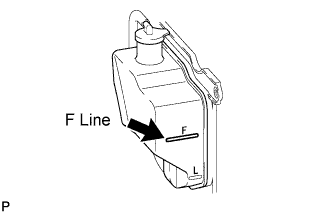
Install the reservoir cap.
Press the No. 1 and No. 2 radiator hoses several times by hand, and then check the coolant level. If the coolant level is low, add coolant.
Install the radiator cap.
Set the air conditioning as follows while warming up the engine.
Item
Condition
Fan speed
Any setting except off
Temperature
Toward WARM
Air conditioning switch
Off
Start the engine and warm it up until the thermostat opens.
- HINT:
- The thermostat opening timing can be confirmed by pressing the No. 2 radiator hose by hand, and checking when the engine coolant starts to flow inside the hose.
Maintain the engine speed at 2000 to 2500 rpm.
- NOTICE:
- Make sure that the radiator reservoir still has some coolant in it.
- Pay attention to the needle of the water temperature meter. Make sure that the needle does not show an abnormally high temperature.
- If there is not enough coolant, the engine may burn out or overheat.
- Immediately after starting the engine, if the radiator reservoir does not have any coolant, perform the following: 1) stop the engine, 2) wait until the coolant has cooled down, and 3) add coolant until the coolant is filled to the F line.
- Run the engine at 2000 rpm until the coolant level has stabilized.
- Make sure that the radiator reservoir still has some coolant in it.
Press the No. 1 and No. 2 radiator hoses several times by hand to bleed air.
- CAUTION:
- Wear protective gloves. Heat areas on the parts may injure your hands.
- Be careful as the radiator hoses are hot.
- Keep your hands away from the fan.
- Wear protective gloves. Heat areas on the parts may injure your hands.
Stop the engine, and wait until the engine coolant cools down to ambient temperature.
- CAUTION:
- Do not remove the radiator cap while the engine and radiator are still hot. Pressurized, hot engine coolant and steam may be released and cause serious burns.
Check that the coolant level is between the F and L lines.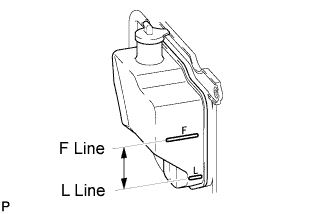
If the coolant level is below the L line, repeat all of the procedures above.
If the coolant level is above the F line, drain coolant so that the coolant level is between the F and L lines.
| 8. INSPECT FOR COOLANT LEAK |
- CAUTION:
- Do not remove the radiator cap while the engine and radiator are still hot. Pressurized, hot engine coolant and steam may be released and cause serious burns.
Fill the radiator with coolant and attach a radiator cap tester.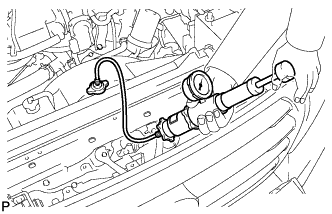
Warm up the engine.
Using the radiator cap tester, increase the pressure inside the radiator to 123 kPa (1.3 kgf/cm2, 18 psi), and check that the pressure does not drop.
If the pressure drops, check the hoses, radiator and water pump for leaks. If no external leaks are found, check the heater core, cylinder block and head.
| 9. INSPECT FOR FUEL LEAK |
Connect the intelligent tester to the DLC3.
Turn the ignition switch to ON and intelligent tester on.
- NOTICE:
- Do not start the engine.
Enter the following menus: Powertrain / Engine and ECT / Active Test / Activate the Fuel Pump Speed Control.
Check that there are no fuel leaks after doing maintenance anywhere on the fuel system.
| 10. INSTALL V-BANK COVER |
Install the V-bank cover with the 2 nuts.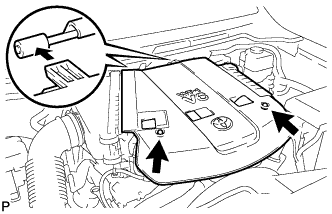
- Torque:
- 7.5 N*m{ 76 kgf*cm , 66 in.*lbf }
| 11. INSTALL UPPER RADIATOR SUPPORT SEAL |
Install the radiator support seal with the 7 clips.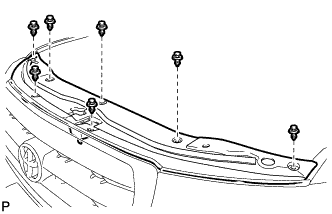
| 12. INSTALL NO. 1 ENGINE UNDER COVER SUB-ASSEMBLY |
Install the under cover with the 10 bolts.
| 13. INSTALL FRONT FENDER SPLASH SHIELD SUB-ASSEMBLY LH |
 |
Push in the clip indicated by the arrow in the illustration to install the fender splash shield.
Install the 3 bolts and screw.
| 14. INSTALL FRONT FENDER SPLASH SHIELD SUB-ASSEMBLY RH |
- HINT:
- Use the same procedures described for the LH side.
| 15. INSTALL COWL TOP VENTILATOR LOUVER SUB-ASSEMBLY |
Install the cowl top ventilator louver (Click here).