B1422 Compressor Lock Sensor Circuit
Diagnostic trouble codes · Vehicles built from Jan 2012
Versions by build date: Sep 2011 – Dec 2011 from Jan 2012
SYSTEM DESCRIPTION
The ECM sends the engine speed signal to the air conditioning amplifier assembly via CAN communication.The air conditioning amplifier assembly sends an air conditioning operation request signal to the ECM via direct line, and the ECM sends a magnet clutch operation permission signal to the air conditioning amplifier assembly via direct line.
The air conditioning amplifier assembly reads the difference between compressor speed and engine speed. When the difference becomes too large, the air conditioning amplifier assembly determines that the cooler compressor assembly is locked and turns the magnet clutch assembly off.
| DTC Code |
DTC Detection Condition |
Trouble Area |
| B1422 |
An open or short in the compressor lock sensor circuit. |
|
WIRING DIAGRAM
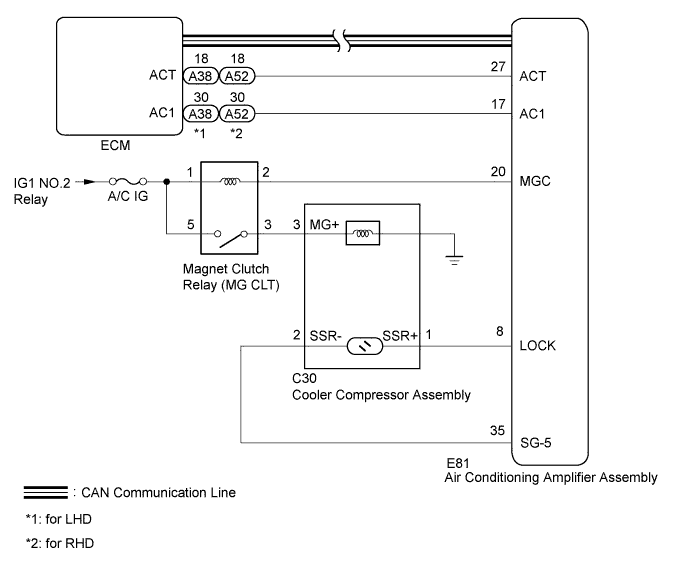

INSPECTION PROCEDURE
- HINT:
- As DTC B1422 is also output when the fan & generator V-belt is damaged or loose, inspect the belt before performing troubleshooting.
| 1. CHECK CAN COMMUNICATION SYSTEM |

Use the intelligent tester to check if the CAN communication system is functioning normally (Click here).
Result Result
Proceed to
CAN DTC is not output
A
CAN DTC is output (for LHD)
B
CAN DTC is output (for RHD)
C
|
|
||||
|
|
||||

| A | |
 |
| 2. INSPECT MAGNET CLUTCH RELAY (MG CLT) |
Remove the magnet clutch relay (MG CLT).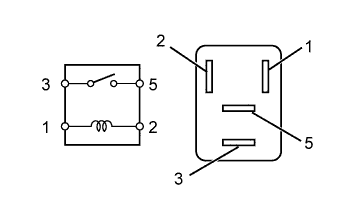
Measure the resistance according to the value(s) in the table below.
- Standard Resistance:
Tester Connection
Condition
Specified Condition
3 - 5
Battery voltage is not applied to terminals 1 and 2
10 kΩ or higher
Battery voltage is applied to terminals 1 and 2
Below 1 Ω
|
|
||||
| OK | |
|
| 3. CHECK HARNESS AND CONNECTOR (MAGNET CLUTCH RELAY - BATTERY, AIR CONDITIONING AMPLIFIER AND COOLER COMPRESSOR) |
Remove the magnet clutch relay (MG CLT).
Disconnect the E81 air conditioning amplifier assembly connector.
Disconnect the C30 cooler compressor assembly connector.
Measure the voltage according to the value(s) in the table below.
- Standard Voltage:
Tester Connection
Switch Condition
Specified Condition
Magnet clutch relay terminal 1 - Body ground
Ignition switch ON
11 to 14 V
Ignition switch off
Below 1 V
Magnet clutch relay terminal 5 - Body ground
Ignition switch ON
11 to 14 V
Ignition switch off
Below 1 V
Measure the resistance according to the value(s) in the table below.
- Standard Resistance:
Tester Connection
Condition
Specified Condition
Magnet clutch relay terminal 2 - E81-20 (MGC)
Always
Below 1 Ω
Magnet clutch relay terminal 3 - C30-3 (MG+)
Magnet clutch relay terminal 1 - Body ground
Always
10 kΩ or higher
Magnet clutch relay terminal 2 - Body ground
Magnet clutch relay terminal 3 - Body ground
Magnet clutch relay terminal 4 - Body ground
|
|
||||
| OK | |
|
| 4. CHECK AIR CONDITIONING AMPLIFIER ASSEMBLY |
Remove the air conditioning amplifier assembly with its connectors still connected (Click here).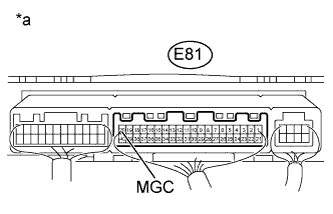
Measure the voltage according to the value(s) in the table below.
- Standard Voltage:
Tester Connection
Condition
Specified Condition
E81-20 (MGC) - Body ground
- Engine idling
- Blower switch LO level
- A/C switch on (magnet clutch on permitted)
Below 1 V
- Engine idling
- Blower switch LO level
- A/C switch off or on (magnet clutch on not permitted)
11 to 14 V
- Engine idling
Text in Illustration *a
Component with harness connected
(Air Conditioning Amplifier Assembly)
|
|
||||

| OK | |
|
| 5. INSPECT COOLER COMPRESSOR ASSEMBLY |
Remove the cooler compressor assembly.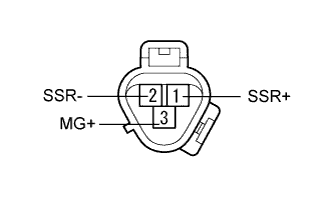
- for 1VD-FTV: Click here.
- for 1GR-FE: Click here.
- for 1VD-FTV: Click here.
Check the magnet clutch operation.
- OK:
Measurement Connection
Specified Condition
Battery positive (+) → 3 (MG+)
Battery negative (-) → cooler compressor assembly body
Magnet clutch engages
Measure the resistance according to the value(s) in the table below.
- Standard Resistance:
Tester Connection
Condition
Specified Condition
1 (SSR+) - 2 (SSR-)
20°C (68°F)
160 to 320 Ω
Result Result
Proceed to
OK
A
NG (for 1VD-FTV)
B
NG (for 1GR-FE)
C
|
|
||||
|
|
||||
| A | |
|
| 6. CHECK HARNESS AND CONNECTOR (AIR CONDITIONING AMPLIFIER - COOLER COMPRESSOR) |
Disconnect the E81 air conditioning amplifier assembly connector.
Disconnect the C30 cooler compressor connector.
Measure the resistance according to the value(s) in the table below.
- Standard Resistance:
Tester Connection
Condition
Specified Condition
E81-8 (LOCK) - C30-1 (SSR+)
Always
Below 1 Ω
E81-35 (SG-5) - C30-2 (SSR-)
Always
Below 1 Ω
E81-8 (LOCK) - Body ground
Always
10 kΩ or higher
E81-35 (SG-5) - Body ground
Always
10 kΩ or higher
Result Result
Proceed to
OK (When troubleshooting according to problem symptoms table)
A
OK (When troubleshooting according to the DTC)
B
NG
C
|
|
||||
|
|
||||
| A | ||
 |
||
| ||
| 7. CHECK HARNESS AND CONNECTOR (AIR CONDITIONING AMPLIFIER - ECM) |
Disconnect the E81 air conditioning amplifier assembly connector.
Disconnect the A38*1 or A52*2 ECM connector.
- *1: for LHD
- *2: for RHD
- *1: for LHD
Measure the resistance according to the value(s) in the table below.
- Standard Resistance:
for LHD Tester Connection
Condition
Specified Condition
E81-17 (AC1) - A38-30 (AC1)
Always
Below 1 Ω
E81-27 (ACT) - A38-18 (ACT)
Always
Below 1 Ω
E81-17 (AC1) - Body ground
Always
10 kΩ or higher
E81-27 (ACT) - Body ground
Always
10 kΩ or higher
for RHD Tester Connection
Condition
Specified Condition
E81-17 (AC1) - A52-30 (AC1)
Always
Below 1 Ω
E81-27 (ACT) - A52-18 (ACT)
Always
Below 1 Ω
E81-17 (AC1) - Body ground
Always
10 kΩ or higher
E81-27 (ACT) - Body ground
Always
10 kΩ or higher
|
|
||||
| OK | |
|
| 8. CHECK AIR CONDITIONING AMPLIFIER ASSEMBLY |
Remove the air conditioning amplifier assembly with its connectors still connected (Click here).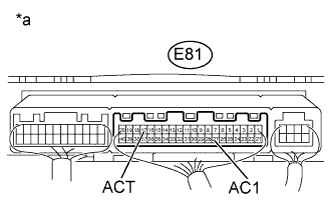
Measure the voltage according to the value(s) in the table below.
- Standard Voltage:
Tester Connection
Condition
Specified Condition
E81-17 (AC1) - Body ground
- Engine idling
- Blower switch LO level
- A/C switch on
Below 1 V
- Engine idling
- Blower switch LO level
- A/C switch off
11 to 14 V
E81-27 (ACT) - Body ground
- Engine idling
- Blower switch LO level
- A/C switch on (magnet clutch on)
Below 1 V
- Engine idling
- Blower switch LO level
- A/C switch off or on (magnet clutch off)
11 to 14 V
- Engine idling
Text in Illustration *a
Component with harness connected
(Air Conditioning Amplifier Assembly)
|
|
||||
| OK | ||
|
||
| ||
| 9. REPLACE AIR CONDITIONING AMPLIFIER ASSEMBLY |
Temporarily replace the air conditioning amplifier assembly with a new or normally functioning one (Click here).
Check the air conditioning system to check it functions properly.
- OK:
- Air conditioning system functions operate normally.
Result Result
Proceed to
OK
A
NG (for 1GR-FE)
B
NG (for 1VD-FTV)
C
|
|
||||
|
|
||||
| A | ||
|
||
| ||