INSTALLATION
Removal / installation · Vehicles built Sep 2011 – Dec 2011
| 1. INSTALL ENGINE COOLANT TEMPERATURE SENSOR |

Install a new gasket to the sensor.
Using a 19 mm deep socket wrench, install the sensor.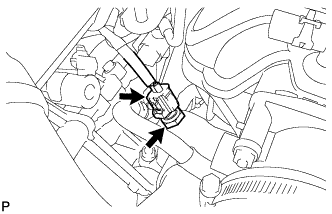

- Torque:
- 20 N*m{ 200 kgf*cm , 14 ft.*lbf }
Connect the sensor connector.
| 2. INSTALL AIR CLEANER HOSE ASSEMBLY |
Install the air cleaner hose so that the protrusion of the air cleaner cap aligns with the groove of the hose as shown in the illustration.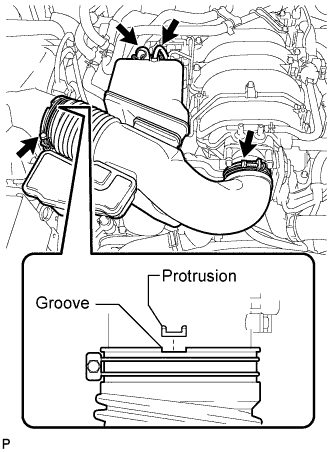
Tighten the 2 clamps.
- Torque:
- 5.0 N*m{ 51 kgf*cm , 44 in.*lbf }
Connect the vacuum transmitting hose.
Connect the No. 2 ventilation hose.
| 3. ADD ENGINE COOLANT |
Add engine coolant.
- Standard Capacity:
Item
Specified Condition
w/o Transmission oil cooler
w/o Rear Heater
13.4 liters (14.2 US qts, 11.8 Imp. qts)
w/ Rear Heater
16.3 liters (17.2 US qts, 14.3 Imp. qts)
w/ Transmission oil cooler
w/o Rear Heater
14.1 liters (14.9 US qts, 12.4 Imp. qts)
w/ Rear Heater
16.9 liters (17.9 US qts, 14.9 Imp. qts)
- HINT:
- TOYOTA vehicles are filled with TOYOTA SLLC at the factory. In order to avoid damage to the engine cooling system and other technical problems, only use TOYOTA SLLC or similar high quality ethylene glycol based non-silicate, non-amine, non-nitrite, non-borate coolant with long-life hybrid organic acid technology (coolant with long-life hybrid organic acid technology consists of a combination of low phosphates and organic acids).
Slowly pour coolant into the radiator reservoir until it reaches the F line.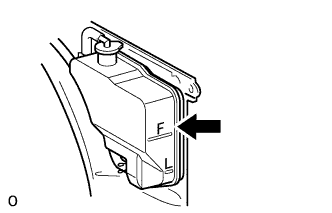
Install the radiator reservoir cap.
Press the inlet and outlet radiator hoses several times by hand, and then check the coolant level. If the coolant level is low, add coolant.
Install the radiator cap.
Start the engine and warm it up until the thermostat opens.
- NOTICE:
- Switch off the A/C.
Maintain the engine speed at 2000 to 2500 rpm.
- NOTICE:
- Make sure that the radiator reservoir still has some coolant in it.
- Pay attention to the needle of the water temperature meter. Make sure that the needle does not show an abnormally high temperature.
- If there is not enough coolant, the engine may burn out or overheat.
- Immediately after starting the engine, if the radiator reservoir does not have any coolant, perform the following: 1) stop the engine, 2) wait until the coolant has cooled down, and 3) add coolant until the coolant is filled to the F line.
- Run the engine at 2000 rpm until the coolant level has stabilized.
- Make sure that the radiator reservoir still has some coolant in it.
Press the inlet and outlet radiator hoses several times by hand to bleed air.
- CAUTION:
- Wear protective gloves.
- Be careful as the radiator hoses are hot.
- Keep your hands away from the cooling fan.
- Wear protective gloves.
Stop the engine, and wait until the engine coolant cools down to the ambient temperature.
- CAUTION:
- Do not remove the radiator cap while the engine and radiator are still hot. Pressurized, hot engine coolant and steam may be released and cause serious burns.
Check that the coolant level is between the F and L lines. If the coolant level is below the L line, repeat all of the procedures above. If the coolant level is above the F line, drain coolant so that the coolant level is between the F and L lines.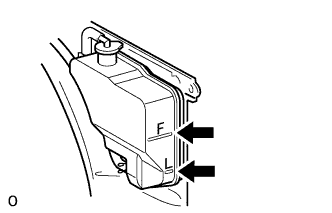
| 4. INSPECT FOR ENGINE COOLANT LEAK |
Fill the radiator with coolant and attach a radiator cap tester.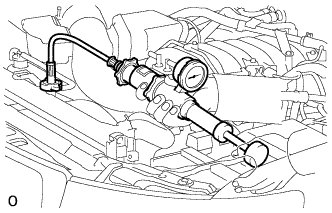
Warm up the engine.
Using the radiator cap tester, increase the pressure inside the radiator to 123 kPa (1.3 kgf/cm2, 18 psi), and check that the pressure does not drop.
If the pressure drops, check the hoses, radiator and water pump for leaks. If no external leaks are found, check the heater core, cylinder block and head.
| 5. INSTALL V-BANK COVER SUB-ASSEMBLY |
Attach the 2 V-bank cover hooks to the bracket.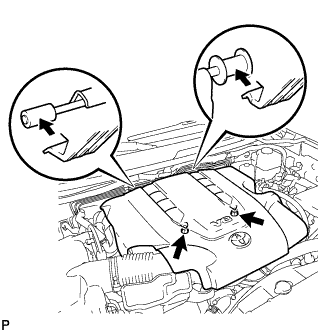
Install the V-bank cover with the 2 nuts.
- Torque:
- 7.5 N*m{ 76 kgf*cm , 66 in.*lbf }
| 6. INSTALL NO. 1 ENGINE UNDER COVER SUB-ASSEMBLY |
Install the No. 1 engine under cover with the 10 bolts.
- Torque:
- 29 N*m{ 296 kgf*cm , 21 ft.*lbf }
| 7. INSTALL FRONT FENDER SPLASH SHIELD SUB-ASSEMBLY LH |
 |
Push in the clip indicated by the arrow in the illustration to install the fender splash shield.
Install the 3 bolts and screw.
| 8. INSTALL FRONT FENDER SPLASH SHIELD SUB-ASSEMBLY RH |
- HINT:
- Use the same procedures described for the LH side.