INSTALLATION
Removal / installation · Vehicles built Sep 2011 – Dec 2011
| 1. INSTALL VANE PUMP ASSEMBLY |

Install the vane pump with the 2 bolts and nut.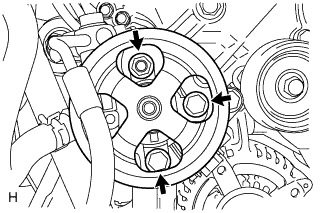

- Torque:
- 21 N*m{ 214 kgf*cm , 15 ft.*lbf }
| 2. CONNECT PRESSURE FEED TUBE |
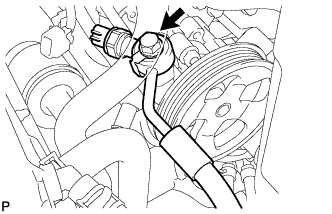 |
Install a new gasket to the pressure feed tube.
Connect the pressure feed tube and install the union bolt.
- Torque:
- 50 N*m{ 510 kgf*cm , 37 ft.*lbf }
| 3. CONNECT POWER STEERING OIL PRESSURE SWITCH CONNECTOR |
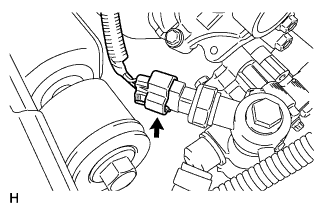 |
Connect the connector to the oil pressure switch.
| 4. CONNECT NO. 1 OIL RESERVOIR TO PUMP HOSE |
Connect the hose to the vane pump assembly with the clip.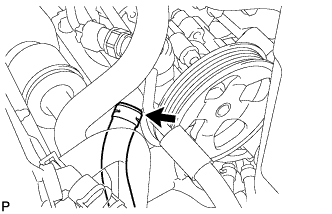
| 5. INSTALL FAN & GENERATOR V BELT |
Set the V belt onto every part except the belt tensioner, as shown in the illustration.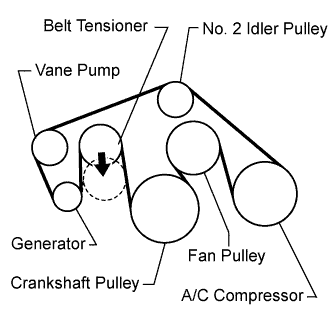
Loosen the V belt by turning the belt tensioner counterclockwise.
Set the V belt to the belt tensioner.
Check that the belt fits properly in the ribbed grooves.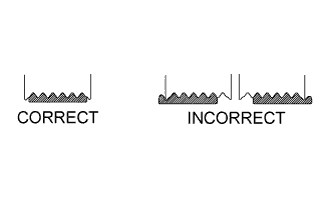
- HINT:
- Make sure to check by hand that the belt has not slipped out of the grooves on the bottom of the pulley.
Check that the arrow on the belt tensioner is within area "A".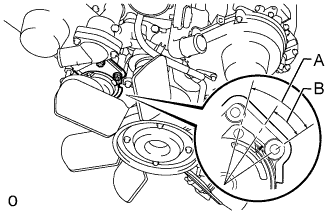
If the arrow is outside area "A", replace the fan and generator V belt.- HINT:
- When a new belt is installed, the arrow should be within area "B". If not, the fan and generator V belt is not installed correctly.
| 6. INSTALL AIR CLEANER ASSEMBLY |
Install the air cleaner with the 3 bolts.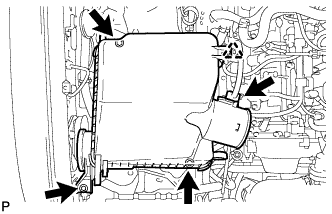
- Torque:
- 5.0 N*m{ 51 kgf*cm , 44 in.*lbf }
Connect the clamp and MAF connector.
| 7. INSTALL AIR CLEANER HOSE ASSEMBLY |
Install the air cleaner hose so that the protrusion of the air cleaner cap aligns with the groove of the hose as shown in the illustration.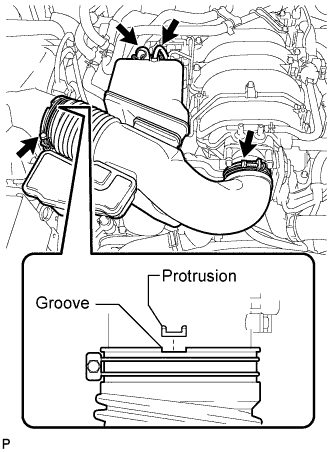
Tighten the 2 clamps.
- Torque:
- 5.0 N*m{ 51 kgf*cm , 44 in.*lbf }
Connect the vacuum transmitting hose.
Connect the No. 2 ventilation hose.
| 8. INSTALL V-BANK COVER SUB-ASSEMBLY |
Attach the 2 V-bank cover hooks to the bracket.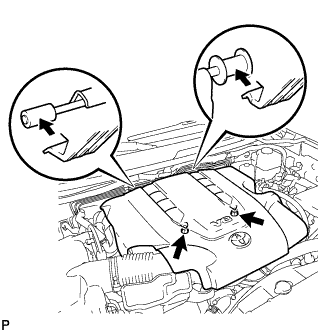
Install the V-bank cover with the 2 nuts.
- Torque:
- 7.5 N*m{ 76 kgf*cm , 66 in.*lbf }
| 9. ADD POWER STEERING FLUID |
| 10. BLEED POWER STEERING FLUID |
Check the fluid level.
Jack up the front of the vehicle and support it with stands.
Turn the steering wheel.
With the engine stopped, turn the wheel slowly from lock to lock several times.
Lower the vehicle.
Start the engine.
Idle the engine for a few minutes.
Turn the steering wheel.
With the engine idling, turn the wheel left or right to the full lock position and keep it there for 2 to 3 seconds, then turn the wheel to the opposite full lock position and keep it there for 2 to 3 seconds. *1
Repeat *1 several times.
- NOTICE:
- For vehicles with VGRS, if the steering wheel is turned from lock to lock repeatedly, the system may stop operating and the amount of rotation before the steering wheel locks may increase due to operation of the overheating prevention function. When the system temperature drops, the system operation automatically returns to normal.
Stop the engine.
Check for foaming or emulsification.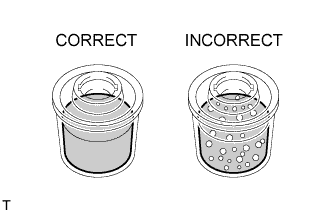
If the system has to be bled twice because of foaming or emulsification, check for fluid leaks in the system.
Check the fluid level.
| 11. INSPECT FOR POWER STEERING FLUID LEAK |
| 12. CONNECT CABLE TO NEGATIVE BATTERY TERMINAL |
- NOTICE:
- When disconnecting the cable, some systems need to be initialized after the cable is reconnected (Click here).