INSTALLATION
Removal / installation · Vehicles built from Sep 2011
- HINT:
- Use the same procedure for RHD and LHD vehicles.
- The procedure listed below is for LHD vehicles.
- Use the same procedure for the RH and LH sides.
- The procedure listed below is for the LH side.
- A bolt without a torque specification is shown in the standard bolt chart (Click here).
- Use the same procedure for RHD and LHD vehicles.
| 1. INSTALL FRONT SEAT OUTER LAP BELT SUB-ASSEMBLY |

Install the front seat outer lap belt sub-assembly with the bolt.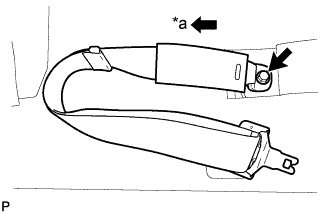

- Torque:
- 42 N*m{ 428 kgf*cm , 31 ft.*lbf }
Text in Illustration *a
Front
| 2. INSTALL FRONT SHOULDER BELT ANCHOR ADJUSTER ASSEMBLY |
Align the adjuster positioning hole with the claw, and install the front shoulder belt anchor adjuster assembly with the 2 bolts.
- Torque:
- 42 N*m{ 428 kgf*cm , 31 ft.*lbf }
- HINT:
- First install the lower bolt, and then install the upper bolt.
| 3. INSTALL FRONT SEAT OUTER BELT ASSEMBLY LH |
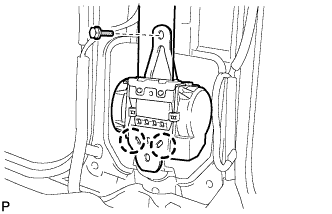 |
Align the 2 claws of the vehicle with the seat belt retractor positioning holes.
Install the front seat outer belt assembly LH with the bolt.
- Torque:
- 8.5 N*m{ 87 kgf*cm , 75 in.*lbf }
Install the shoulder anchor to the front shoulder belt anchor adjuster assembly with the nut.
- Torque:
- 42 N*m{ 428 kgf*cm , 31 ft.*lbf }
| 4. INSTALL CENTER PILLAR GARNISH LH |
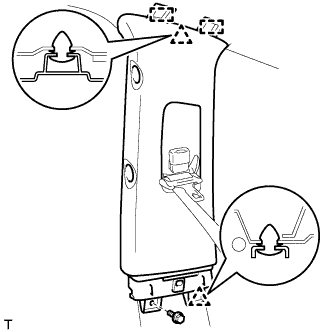 |
Pass the seat belt anchor through the center pillar garnish.
Attach the 2 clips and 2 guides to install the center pillar garnish.
Install the bolt.
| 5. INSTALL REAR ASSIST GRIP ASSEMBLY |
 |
- HINT:
- Use the same procedure to install the rear assist grip on the other side.
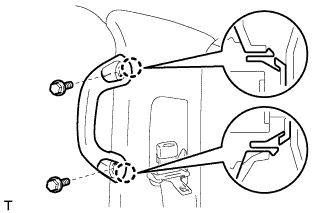
Attach the 2 claws to install the rear assist grip.
Install the 2 bolts.
Attach the 4 claws to install the 2 assist grip plugs.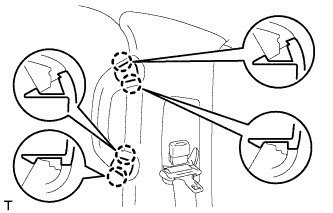
| 6. INSTALL CENTER LOWER PILLAR GARNISH LH |
- HINT:
- When installing the center lower pillar garnish, move the front seat and seatback to the foremost upright position.
- After moving the front seat, disconnect the cable from the negative (-) battery terminal.
- When installing the center lower pillar garnish, move the front seat and seatback to the foremost upright position.
Attach the 2 claws and 7 clips to install the center lower pillar garnish.
Install the seat belt anchor with the bolt.
- Torque:
- 42 N*m{ 428 kgf*cm , 31 ft.*lbf }
| 7. INSTALL CENTER PILLAR GARNISH COVER LH |
- HINT:
- for Manual Seat:
When installing the center pillar garnish cover, move the front seat and seatback to the foremost upright position.
- for Power Seat:
When installing the center pillar garnish cover, connect the cable to the negative (-) battery terminal and operate the power seat switch to move the front seat and seatback to the foremost upright position.
- for Power Seat:
After moving the front seat, disconnect the cable from the negative (-) battery terminal.
- for Manual Seat:
Attach the 2 clips and 2 guides to install the cover.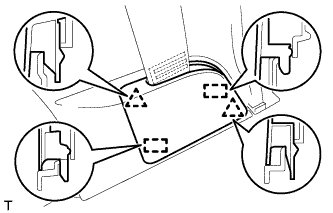
| 8. INSTALL REAR DOOR SCUFF PLATE LH |
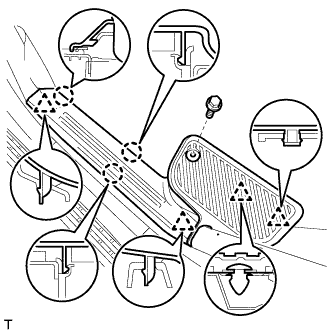 |
Attach the 3 claws and 4 clips to install the scuff plate.
Install the screw.
| 9. INSTALL REAR STEP COVER |
 |
- HINT:
- Use the same procedure to install the step cover on the other side.
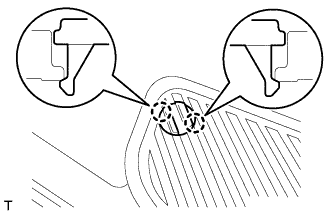
Attach the 2 claws to install the step cover.
| 10. INSTALL FRONT DOOR SCUFF PLATE LH |
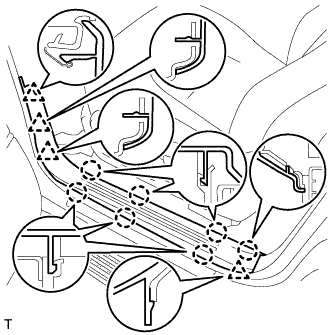 |
Attach the 7 claws and 4 clips to install the scuff plate.
| 11. INSTALL FRONT SEAT ASSEMBLY RH |