REPLACEMENT
Removal / installation · Vehicles built from Jan 2012
Versions by build date: Sep 2011 – Dec 2011 from Jan 2012
- CAUTION:
- Prolonged and repeated contact with engine oil will result in the removal of natural oils from the skin, leading to dryness, irritation and dermatitis. In addition, used engine oil contains potentially harmful contaminants which may cause skin cancer.
- Precautions should be taken when replacing engine oil to minimize the risk of your skin making contact with used engine oil. Protective clothing and gloves that cannot be penetrated by oil should be worn. The skin should be washed with soap and water, or use waterless hand cleaner, to remove any used engine oil thoroughly. Do not use gasoline, thinners, or solvents.
- In order to protect the environment, used oil and used oil filters must be disposed of at designated disposal sites.
- Prolonged and repeated contact with engine oil will result in the removal of natural oils from the skin, leading to dryness, irritation and dermatitis. In addition, used engine oil contains potentially harmful contaminants which may cause skin cancer.
| 1. DRAIN ENGINE OIL |

Remove the 2 bolts and No. 2 engine under cover seal from the No. 2 engine under cover.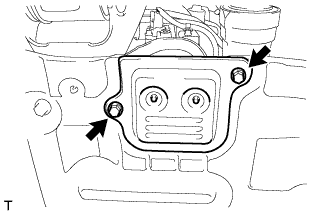

Remove the oil filler cap.
Remove the oil pan drain plug and gasket, and then drain the engine oil into a container.
Install a new gasket and the oil pan drain plug.
- Torque:
- 38 N*m{ 387 kgf*cm , 28 ft.*lbf }
| 2. REMOVE FRONT FENDER SPLASH SHIELD SUB-ASSEMBLY RH |
Remove the 3 bolts and 2 screws.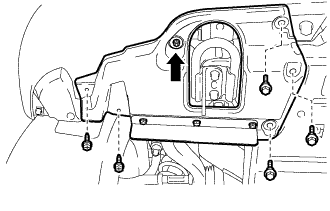
Turn the clip indicated by the arrow in the illustration to remove the front fender splash shield sub-assembly RH.
| 3. REMOVE ENGINE UNDER COVER SUB-ASSEMBLY RH |
Remove the 5 bolts and engine under cover sub-assembly RH.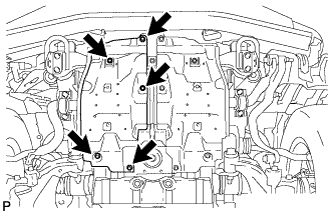
- HINT:
-
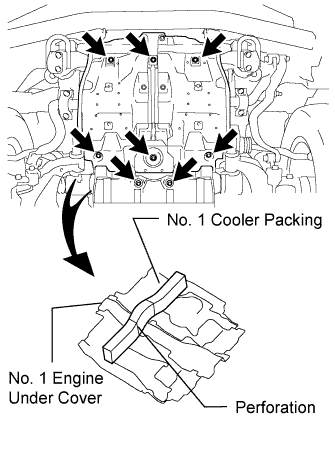
- If the No. 1 cooler packing is not divided, remove both sides of the engine under cover assembly and cut the packing at the perforation indicated in the illustration.
| 4. REMOVE OIL FILTER ELEMENT |
Remove the oil filter drain plug.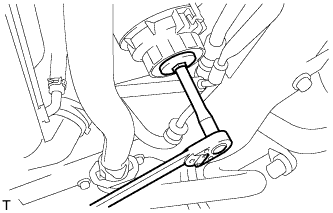
Connect a hose with an inside diameter of 15 mm (0.591 in.) to the pipe.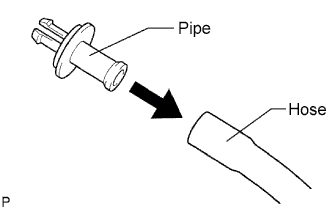
Remove the O-ring from the oil filter drain plug and install it to the drain pipe.
Install the oil filter drain pipe to the oil filter cap and drain the engine oil.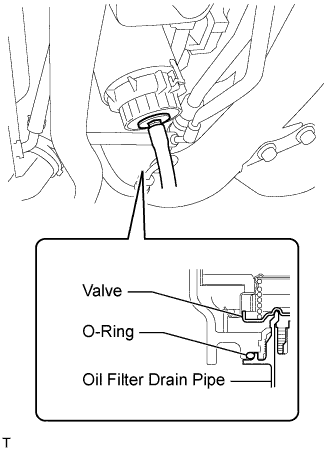
Remove the oil filter drain pipe.
Apply a light coat of engine oil to a new O-ring, and install it to the oil filter drain plug.
Install the oil filter drain plug to the oil filter cap.
- Torque:
- 13 N*m{ 127 kgf*cm , 9 ft.*lbf }
Using SST, remove the oil filter cap.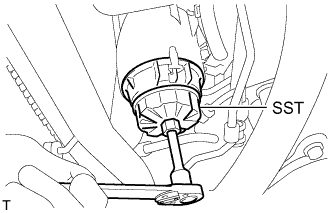
- SST
- 09228-06501
- HINT:
- Use a container to catch the draining oil. After the oil filter cap is loosened approximately 4 turns and the cap ribs are vertical, engine oil drains from the gap between the oil filter cap and oil pan.
Remove the oil filter element and O-ring from the oil filter cap.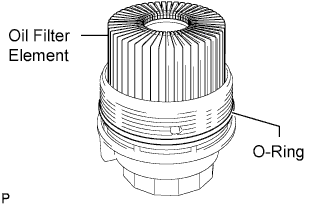
- NOTICE:
- Be sure to remove the cap O-ring by hand, without using any tools, to prevent damage to the cap O-ring groove.
| 5. INSTALL OIL FILTER ELEMENT |
Clean the inside of the oil filter cap, its threads and its O-ring groove.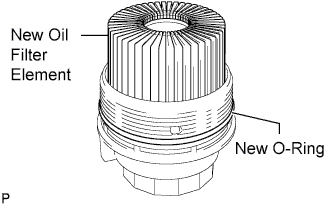
Apply a small amount of engine oil to a new O-ring and install it to the oil filter cap.
Set a new oil filter element in the oil filter cap.
Remove any dirt or foreign matter from the installation surface of the engine.
Apply a small amount of engine oil to the O-ring again and temporarily install the oil filter cap by hand.
Using SST, tighten the oil filter cap.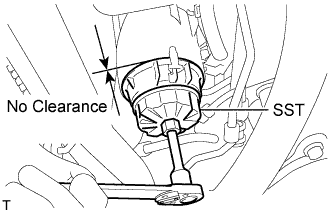
- SST
- 09228-06501
- Torque:
- 25 N*m{ 255 kgf*cm , 18 ft.*lbf }
- NOTICE:
- Make sure that the oil filter is installed securely as shown in the illustration.
- Be careful that the O-ring does not get caught between any surrounding parts.
- Make sure that the oil filter is installed securely as shown in the illustration.
Install the No. 2 engine under cover seal to the No. 2 engine under cover with the 2 bolts.
- Torque:
- 10 N*m{ 102 kgf*cm , 7 ft.*lbf }
| 6. ADD ENGINE OIL |
Add fresh oil.
- Standard Engine Oil:
Item
Oil Grade
Oil Viscosity (SAE)
w/ DPF
ACEA C2
(Using engine oil other than ACEA C2 may damage catalytic converter)
- 0W-30
- 5W-30
(0W-30 is best choice for fuel economy and good starting in cold weather)
w/o DPF
G-DLD-1, API CF-4, API CF or ACEA B1
(You may also use API CE or CD)
- 5W-30
- 10W-30
- 15W-40
- 20W-50
(5W-30 is best choice for fuel economy and good starting in cold weather).
- Standard Capacity:
Item
Specified Condition
Drain and refill with oil filter change
9.2 liters (9.7 US qts, 8.1 Imp. qts)
Drain and refill without oil filter change
8.2 liters (8.7 US qts, 7.2 Imp. qts)
Dry fill
9.9 liters (10.5 US qts, 8.7 Imp. qts)
Install the oil filler cap.
| 7. INSPECT FOR ENGINE OIL LEAK |
Warm up the engine and check for an engine oil leak.
| 8. CHECK ENGINE OIL LEVEL |
Warm up the engine, stop the engine and wait 5 minutes. The engine oil level should be between the dipstick low level mark and full level mark.
If low, check for leakage and add oil up to the full level mark.- NOTICE:
- Do not fill engine oil above the full level mark.
| 9. INSTALL ENGINE UNDER COVER SUB-ASSEMBLY RH |
Install the engine under cover sub-assembly RH with the 5 bolts.
- HINT:
-
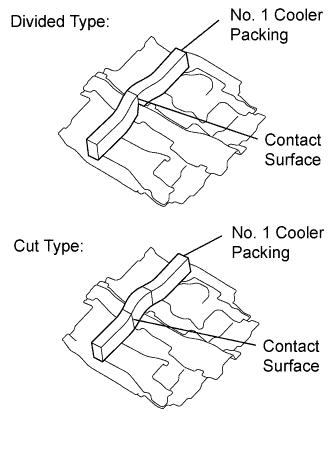
- Make sure there is no gap between the ends of the No. 1 cooler packing.
| 10. INSTALL FRONT FENDER SPLASH SHIELD SUB-ASSEMBLY RH |
Push in the clip to install the front fender splash shield sub-assembly RH.
Install the 3 bolts and 2 screws.