INSTALLATION
Removal / installation · Vehicles built Sep 2011 – Dec 2011
Versions by build date: Sep 2011 – Dec 2011 from Jan 2012
| 1.
INSTALL GASKET |
 |
Clean the ECM seal surface with non-residue solvent.
Install a new gasket to the ECM.
| 2.
INSTALL ECM |
|
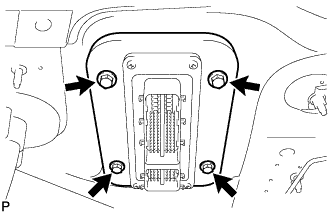
- Install the ECM with the 4 bolts.
-
Torque:
- 8.0 N*m{
82 kgf*cm
, 71 in.*lbf
}
- NOTICE:
- Make sure the gasket is not folded or caught on any area on the surrounding part.
- Make sure there is no foreign matter caught between the gasket and surrounding part.
- Do not damage the gasket.
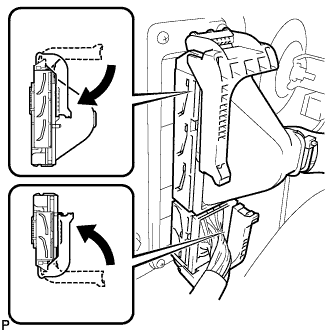
- Connect the 2 ECM connectors and push each lock lever down to lock the ECM connectors.
- NOTICE:
- Be careful not to allow dirt, water, or other foreign matter to adhere to the connecting parts when connecting the connectors.
- Do not twist the wire harness when connecting the ECM connectors.
- Make sure that the lock lever is raised 90° before connecting the ECM connectors. Failure to do this may cause the lock lever and terminals to break.
- Make sure that the levers are securely locked.
| 3.
CONNECT CONNECTOR HOLDER BLOCK |
|
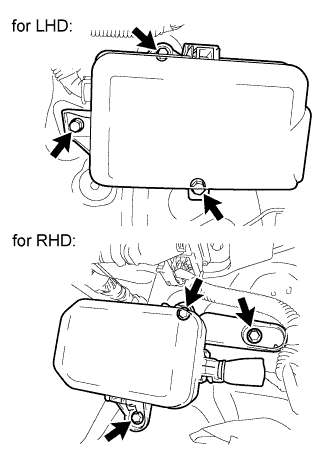
- Connect the connector holder block with the 3 bolts.
-
Torque:
- 8.0 N*m{
82 kgf*cm
, 71 in.*lbf
}
| 4.
REGISTER INJECTOR COMPENSATION CODE |
|
Register the injector compensation code (Click here).
| 5.
CONNECT CABLE TO NEGATIVE BATTERY TERMINAL |
|
- NOTICE:
- When disconnecting the cable, some systems need to be initialized after the cable is reconnected (Click here).