INSTALLATION
Removal / installation · Vehicles built from Sep 2011
| 1.
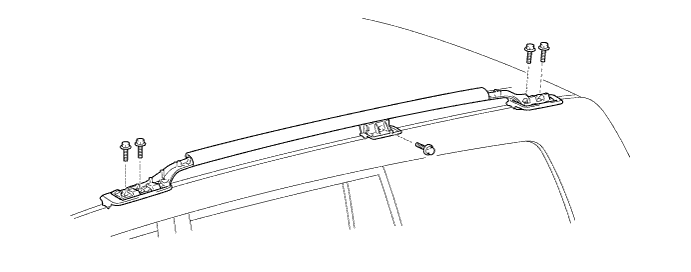
INSTALL ROOF CARRIER SUB-ASSEMBLY LH |
 |
Clean the threaded surface on the vehicle body with a non-residue solvent.
Apply adhesive to the threads of the 5 bolts.
- Adhesive:
- Toyota Genuine Adhesive 1324, Three Bond 1324 or equivalent
Install the roof carrier with the 5 bolts.
-
Torque:
- 39 N*m{
398 kgf*cm
, 29 ft.*lbf
}

| 2.
INSTALL ROOF CARRIER SUB-ASSEMBLY RH |
|
- HINT:
- Use the same procedures described for the LH side.
| 3.
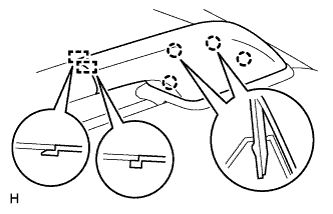
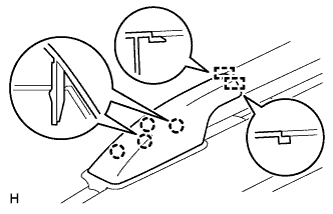
INSTALL REAR ROOF RACK LEG COVER LH |
|
Attach the 2 guides and 2 clips to install the cover.
| 4.
INSTALL REAR ROOF RACK LEG COVER RH |
|
- HINT:
- Use the same procedures described for the LH side.
| 5.
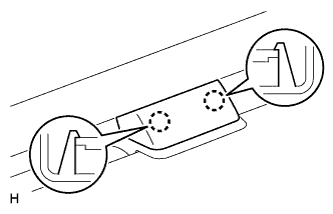
INSTALL CENTER ROOF RACK LEG COVER LH |
|
Attach the 2 claws to install the cover.
| 6.
INSTALL CENTER ROOF RACK LEG COVER RH |
|
- HINT:
- Use the same procedures described for the LH side.
| 7.
INSTALL FRONT ROOF RACK LEG COVER LH |
|
Attach the 2 guides and 2 clips to install the cover.
| 8.
INSTALL FRONT ROOF RACK LEG COVER RH |
|
- HINT:
- Use the same procedures described for the LH side.