Removal / installation · Vehicles built Sep 2011 – Dec 2011
Versions by build date: Sep 2011 – Dec 2011from Jan 2012
1.
DISCONNECT CABLE FROM NEGATIVE BATTERY TERMINAL
CAUTION:
Wait at least 90 seconds after disconnecting the cable from the negative (-) battery terminal to disable the SRS system.
NOTICE:
When disconnecting the cable, some systems need to be initialized after the cable is reconnected (Click here).
2.
REMOVE REAR NO. 2 SEAT ASSEMBLY LH (except Face to Face Seat Type)
Remove the rear No. 2 seat assembly LH (Click here).
3.
REMOVE REAR NO. 2 SEAT ASSEMBLY RH (except Face to Face Seat Type)
HINT:
Use the same procedures described for the LH side.
4.
REMOVE REAR NO. 2 SEAT ASSEMBLY LH (for Face to Face Seat Type)
Remove the rear No. 2 seat assembly LH (Click here).
5.
REMOVE REAR NO. 2 SEAT ASSEMBLY RH (for Face to Face Seat Type)
HINT:
Use the same procedures described for the LH side.
6.
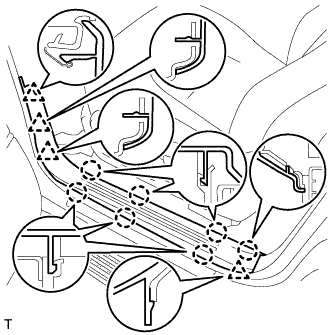
REMOVE FRONT DOOR SCUFF PLATE LH
Detach the 7 claws and 4 clips, and remove the scuff plate.
7.
REMOVE FRONT DOOR SCUFF PLATE RH
HINT:
Use the same procedures described for the LH side.
8.
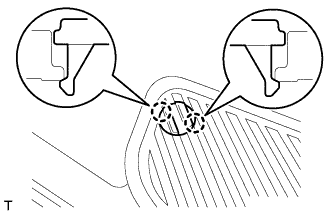
REMOVE REAR STEP COVER
HINT:
Use the same procedure to remove the step cover on the other side.
Detach the 2 claws and remove the step cover.
9.
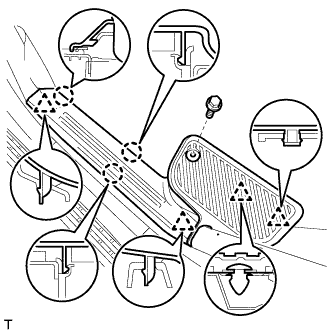
REMOVE REAR DOOR SCUFF PLATE LH
Remove the screw.
Detach the 3 claws and 4 clips, and remove the scuff plate.
10.
REMOVE REAR DOOR SCUFF PLATE RH
HINT:
Use the same procedures described for the LH side.
11.
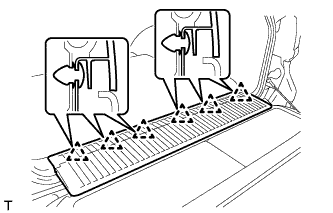
REMOVE REAR FLOOR MAT REAR SUPPORT PLATE
Detach the 6 clips and remove the support plate.
12.
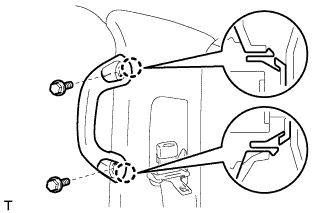
REMOVE FRONT ASSIST GRIP SUB-ASSEMBLY
HINT:
Use the same procedure to remove the front assist grip on the other side.
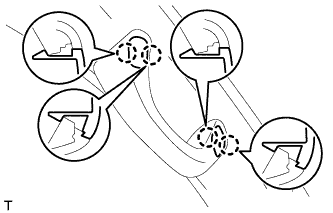
Detach the 4 claws and remove the 2 assist grip plugs.
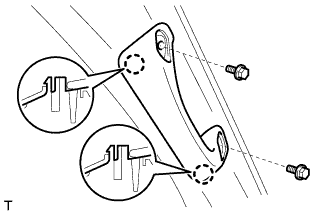
Remove the 2 bolts.
Detach the 2 claws and remove the front assist grip.
13.
REMOVE FRONT PILLAR GARNISH LH
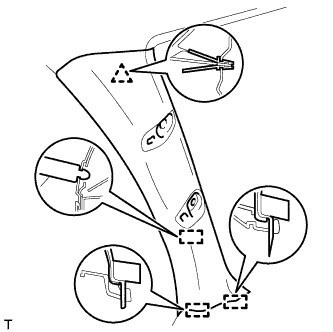
Detach the clip 3 guides, and remove the front pillar garnish.
for 9, 14 Speakers: Disconnect the speaker connector and then remove the front pillar garnish.
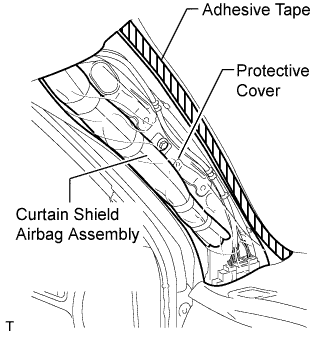
Protect the curtain shield airbag.
Thoroughly cover the airbag with a cloth or nylon sheet and fix the ends of the cover with adhesive tape, as shown in the illustration.
NOTICE:
Cover the curtain shield airbag with a protective cover as soon as the front pillar garnish is removed.
14.
REMOVE FRONT PILLAR GARNISH RH
HINT:
Use the same procedures described for the LH side.
15.
REMOVE CENTER PILLAR GARNISH COVER LH
HINT:
for Manual Seat: When removing the center pillar garnish cover, move the front seat and seatback to the foremost upright position.
for Power Seat: When removing the center pillar garnish cover, connect the cable to the negative (-) battery terminal and operate the power seat switch to move the front seat and seatback to the foremost upright position.
for Power Seat: After moving the front seat, disconnect the cable from the negative (-) battery terminal.
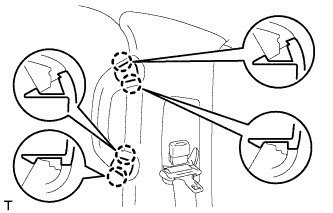
Detach the 2 clips and 2 guides, and remove the cover.
16.
REMOVE CENTER PILLAR GARNISH COVER RH
HINT:
Use the same procedures described for the LH side.
17.
REMOVE CENTER LOWER PILLAR GARNISH LH
HINT:
for Manual Seat: When removing the center lower pillar garnish, move the front seat and seatback to the foremost upright position.
for Power Seat: When removing the center lower pillar garnish, connect the cable to the negative (-) battery terminal and operate the power seat switch to move the front seat and seatback to the foremost upright position.
for Power Seat: After moving the front seat, disconnect the cable from the negative (-) battery terminal.
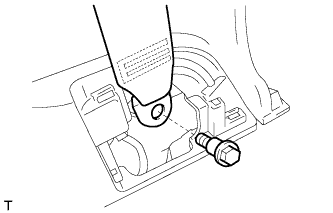
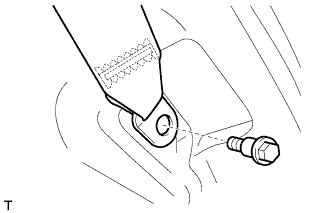
Remove the bolt and seat belt anchor.
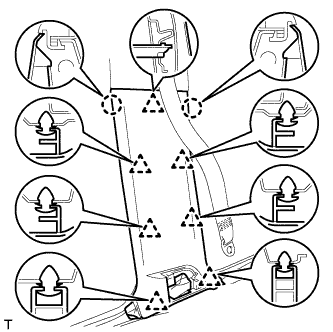
Detach the 2 claws and 7 clips, and remove the center lower pillar garnish.
18.
REMOVE CENTER LOWER PILLAR GARNISH RH
HINT:
Use the same procedures described for the LH side.
19.
REMOVE REAR ASSIST GRIP ASSEMBLY
HINT:
Use the same procedure to remove the rear assist grip on the other side.
Detach the 4 claws and remove the 2 assist grip plugs.
Remove the 2 bolts.
Detach the 2 claws and remove the rear assist grip.
20.
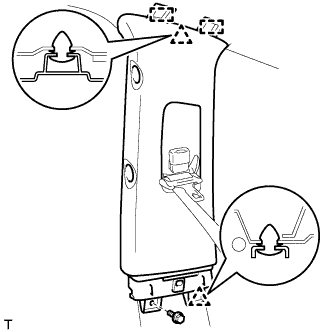
REMOVE CENTER PILLAR GARNISH LH
Remove the bolt.
Detach the 2 clips and 2 guides.
Pass the seat belt anchor through the center pillar garnish, and remove the center pillar garnish.
21.
REMOVE CENTER PILLAR GARNISH RH
HINT:
Use the same procedures described for the LH side.
22.
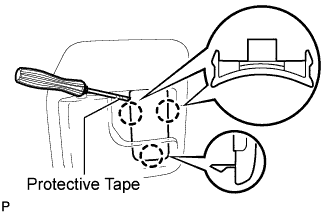
REMOVE REAR SEAT COVER CAP (w/ Rear No. 2 Seat, except Face to Face Seat Type)
HINT:
Use the same procedure to remove the rear seat cover cap on the other side.
Using a screwdriver, detach the 3 claws and remove the rear seat cover cap.
HINT:
Tape the screwdriver tip before use.
23.
REMOVE FRONT QUARTER TRIM PANEL ASSEMBLY LH
HINT:
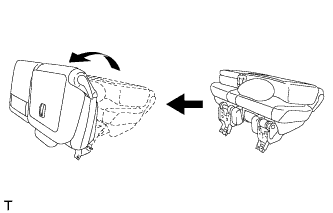
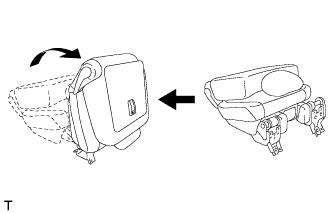
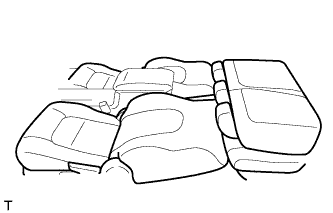
When removing the front quarter trim panel, operate the reclining adjuster release handle and move the No. 1 rear seat to the position shown in the illustration.
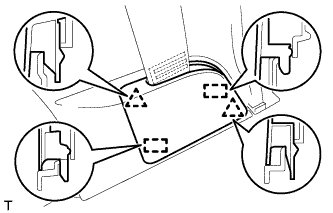
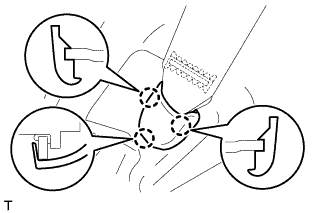
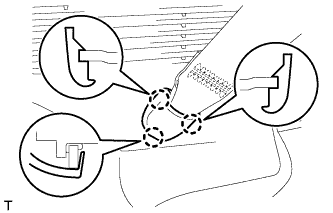
Detach the 3 claws and remove the cover.
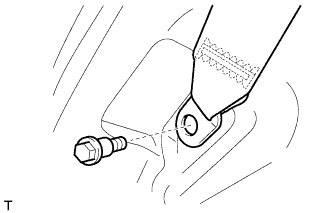
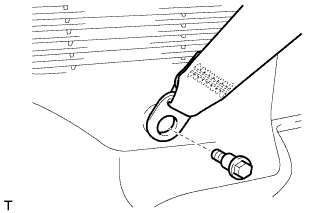
Remove the bolt and rear No. 1 seat belt anchor.
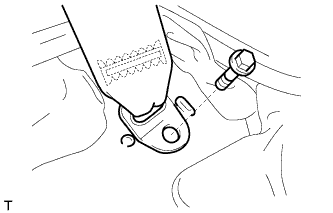
w/ Rear No. 2 Seat, except Face to Face Seat Type: Remove the bolt and rear No. 2 seat belt anchor.
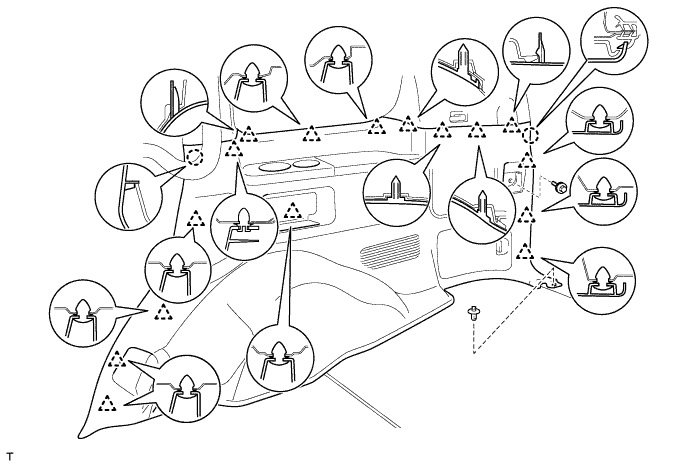
w/ Rear No. 2 Seat, except Face to Face Seat Type:
Remove the clip and bolt.
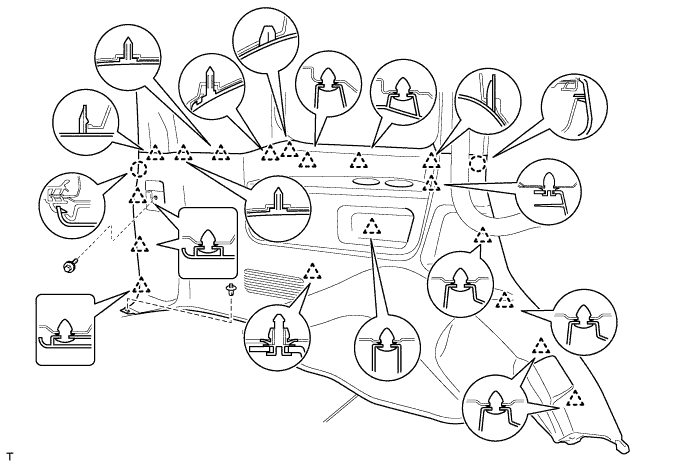
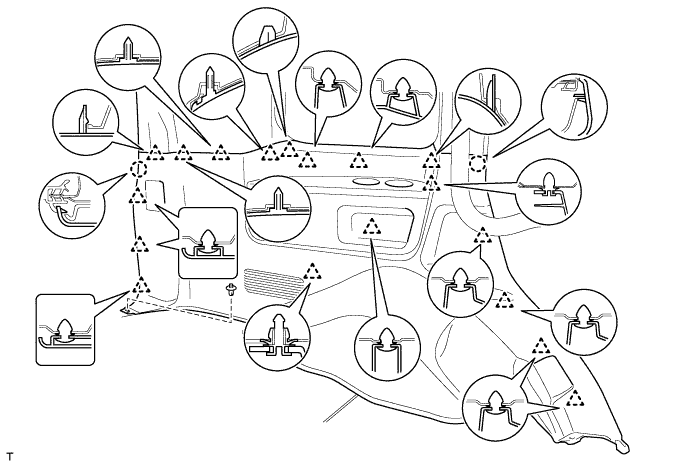
Detach the 18 clips and 2 claws.
w/o Rear Air Conditioning System: Disconnect the rear seat lock control lever cable and then remove the quarter trim panel.
w/ Rear Air Conditioning System: Disconnect the thermistor connector and rear seat lock control lever cable, and then remove the quarter trim panel.
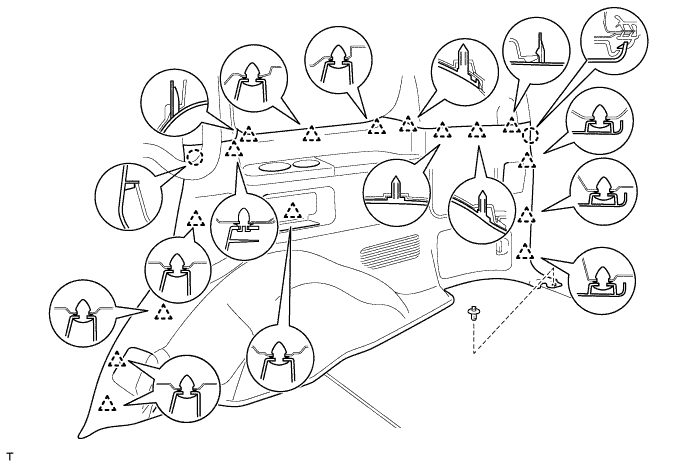
w/o Rear No. 2 Seat or w/ Rear No. 2 Seat, for Face to Face Seat Type:
Remove the clip.
Detach the 18 clips and 2 claws, and remove the quarter trim panel.
24.
REMOVE FRONT QUARTER TRIM PANEL ASSEMBLY RH
HINT:
When removing the front quarter trim panel, operate the reclining adjuster release handle and move the No. 1 rear seat to the position shown in the illustration.
Detach the 3 claws and remove the cover.
Remove the bolt and rear No. 1 seat belt anchor.
w/ Rear No. 2 Seat, except Face to Face Seat Type:
Detach the 3 claws and remove the cover.
Remove the bolt and rear No. 2 seat belt anchor.
w/ Rear No. 2 Seat, except Face to Face Seat Type:
Remove the clip and bolt.
Detach the 16 clips and 2 claws.
w/o Rear Air Conditioning System: Disconnect the rear seat lock control lever cable and then remove the quarter trim panel.
w/ Rear Air Conditioning System: Disconnect the thermistor connector and rear seat lock control lever cable, and then remove the quarter trim panel.
w/o Rear No. 2 Seat or w/ Rear No. 2 Seat, for Face to Face Seat Type:
Remove the clip.
Detach the 16 clips and 2 claws, and remove the quarter trim panel.
25.
REMOVE REAR FRONT QUARTER TRIM GARNISH LH
Remove the screw.
Detach the clip and 2 guides.
Pass the seat belt anchor through the quarter trim garnish, and remove the quarter trim garnish.
26.
REMOVE REAR FRONT QUARTER TRIM GARNISH RH
HINT:
Use the same procedures described for the LH side.
27.
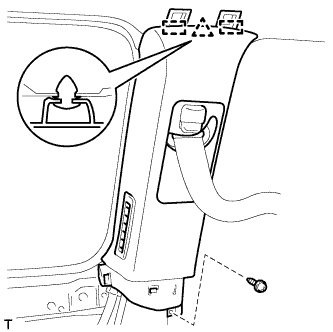
REMOVE REAR UPPER PILLAR GARNISH LH
w/ Rear No. 2 Seat, except Face to Face Seat Type
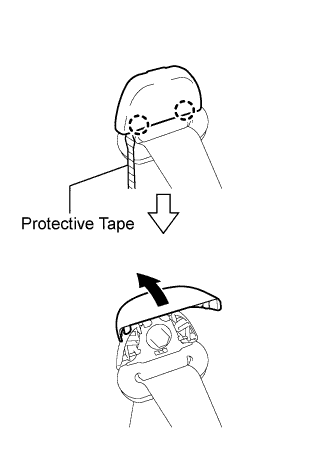
Using a screwdriver, detach the 2 claws and open the seat belt shoulder anchor cover.
HINT:
Tape the screwdriver tip before use.
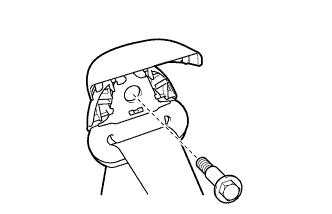
Remove the bolt and seat belt shoulder anchor.
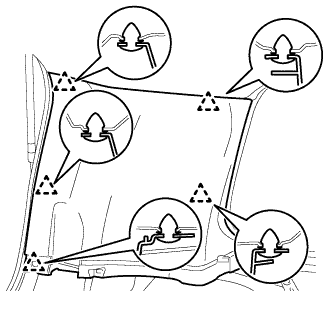
Detach the 5 clips and remove the rear upper pillar garnish.
28.
REMOVE REAR UPPER PILLAR GARNISH RH
HINT:
Use the same procedures described for the LH side.
29.
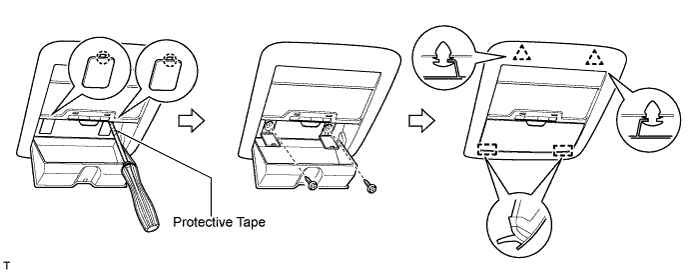
REMOVE MAP LIGHT ASSEMBLY
Using a screwdriver, detach the 2 claws and open the 2 covers.
HINT:
Tape the screwdriver tip before use.
Remove the 2 screws.
Detach the 2 clips and 2 guides.
Disconnect the connector and then remove the map light.
30.
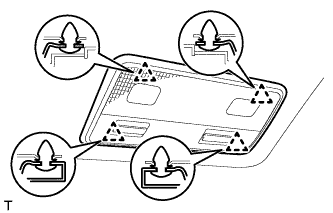
REMOVE NO. 1 ROOM LIGHT ASSEMBLY
Detach the 4 clips.
Disconnect the connector and then remove the room light.
31.
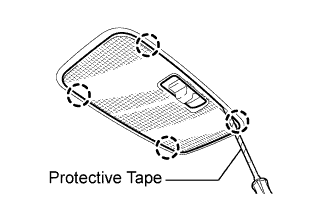
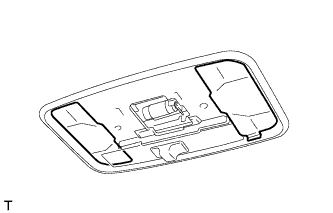
REMOVE NO. 2 ROOM LIGHT ASSEMBLY
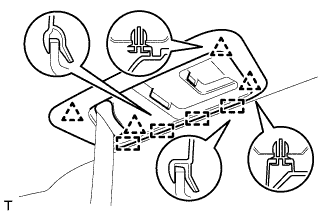
Using a screwdriver, detach the 4 claws and remove the room light lens.
HINT:
Tape the screwdriver tip before use.
Remove the 2 covers.
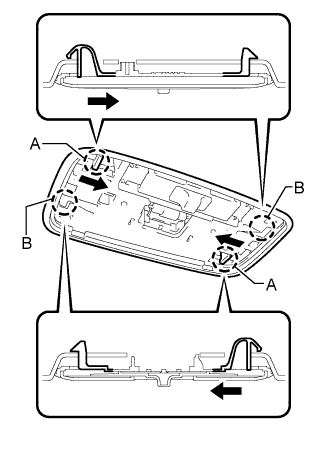
Using a screwdriver, push the 2 levers in the direction of the arrows in the illustration, and detach the 2 claws labeled A.
Detach the 2 claws labeled B.
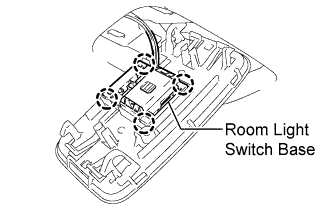
Detach the 4 claws and remove the room light from the room light switch base.
32.
REMOVE VISOR BRACKET COVER
HINT:
Use the same procedure to remove the visor bracket cover on the other side.
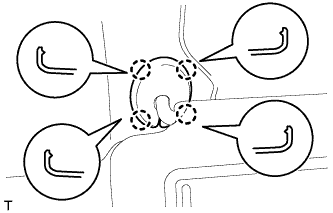
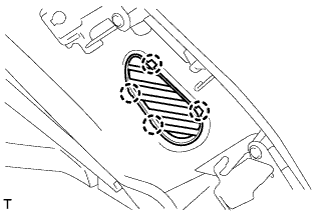
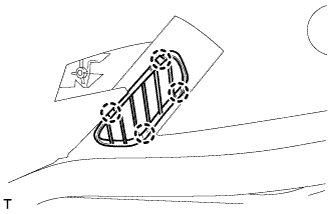
Detach the 4 claws and remove the visor bracket cover.
33.
REMOVE VISOR ASSEMBLY LH
Remove the 2 screws and visor.
34.
REMOVE VISOR ASSEMBLY RH
HINT:
Use the same procedures described for the LH side.
35.
REMOVE VISOR HOLDER
HINT:
Use the same procedure to remove the visor holder on the other side.
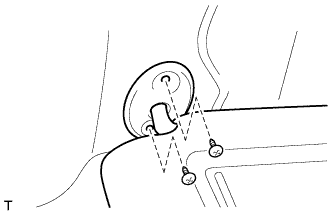
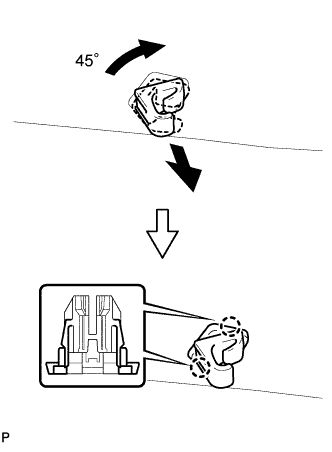
Turn the visor holder approximately 45° and pull it out as shown in the illustration.
Detach the 2 claws and remove the visor holder.
36.
REMOVE CENTER VISOR ASSEMBLY LH (w/ Sub Visor)
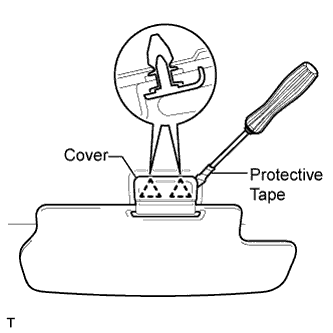
Using a screwdriver, pry off the cover to detach the 2 clips and remove the center visor.
HINT:
Tape the screwdriver tip before use.
37.
REMOVE CENTER VISOR ASSEMBLY RH (w/ Sub Visor)
HINT:
Use the same procedures described for the LH side.
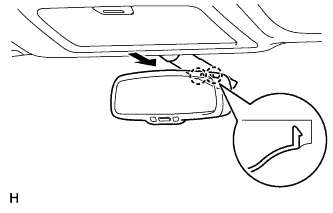
Detach the 2 claws and remove the cover as shown in the illustration.
39.
REMOVE RAIN SENSOR COVER (w/ Rain Sensor)
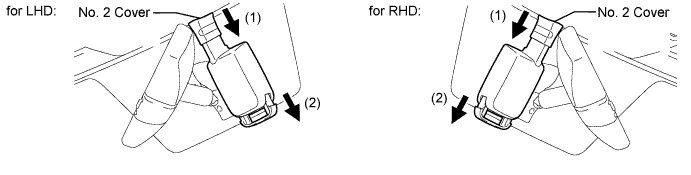
Slide the No. 2 cover in the direction of the arrow labeled (1).
Pull the stopper in the direction of the arrow labeled (2) to remove the No. 2 cover.
40.
REMOVE SEAT BELT ANCHOR COVER (for 3 Person Seat Type Rear No. 2 Seat)
Detach the 4 clips and 4 guides, and remove the seat belt anchor cover.
41.
REMOVE ASSIST GRIP ASSEMBLY
HINT:
Use the same procedure to remove the assist grip on the other side.
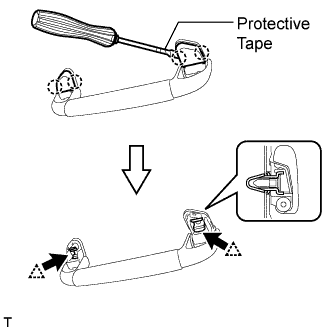
Using a screwdriver, detach the 4 claws and remove the 2 assist grip covers.
HINT:
Tape the screwdriver tip before use.
Detach the 2 clips and remove the assist grip.
Remove the 2 clips from the vehicle body.
42.
REMOVE NO. 2 ASSIST GRIP ASSEMBLY LH
w/ Rear No. 2 Seat, except Face to Face Seat Type or w/o Rear No. 2 Seat: Remove the No. 2 assist grip assembly.
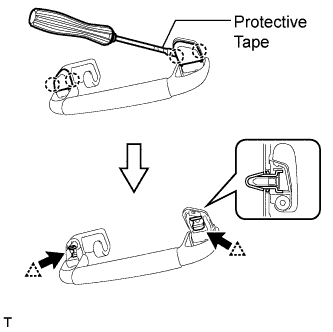
Using a screwdriver, detach the 4 claws and remove the 2 assist grip covers.
HINT:
Tape the screwdriver tip before use.
Detach the 2 clips and remove the assist grip.
Remove the 2 clips from the vehicle body.
w/ Rear No. 2 Seat, for Face to Face Seat Type: Remove the No. 2 assist grip assembly.
Using a screwdriver, detach the 4 claws and remove the 2 assist grip covers.
HINT:
Tape the screwdriver tip before use.
Detach the 2 clips and remove the assist grip.
Remove the 2 clips from the vehicle body.
43.
REMOVE NO. 2 ASSIST GRIP ASSEMBLY RH
HINT:
Use the same procedures described for the LH side.
44.
REMOVE 3RD SEAT ASSIST GRIP ASSEMBLY (w/ Rear No. 2 Seat, except Face to Face Seat Type)
HINT:
Use the same procedure to remove the 3rd seat assist grip on the other side.
Using a screwdriver, detach the 4 claws and remove the 2 assist grip covers.
HINT:
Tape the screwdriver tip before use.
Detach the 2 clips and remove the assist grip.
Remove the 2 clips from the vehicle body.
45.
REMOVE ROOF HEADLINING ASSEMBLY
HINT:
for Manual Seat: When removing the roof headlining, move the front seat and rear No. 1 seat to the position shown in the illustration.
for Power Seat: When removing the roof headlining, connect the cable to the negative (-) battery terminal and move the front seat and No. 1 rear seat to the position shown in the illustration.
for Power Seat: After moving the seats, disconnect the cable from the negative (-) battery terminal.
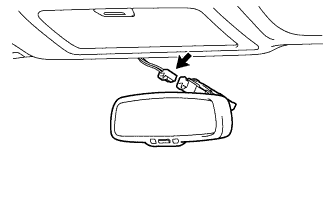
w/ EC Mirror: Disconnect the inner mirror connector.
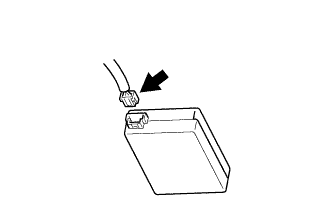
w/ Rain Sensor: Disconnect the rain sensor connector.
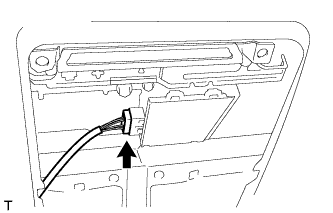
Disconnect the drive gear connector.
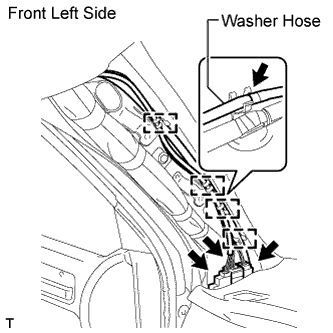
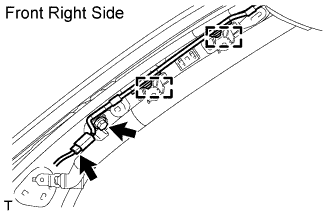
Disconnect the 3 roof wire connectors and washer hose.
Detach the 4 clamps.
Remove the bolt.
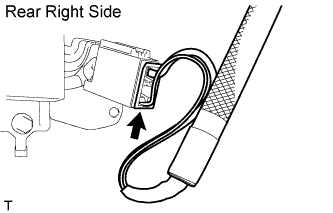
Disconnect the antenna cord connector and detach the 2 clamps.
Disconnect the antenna cord connector.
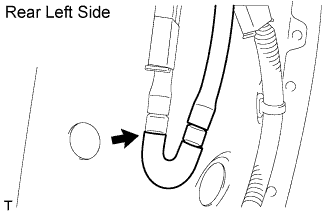
Disconnect the washer hose.
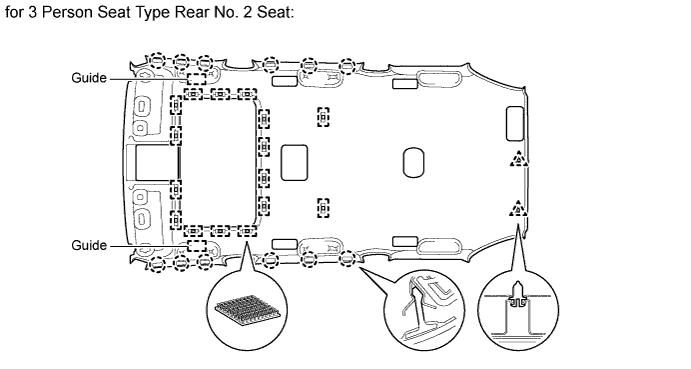
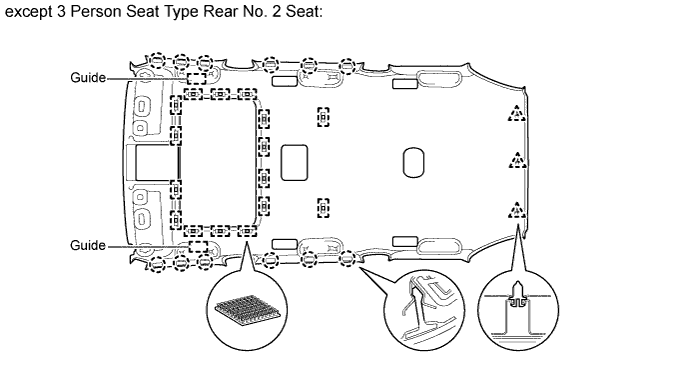
for 3 Person Seat Type Rear No. 2 Seat: Detach the 12 claws, 2 clips, 2 guides and 16 fasteners.
except 3 Person Seat Type Rear No. 2 Seat: Detach the 12 claws, 3 clips, 2 guides and 16 fasteners.
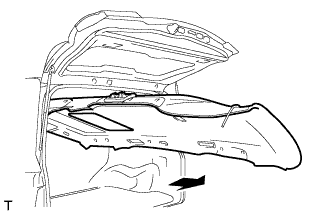
Remove the headlining from the rear of the vehicle as shown in the illustration.
NOTICE:
Be careful not to damage the roof headlining when taking it out.
46.
REMOVE FRONT ROOF SIDE RAIL GARNISH LH
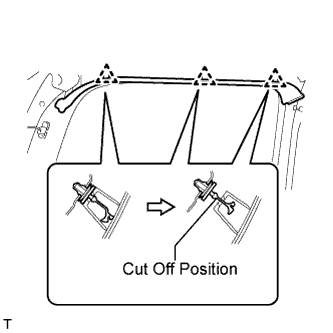
Detach the 3 clips.
Cut off the 3 clips and remove the roof side rail garnish.
Remove 3 clips from the vehicle body.
47.
REMOVE FRONT ROOF SIDE RAIL GARNISH RH
HINT:
Use the same procedures described for the LH side.
48.
REMOVE FRONT DOOR OPENING TRIM WEATHERSTRIP LH
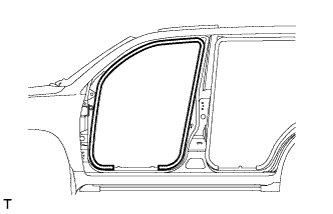
Remove the front door opening trim weatherstrip.
49.
REMOVE FRONT DOOR OPENING TRIM WEATHERSTRIP RH
HINT:
Use the same procedures described for the LH side.
50.
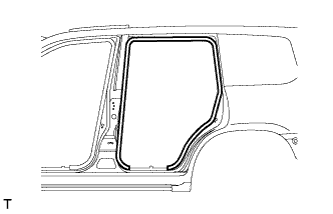
REMOVE REAR DOOR OPENING TRIM WEATHERSTRIP LH
Remove the rear door opening trim weatherstrip.
51.
REMOVE REAR DOOR OPENING TRIM WEATHERSTRIP RH
HINT:
Use the same procedures described for the LH side.
52.
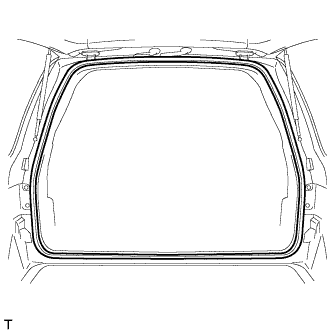
REMOVE BACK DOOR WEATHERSTRIP
Remove the back door weatherstrip.
53.
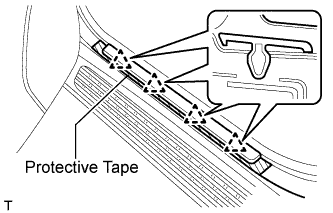
REMOVE FRONT DOOR SCUFF PLATE OUTSIDE LH
Put protective tape around the front door scuff plate outside.
Detach the 4 clips and remove the front door scuff plate outside.
54.
REMOVE FRONT DOOR SCUFF PLATE RH
HINT:
Use the same procedures described for the LH side.
55.
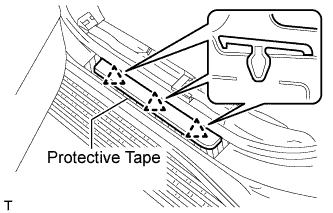
REMOVE REAR DOOR SCUFF PLATE OUTSIDE LH
Put protective tape around the rear door scuff plate outside.
Detach the 3 clips and remove the rear door scuff plate outside.
56.
REMOVE REAR DOOR SCUFF PLATE OUTSIDE RH
HINT:
Use the same procedures described for the LH side.
57.
REMOVE FRONT SHOULDER BELT ANCHOR PLATE SUB-ASSEMBLY LH
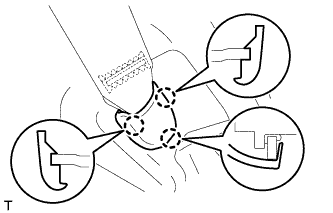
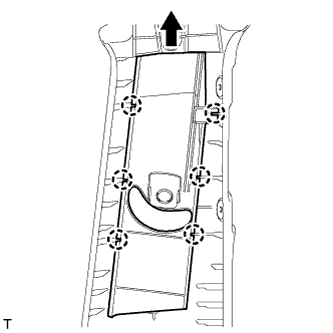
Detach the 6 claws of the plate, and slide the plate in the direction of the arrow to remove it.
58.
REMOVE FRONT SHOULDER BELT ANCHOR PLATE SUB-ASSEMBLY RH
HINT:
Use the same procedures described for the LH side.
59.
REMOVE REAR SHOULDER BELT ANCHOR PLATE SUB-ASSEMBLY LH
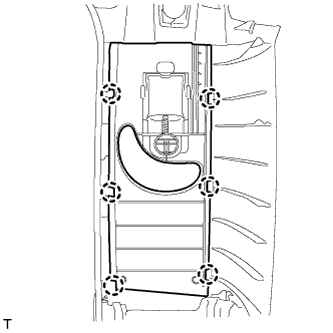
Detach the 6 claws and remove the plate.
60.
REMOVE REAR SHOULDER BELT ANCHOR PLATE SUB-ASSEMBLY RH
HINT:
Use the same procedures described for the LH side.
61.
REMOVE ROOF SIDE INNER GARNISH COVER LH (w/ Rear No. 2 Seat, except Face to Face Seat Type)
Detach the 7 claws and remove the cover.
62.
REMOVE ROOF SIDE INNER GARNISH COVER RH (w/ Rear No. 2 Seat, except Face to Face Seat Type)
HINT:
Use the same procedures described for the LH side.
63.
REMOVE REAR SEAT SHOULDER BELT HANGER (w/ Rear No. 2 Seat, except Face to Face Seat Type)
HINT:
Use the same procedure to remove the hanger on the other side.
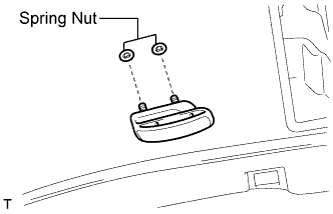
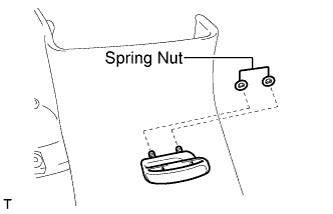
Remove the 2 spring nuts and hanger.
64.
REMOVE REAR NO. 2 SEAT SHOULDER BELT HANGER LH
Remove the 2 spring nuts and hanger.
65.
REMOVE REAR NO. 2 SEAT SHOULDER BELT HANGER RH
HINT:
Use the same procedures described for the LH side.
66.
REMOVE QUARTER TRIM COVER SUB-ASSEMBLY LH
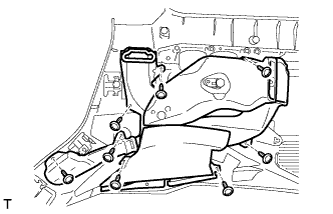
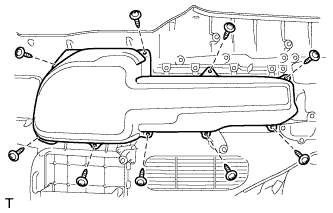
w/ Rear Heater: Remove the 8 screws and duct.
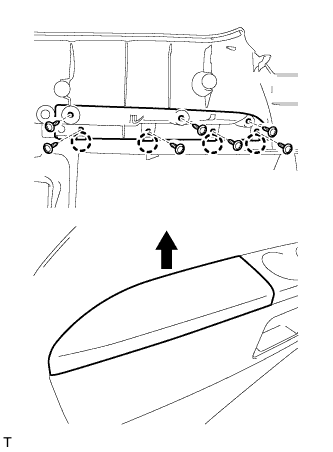
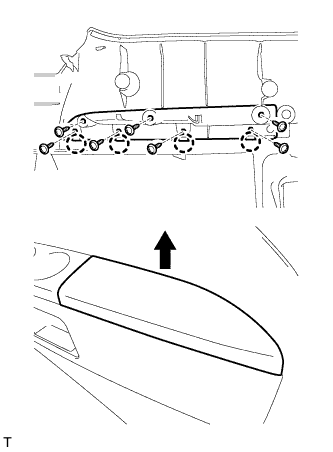
Remove the 7 screws.
Detach the 4 claws and remove the quarter trim cover.
67.
REMOVE QUARTER TRIM COVER SUB-ASSEMBLY RH
Remove the 7 screws.
Detach the 4 claws and remove the quarter trim cover.
68.
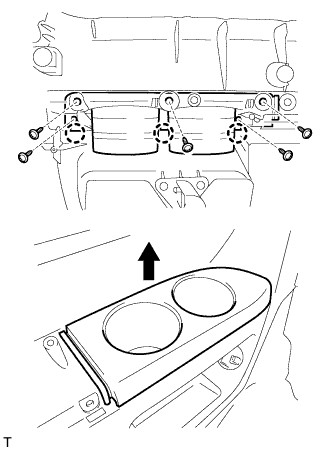
REMOVE NO. 2 CUP HOLDER
Remove the 5 screws.
Detach the 3 claws and remove the cup holder.
69.
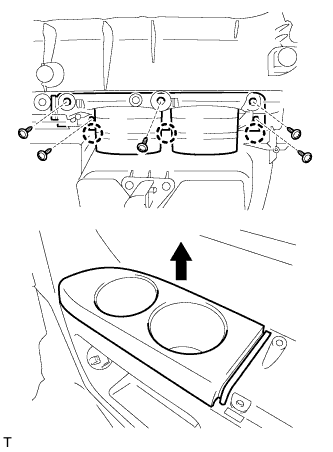
REMOVE NO. 1 CUP HOLDER
Remove the 5 screws.
Detach the 3 claws and remove the cup holder.
70.
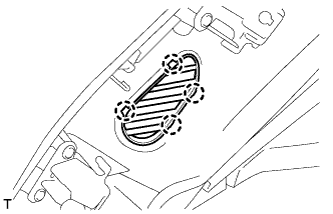
REMOVE NO. 1 SIDE TRIM BASE COVER LH (w/ Rear Heater)
Detach the 4 claws and remove the cover.
71.
REMOVE NO. 1 SIDE TRIM BASE COVER RH (w/ Rear Heater)
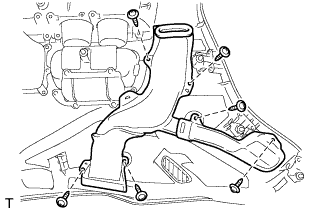
Remove the 6 screws and duct.
Detach the 4 claws and remove the cover.
72.
REMOVE NO. 2 SIDE TRIM BASE COVER LH (w/ Rear Heater)
Detach the 4 claws and remove the cover.
73.
REMOVE NO. 2 SIDE TRIM BASE COVER RH (w/ Rear Heater)
HINT:
Use the same procedures described for the LH side.
74.
REMOVE REAR SEAT LOCK CONTROL LEVER SUB-ASSEMBLY LH (w/ Rear No. 2 Seat, except Face to Face Seat Type)
Detach the 4 claws and remove the seat lock control lever.
75.
REMOVE REAR SEAT LOCK CONTROL LEVER SUB-ASSEMBLY RH (w/ Rear No. 2 Seat, except Face to Face Seat Type)
HINT:
Use the same procedures described for the LH side.
76.
REMOVE REAR NO. 2 SEAT COVER BEZEL (w/ Rear No. 2 Seat, except Face to Face Seat Type)
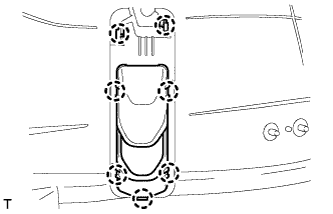
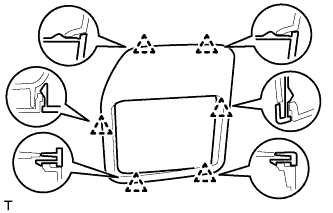
Detach the 6 clips and remove the rear No. 2 seat cover bezel.
77.
REMOVE REAR NO. 1 SEAT COVER BEZEL (w/ Rear No. 2 Seat, except Face to Face Seat Type)
HINT:
Use the same procedures described for the rear No. 2 seat cover bezel.
78.
REMOVE QUARTER TRIM COVER LH (w/o Rear No. 2 Seat or w/ Rear No. 2 Seat, for Face to Face Seat Type)
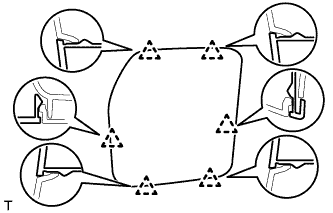
Detach the 6 clips and remove the quarter trim cover.
79.
REMOVE QUARTER TRIM COVER RH (w/o Rear No. 2 Seat or w/ Rear No. 2 Seat, for Face to Face Seat Type)
HINT:
Use the same procedures described for the LH side.