INSTALLATION
Removal / installation · Vehicles built Sep 2011 – Dec 2011
Versions by build date: Sep 2011 – Dec 2011 from Jan 2012
| 1. INSTALL POWER STEERING OIL PRESSURE SWITCH |

Install a new O-ring to the oil pressure switch.
Apply a light coat of engine oil to the O-ring of the oil pressure switch.
Using a 19 mm deep socket wrench, install the oil pressure switch.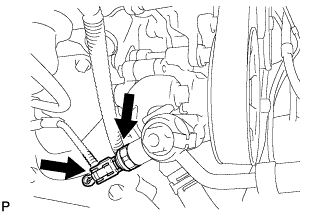

- Torque:
- 21 N*m{ 210 kgf*cm , 15 ft.*lbf }
- NOTICE:
- Do not allow foreign matter to contact the oil seal face of the power steering oil pressure switch (connecting surface with pressure feed tube).
- Be careful not to damage the O-ring when installing the power steering oil pressure switch
- Do not allow foreign matter to contact the oil seal face of the power steering oil pressure switch (connecting surface with pressure feed tube).
Connect the oil pressure switch connector.
| 2. INSTALL FAN & GENERATOR V BELT |
While turning the belt tensioner counterclockwise, align the holes, and then insert a bar of φ6 mm (0.236 in.) into the holes to fix the belt tensioner in place.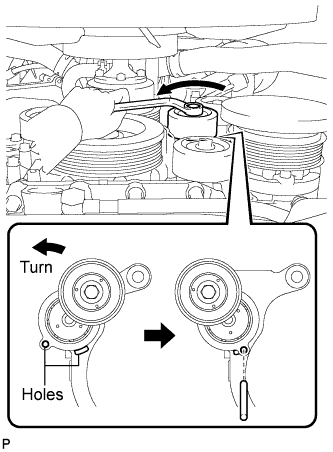
Install the fan and generator V belt.
- HINT:
-
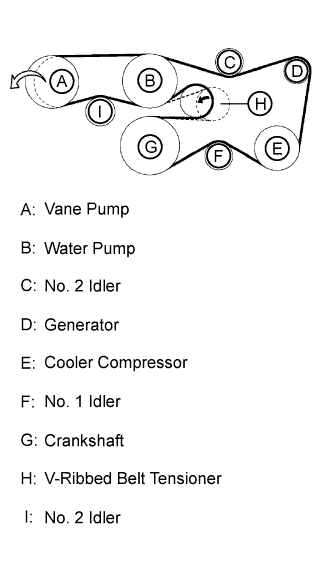
- If it is hard to install the fan and generator V belt, perform the following procedures.
- Put the fan and generator V belt on all parts except the vane pump, as shown in the illustration.
- While releasing the belt tension by turning the belt tensioner counterclockwise, put the fan and generator V belt on the vane pump.
- Put the fan and generator V belt on all parts except the vane pump, as shown in the illustration.
While turning the belt tensioner counterclockwise, remove the bar.
| 3. INSTALL NO. 2 AIR CLEANER HOSE |
Align the protrusion of the pre-cleaner with the groove of the No. 2 air cleaner hose as shown in the illustration.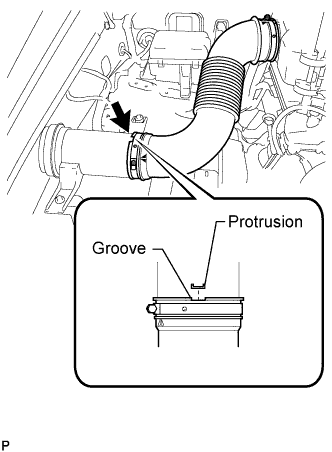
Tighten the 2 hose clamps.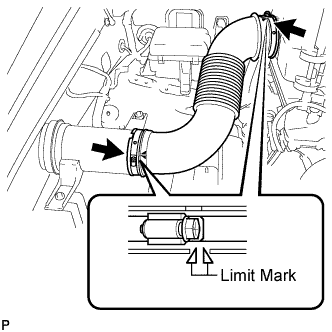
- Torque:
- 4.0 N*m{ 41 kgf*cm , 35 in.*lbf }
- HINT:
- Tighten the clamp until the end of the clamp band is within both limit marks.
| 4. ADD POWER STEERING FLUID |
| 5. INSPECT FOR POWER STEERING FLUID LEAK |
| 6. BLEED POWER STEERING FLUID |
Check the fluid level.
Jack up the front of the vehicle and support it with stands.
Turn the steering wheel.
With the engine stopped, turn the wheel slowly from lock to lock several times.
Lower the vehicle.
Start the engine.
Idle the engine for a few minutes.
Turn the steering wheel.
With the engine idling, turn the wheel left or right to the full lock position and keep it there for 2 to 3 seconds, then turn the wheel to the opposite full lock position and keep it there for 2 to 3 seconds. *1
Repeat *1 several times.
- NOTICE:
- For vehicles with VGRS, if the steering wheel is turned from lock to lock repeatedly, the system may stop operating and the amount of rotation before the steering wheel locks may increase due to operation of the overheating prevention function. When the system temperature drops, the system operation automatically returns to normal.
Stop the engine.
Check for foaming or emulsification.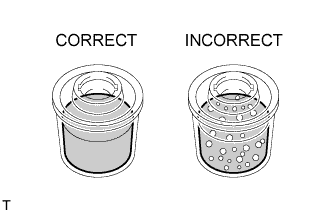
If the system has to be bled twice because of foaming or emulsification, check for fluid leaks in the system.
Check the fluid level.
| 7. INSTALL NO. 1 ENGINE UNDER COVER SUB-ASSEMBLY |
Install the engine under cover with the 10 bolts.
- Torque:
- 29 N*m{ 296 kgf*cm , 21 ft.*lbf }
| 8. INSTALL FRONT FENDER SPLASH SHIELD SUB-ASSEMBLY LH |
 |
Remove the 3 bolts and screw.
Turn the clip indicated by the arrow in the illustration to remove the fender splash shield.
| 9. INSTALL FRONT FENDER SPLASH SHIELD SUB-ASSEMBLY RH |
- HINT:
- Use the same procedures described for the LH side.
| 10. INSTALL V-BANK COVER |
Install the V-bank cover with the 2 cap nuts.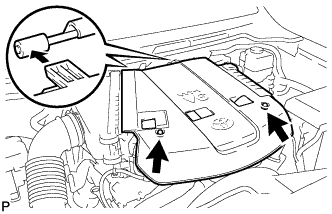
- Torque:
- 7.5 N*m{ 76 kgf*cm , 66 in.*lbf }