REMOVAL
Removal / installation · Vehicles built Sep 2011 – Dec 2011
Versions by build date: Sep 2011 – Dec 2011 from Jan 2012
| 1. DISCONNECT CABLE FROM NEGATIVE BATTERY TERMINAL |

- CAUTION:
- Wait at least 90 seconds after disconnecting the cable from the negative (-) battery terminal to disable the SRS system.
- NOTICE:
- After the engine switch is turned off, the navigation system requires approximately 90 seconds to record various types of memory and settings. As a result, after turning the engine switch off, wait 90 seconds or more before disconnecting the cable from the negative (-) battery terminal.
- When disconnecting the cable, some systems need to be initialized after the cable is reconnected (Click here).
- After the engine switch is turned off, the navigation system requires approximately 90 seconds to record various types of memory and settings. As a result, after turning the engine switch off, wait 90 seconds or more before disconnecting the cable from the negative (-) battery terminal.
| 2. REMOVE NO. 2 INSTRUMENT PANEL FINISH PANEL CUSHION |
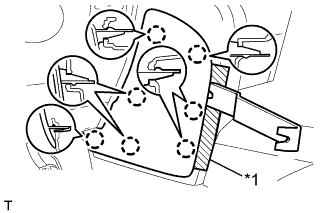  |
Put protective tape around the No. 2 instrument panel finish panel cushion.
Text in Illustration *1
Protective Tape
Using a moulding remover, detach the 7 claws and remove the No. 2 instrument panel finish panel cushion.
| 3. REMOVE LOWER INSTRUMENT PANEL PAD SUB-ASSEMBLY LH |
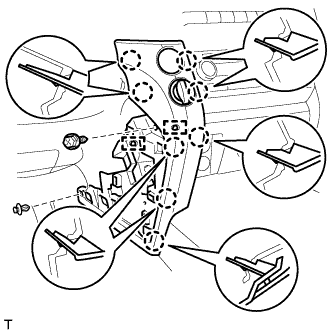 |
Remove the clip and screw.
Detach the 8 claws.
Disconnect the connectors, detach the 2 clamps and remove the lower instrument panel pad sub-assembly.
| 4. REMOVE NO. 1 INSTRUMENT PANEL FINISH PANEL CUSHION |
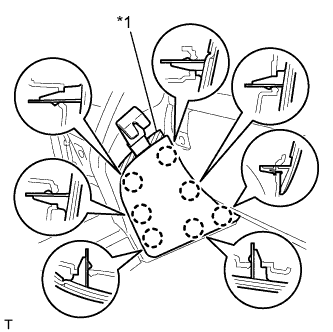 |
Put protective tape around the No. 1 instrument panel finish panel cushion.
Text in Illustration *1
Protective Tape
Using a moulding remover, detach the 7 claws and remove the No. 1 instrument panel finish panel cushion.
| 5. REMOVE LOWER INSTRUMENT PANEL PAD SUB-ASSEMBLY RH |
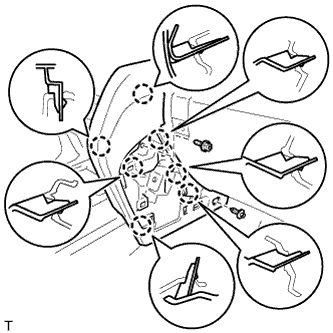 |
Remove the clip and screw.
Detach the 7 claws and remove the lower instrument panel pad sub-assembly.
| 6. REMOVE LOWER CENTER INSTRUMENT CLUSTER FINISH PANEL SUB-ASSEMBLY |
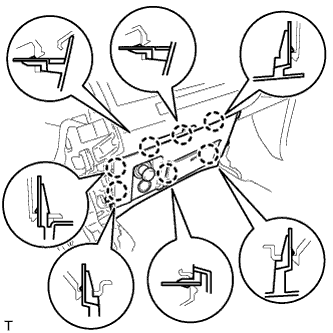 |
Detach the 7 claws.
Disconnect the connectors and remove the lower center instrument cluster finish panel sub-assembly.
| 7. REMOVE INSTRUMENT SIDE PANEL LH |
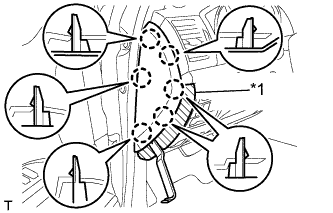 |
Place protective tape as shown in the illustration.
Text in Illustration *1
Protective Tape
Using a moulding remover, detach the 6 claws and remove the instrument side panel.
| 8. REMOVE NO. 1 INSTRUMENT CLUSTER FINISH PANEL GARNISH |
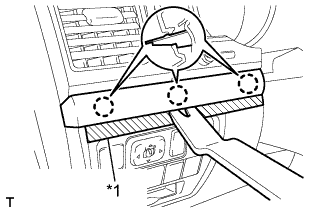 |
Place protective tape as shown in the illustration.
Text in Illustration *1
Protective Tape
Using a moulding remover, detach the 3 claws and remove the No. 1 instrument cluster finish panel garnish.
| 9. REMOVE NO. 2 INSTRUMENT CLUSTER FINISH PANEL GARNISH |
Place protective tape as shown in the illustration.
Using a moulding remover, detach the 2 claws and remove the No. 2 instrument cluster finish panel garnish.
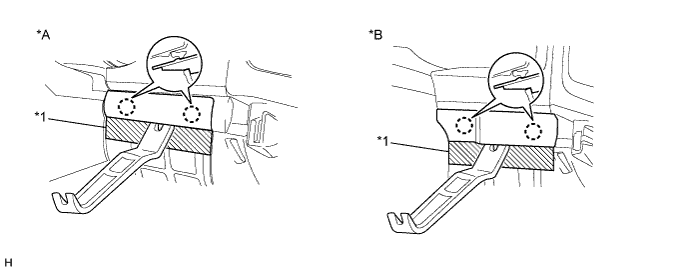
Text in Illustration *A
w/ Entry and Start System
*B
w/o Entry and Start System
*1
Protective Tape
-
-
| 10. REMOVE FRONT DOOR SCUFF PLATE LH |
- HINT:
- Use the same procedures described for the LH side.
| 11. REMOVE NO. 1 INSTRUMENT PANEL UNDER COVER SUB-ASSEMBLY (w/ Floor Under Cover) |
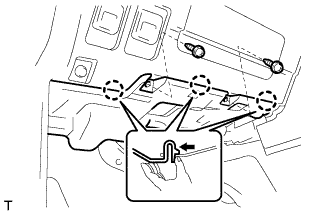 |
Remove the 2 screws.
Detach the 3 claws.
Disconnect the connectors and remove the No. 1 instrument panel under cover.
| 12. REMOVE COWL SIDE TRIM BOARD LH |
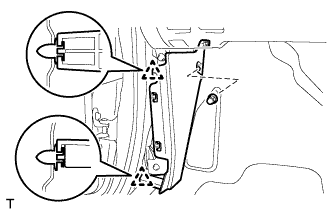 |
Remove the cap nut.
Detach the 2 clips and remove the cowl side trim board.
| 13. REMOVE LOWER NO. 1 INSTRUMENT PANEL FINISH PANEL |
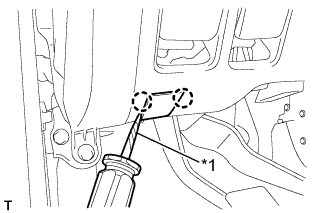 |
Using a screwdriver, detach the 2 claws and open the hole cover.
- HINT:
- Tape the screwdriver tip before use.
Text in Illustration *1
Protective Tape
w/ Driver Side Knee Airbag:
Remove the 2 bolts.
Detach the 16 claws.
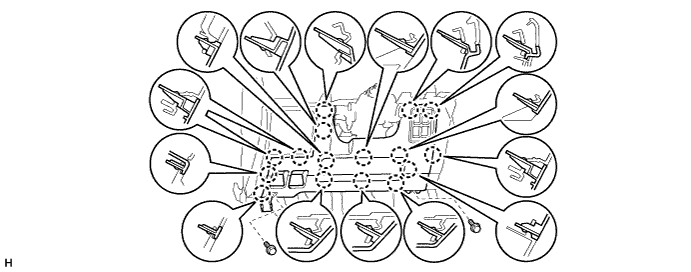
w/o Driver Side Knee Airbag:
Remove the 2 bolts.
Detach the 9 claws.
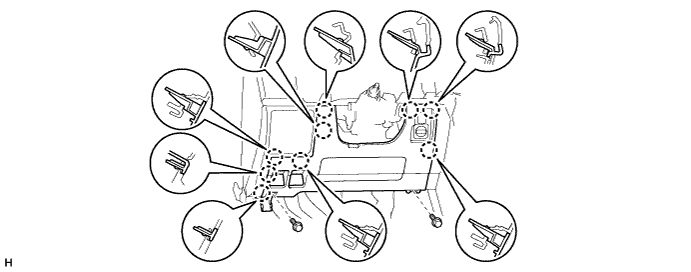
for Automatic Air Conditioning System: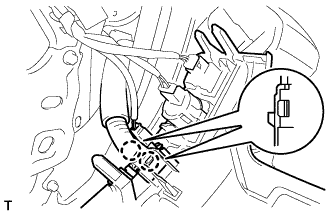
Detach the 2 claws and remove the room temperature sensor.
Detach the 2 claws and disconnect the 2 control cables.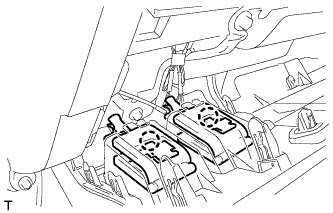
Disconnect the connectors and remove the lower No. 1 instrument panel finish panel.
| 14. REMOVE NO. 1 SWITCH HOLE BASE |
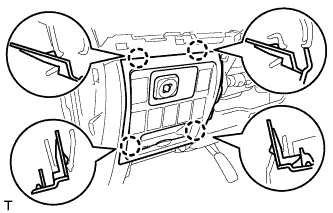 |
Detach the 4 claws.
Disconnect the connectors and remove the No. 1 switch hole cover.
| 15. REMOVE DRIVER SIDE KNEE AIRBAG ASSEMBLY (w/ Driver Side Knee Airbag) |
Remove the 5 bolts and driver side knee airbag.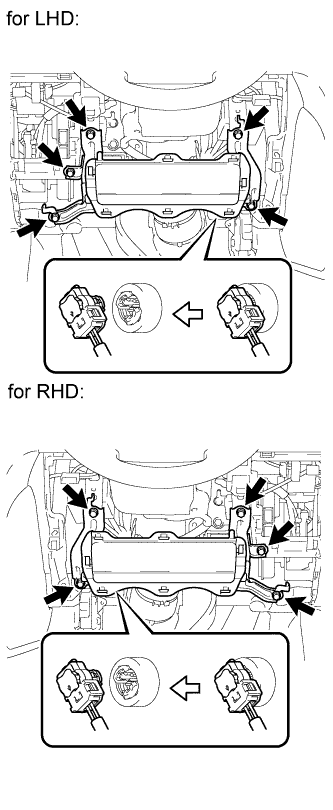
Disconnect the connector.
- NOTICE:
- When handling the airbag connector, take care not to damage the airbag wire harness.
| 16. REMOVE LOWER INSTRUMENT PANEL SUB-ASSEMBLY (w/o Driver Side Knee Airbag) |
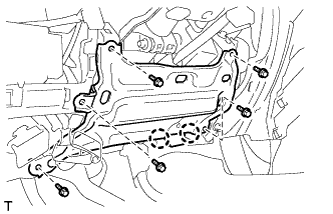 |
Detach the 2 claws and disconnect the DLC3.
Remove the 5 bolts and lower instrument panel.
| 17. REMOVE STEERING CONTROL ECU WITH JUNCTION BLOCK |
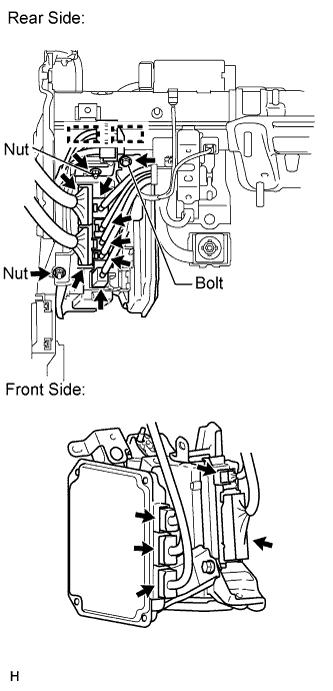 |
Rear Side:
Disconnect the 7 connectors.
Detach the 2 clamps.
Remove the bolt and 2 nuts.
Front Side:
Disconnect the 5 connectors.
Remove the steering control ECU with junction block.
| 18. REMOVE STEERING CONTROL ECU |
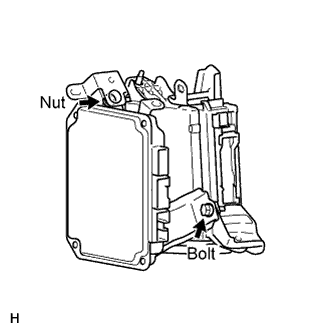
Remove the bolt, nut and steering control ECU from the junction block.