Dimmer Signal Circuit
Circuit diagnosis · Vehicles built from Jan 2012
Versions by build date: Sep 2011 – Dec 2011 from Jan 2012
DESCRIPTION
The radio receiver assembly uses this circuit to communicate with the main body ECU (cowl side junction block LH) via a direct line. The main body ECU (cowl side junction block LH) uses this circuit to send an auto dimmer signal to the radio receiver assembly. The main body ECU (cowl side junction block LH) detects the position of the light control switch according to the resistance. When the light control switch is set to the head/tail position, the resistance between the head/tail terminal and body ground is below 1 Ω. When the light control switch is set to the head/tail position, the main body ECU (cowl side junction block LH) sends an auto dimmer signal to the radio receiver assembly. When the radio receiver assembly receives an auto dimmer signal from the main body ECU (cowl side junction block LH), the radio receiver assembly causes instrument panel illumination to be dimmed.WIRING DIAGRAM
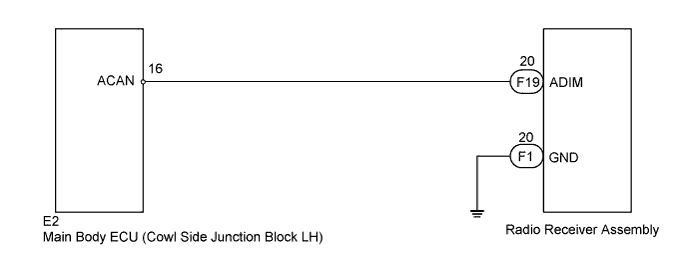

INSPECTION PROCEDURE
| 1. INSPECT MAIN BODY ECU (COWL SIDE JUNCTION BLOCK LH) |

Disconnect the F19 radio receiver assembly connector.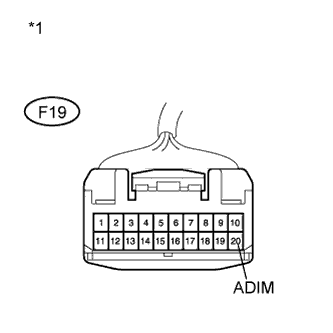
Measure the voltage according to the value(s) in the table below.
- Standard Voltage:
Tester Connection
Switch Condition
Specified Condition
F19-20 (ADIM) - Body ground
Engine switch on (IG), automatic light control sensor covered by hand, and light control switch tail or head position
11 to 14 V
Text in Illustration *1
Front view of wire harness connector
(to Radio Receiver Assembly)
|
|
||||

| OK | |
 |
| 2. INSPECT RADIO RECEIVER ASSEMBLY |
Disconnect the F1 radio receiver assembly connector.
Measure the resistance according to the value(s) in the table below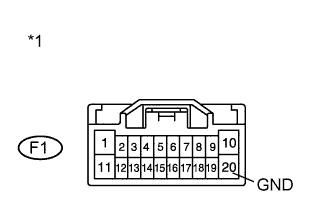
- Standard Resistance:
Tester Connection
Condition
Specified Condition
F1-20 (GND) - Body ground
Always
Below 1 Ω
Text in Illustration *1
Front view of wire harness connector
(to Radio Receiver Assembly)
|
|
||||

| OK | ||
 |
||
| ||
| 3. CHECK HARNESS AND CONNECTOR (RADIO RECEIVER ASSEMBLY - MAIN BODY ECU) |
Disconnect the F19 radio receiver assembly and E2 main body ECU (cowl side junction block LH) connectors.
Measure the resistance according to the value(s) in the table below.
- Standard Resistance:
Tester Connection
Condition
Specified Condition
E2-16 (ACAN) - F19-20 (ADIM)
Always
Below 1 Ω
F19-20 (ADIM) - Body ground
Always
10 kΩ or higher
|
|
||||
| OK | ||
|
||
| ||