BODY PANEL ROOF PANEL ASSEMBLY REPLACEMENT
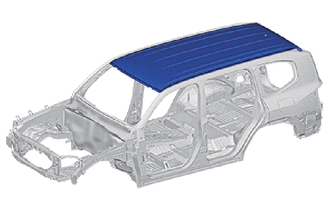
Work procedures for replacement of Aluminum Roof Panel
REMOVE ALUMINUM ROOF PANEL
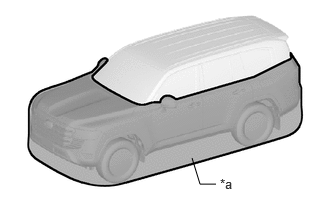
| *a | Protective Cover |
Vehicle protection
In order to prevent aluminum dust, etc. from becoming attached, protect the outer panels and the entire interior by covering them with a protective cover.
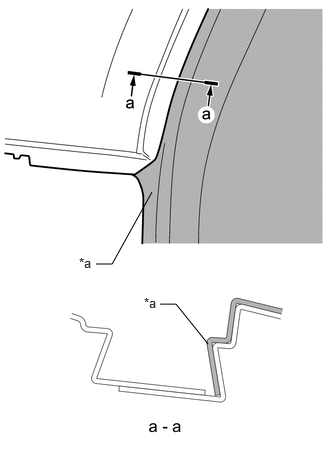
| *a | Masking |
Mask the outer panels including surfaces of the left and right roof side rails.
Remove the RPW.
Using a belt sander, shave down the RPWs.
- NOTICE:
-
Do not shave down all the way to the lower panel.
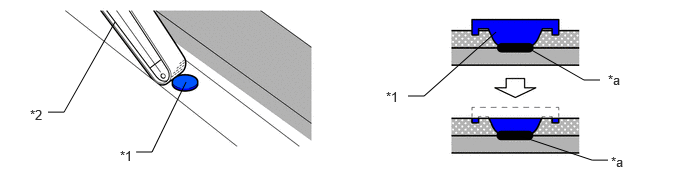
| *1 | RPW | *2 | Belt Sander |
| *a | Welding Part | - | - |
Using a chisel, etc., disconnect the contact surfaces.
- HINT:
-
RPW installation area. (EASW may be used.)
-
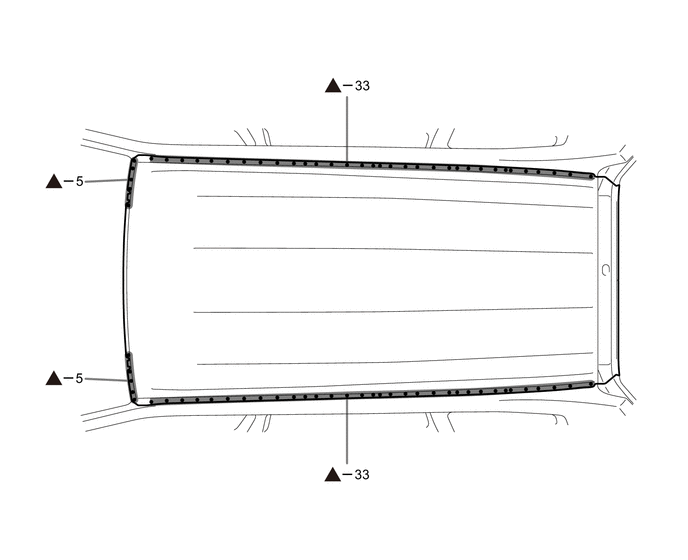 0,0 0,0 false

RPW - -
Remove the EASW.
Using a belt sander, shave down the EASWs.
- NOTICE:
-
Do not shave down all the way to the lower panel.
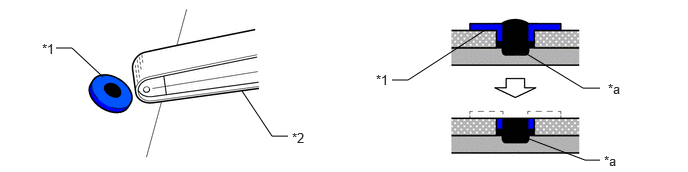
| *1 | EASW | *2 | Belt Sander |
| *a | Welding Part | - | - |
Remove the SPR.
Using a belt sander, remove the SPR protrusions from the interior and smooth the surface.
Using a drill, drill the centers of the SPRs.
- NOTICE:
-
Drills of different sizes may be required depending on the location.
Using a punch, remove the SPRs.
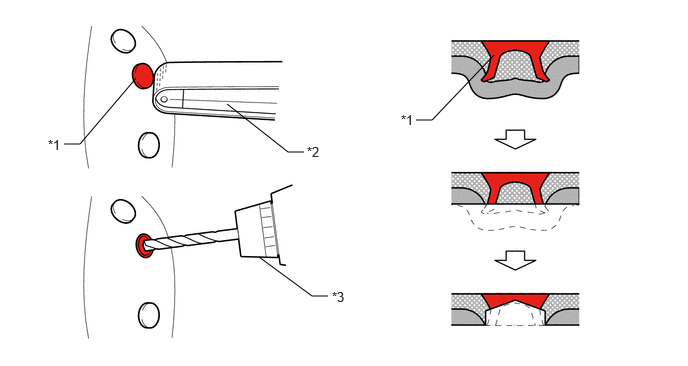
| *1 | SPR | *2 | Belt Sander |
| *3 | Drill | - | - |
- HINT:
-
SPR Installation Area and Drill Sizes
-
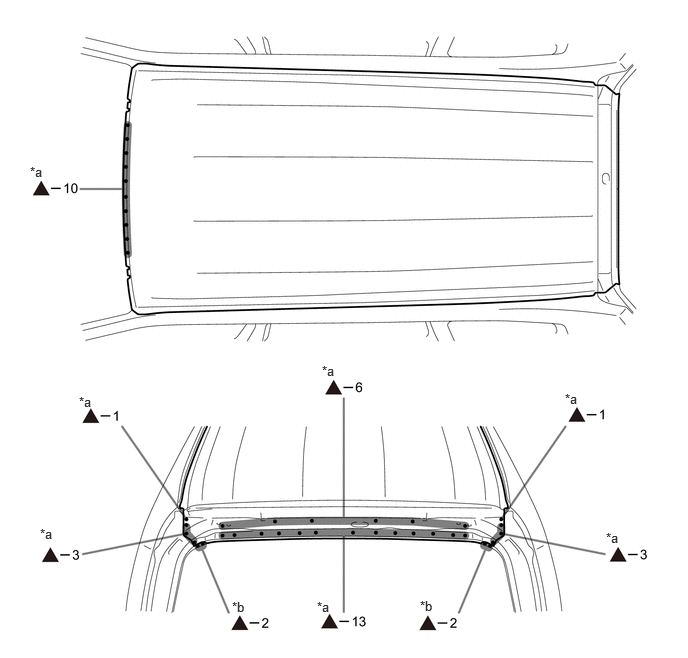 0.313,1.708 0.625,1.865 0.313,0.156 10 false *a 4.375,6.229 4.688,6.385 0.313,0.156 10 false *b 2.417,6.24 2.729,6.396 0.313,0.156 10 false *b 0.417,5.479 0.729,5.635 0.313,0.156 10 false *a 5.885,4.073 6.198,4.229 0.313,0.156 10 false *a 3.354,3.781 3.667,3.938 0.313,0.156 10 false *a 0.823,4.104 1.135,4.26 0.313,0.156 10 false *a 6.313,5.521 6.625,5.677 0.313,0.156 10 false *a 3.302,6.24 3.615,6.396 0.313,0.156 10 false *a
*a 6.5 mm diameter holes (Drill Sizes) *b 5.5 mm diameter holes (Drill Sizes)
SPR - -
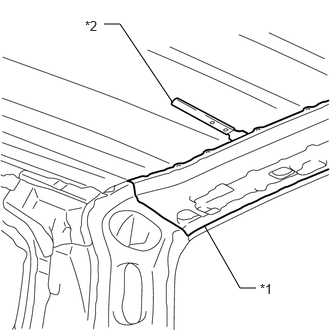
| *1 | BACK DOOR OPENING FRAME |
| *2 | Scraper |
Separate the mastic sealer.
Separate the mastic sealer between the windshield header panel and the aluminum roof panel using a scraper or an equivalent tool.
Separate the mastic sealer between the dome lamp bracket and the aluminum roof panel using a scraper or an equivalent tool. (for Standard Roof)
Separate the mastic sealer between the back door opening frame and the aluminum roof panel using a scraper or an equivalent tool.
- HINT:
-
Mastic sealer application areas.
-
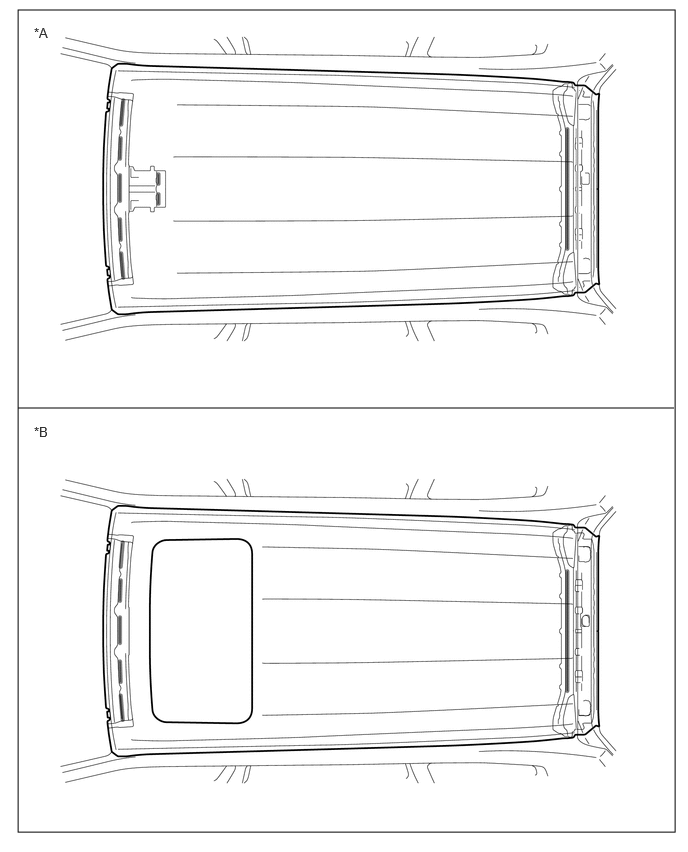 0.188,0.104 7.031,8.667 6.844,8.563 0.188,4.25 7.021,4.25 false 0.354,0.26 0.667,0.417 0.313,0.156 10 false *A 0.354,4.417 0.667,4.573 0.313,0.156 10 false *B
*A for Standard Roof *B for Sliding Roof
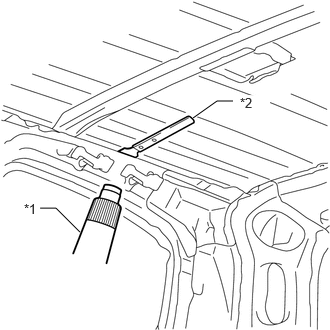
| *1 | Industrial Heater Gun |
| *2 | Scraper |
Separate the adhesive.
While heating the flange area of the aluminum roof panel and the roof side rail using an industrial heater gun from the inside, separate the adhesive using a scraper or an equivalent tool.
- NOTICE:
-
The scraper is used for inserting only. Do not use it for prying.
While heating the flange area of the aluminum roof panel and the back door opening reinforcement using an industrial heater gun from the inside, separate the adhesive using a scraper or an equivalent tool.
- HINT:
-
Use an industrial heater gun (160 to 200 °C) to apply heat.
- HINT:
-
Adhesive application areas.
-
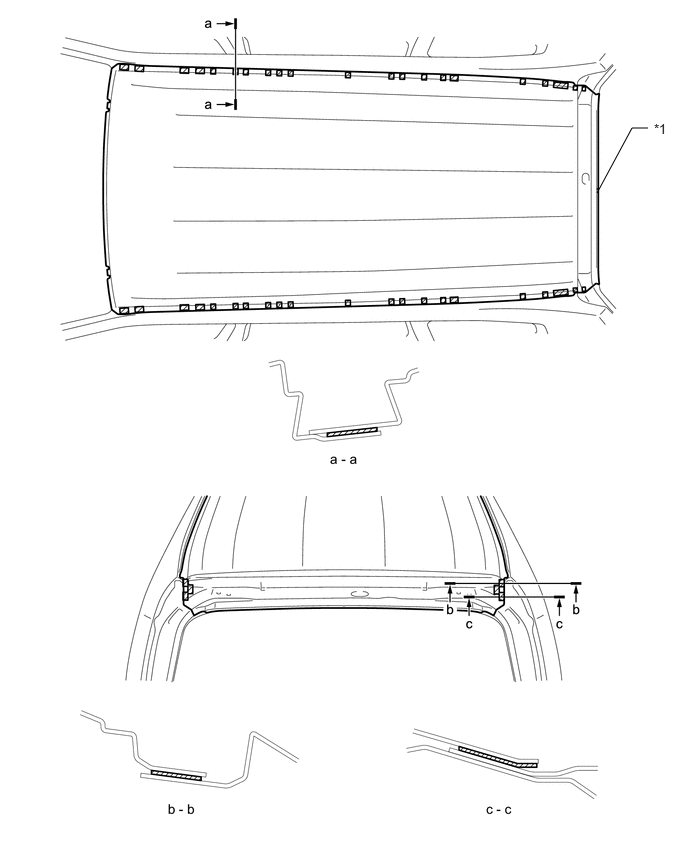 6.219,2.01 6.583,1.333 6.583,1.333 6.75,1.333 false 6.813,1.26 7.125,1.417 0.313,0.156 10 false *1
*1 Aluminum Roof Panel - - 
Adhesive - -
Separate the foamed sealing material.
Separate the foamed sealing material between the windshield header panel and the aluminum roof panel using a scraper or an equivalent tool. (See the painting/coating)
INSTALLATION OF ALUMINUM ROOF PANEL
Mark the installation locations.
Mark the protective masking tape, etc. to indicate welding spots and areas where adhesive was applied.
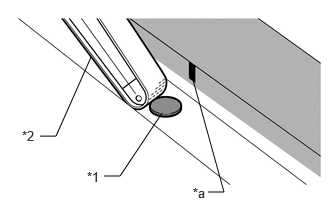
| *1 | Weld Marks |
| *2 | Belt Sander |
| *a | Marking |
Remove the weld marks.
Using a belt sander, remove any weld marks remaining on the vehicle.
Using a belt sander, smooth the contact surface.
- NOTICE:
-
Ensure that the thickness is not reduced.
Remove burrs from SPRs.
Using a belt sander, remove burrs.
Remove the adhesive.
Remove the adhesive remaining on the vehicle using a scraper or an equivalent tool while heating with an industrial heater gun.
Remove the mastic sealer.
Remove the mastic sealer remaining on the vehicle using a wire brush.
Remove the foamed sealing material.
Remove the foamed sealing material remaining on the vehicle using a wire brush.
Scuff the adhesive application area.
Scuff the adhesive application area on the vehicle using a belt sander.
Scuff the mastic sealer application area.
Scuff the mastic sealer application area on the vehicle using a wire brush and a sanding paper (#320).
Scuff the foamed sealing material application area.
Scuff the foamed sealing material application area on the vehicle using a wire brush and a sanding paper (#320).
Repair the contact surface on the vehicle.
Repair deformation of the flange area using a wooden hammer and a dolly.
Position the aluminum roof panel.
Temporarily install the new parts and measure each part of the new parts in accordance with the body dimension diagram. (See the body dimensions)
Open 6.5 mm (0.26 in.) diameter holes in 2 points in the blind rivet installation area for positioning.
- NOTICE:
-
Tapping cannot be used to open holes.
Insert the blind rivet as the base pin.
- HINT:
-
Area with Positioning Holes.
-
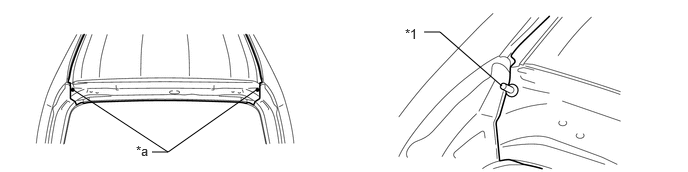 1.583,1.583 1.75,1.583 1.75,1.583 2.667,0.938 false 4.417,0.333 4.583,0.333 4.583,0.333 5.229,0.896 false 1.75,1.583 0.75,0.927 false 4.219,0.271 4.531,0.427 0.313,0.156 10 false *1 1.417,1.49 1.729,1.646 0.313,0.156 10 false *a
*1 Blind Rivet - - *a Area with Holes - -
Mark the locations where holes will be opened in the EASW installation area.
- NOTICE:
-
Do not mark the SPR or blind rivet installation area.
Remove the aluminum roof panel.
Remove the body sealer.
Remove the body sealer remaining on the vehicle using a scraper or an equivalent tool.
Open holes on the aluminum roof panel.
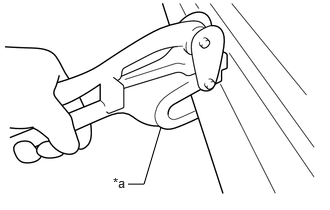
| *a | Puncher (8.5 mm (0.33 in.) diameter holes) |
Using a puncher, open 8.5 mm (0.33 in.) diameter holes in the EASW installation area that was marked.
- HINT:
-
Make sure that the holes are true circles, as deformation in the hole shape could prevent EASW fitting.
- NOTICE:
-
·
Make sure to open holes in the center between the roof rack bracket installation holes. Doing otherwise may prevent the roof rack bracket from being installed.
-
·
Do not open holes in the SPR and blind rivet installation area, as doing so could cause misalignment between the vehicle and hole positions.
-
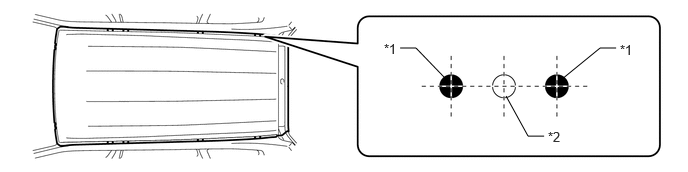 6.417,0.5 6.25,0.5 6.25,0.5 5.854,0.823 false 5.667,1.417 5.5,1.417 5.5,1.417 5.271,1 false 4.635,0.813 4.333,0.5 4.333,0.5 4.167,0.5 false 4,0.427 4.313,0.583 0.313,0.156 10 false *1 5.708,1.344 6.021,1.5 0.313,0.156 10 false *2 6.458,0.438 6.771,0.594 0.313,0.156 10 false *1
*1 Roof Rack Bracket Installation Hole *2 EASW Installation Hole
Scuff, clean and degrease the adhesive application surface.
Using sandpaper(#320), scuff the adhesive application surface on the aluminum roof panel.
Clean and degrease the adhesive application surface.
Scuff, clean and degrease the primer surfacer application surface.
Using sandpaper(#320), scuff the primer surfacer application surface on the aluminum roof panel.
Clean and degrease the primer surfacer application surface.
Clean and degrease the adhesive and body sealer application surfaces on the vehicle.
Clean and degrease the adhesive and body sealer application areas.
Apply anti-rust treatment.
Apply anti-rust agent to areas of exposed steel plate on the vehicle.
- HINT:
-
Anti-rust agent for welding must used around welded spots.
Apply body sealer.
Apply body sealer to the vehicle side.
- HINT:
-
·
Apply enough body sealer to the panels.
·Body sealer application areas.
-
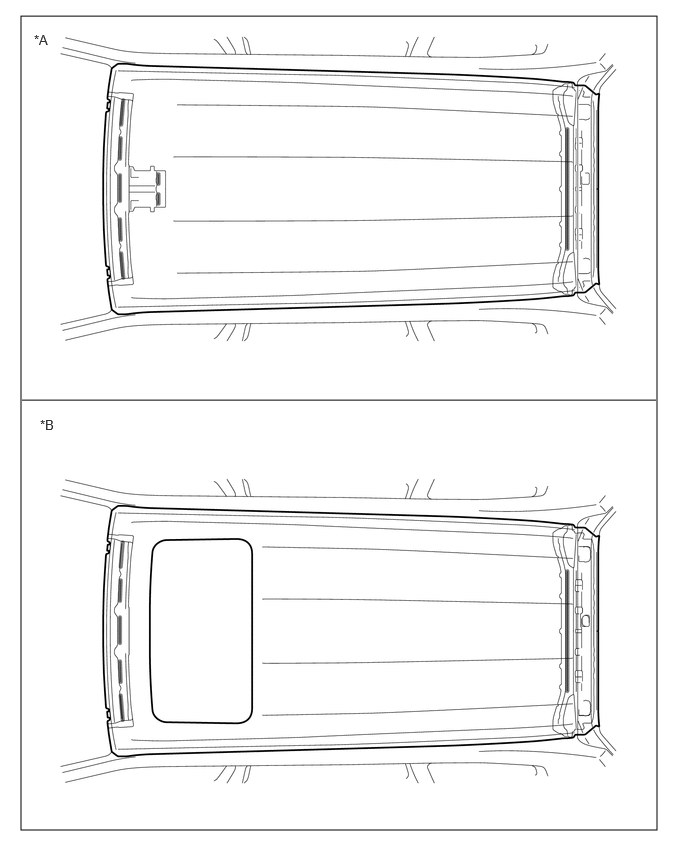 0.219,0.167 6.844,8.646 6.625,8.479 0.229,4.167 6.833,4.167 false 0.354,0.333 0.667,0.49 0.313,0.156 10 false *A 0.417,4.344 0.729,4.5 0.313,0.156 10 false *B
*A for Standard Roof *B for Sliding Roof
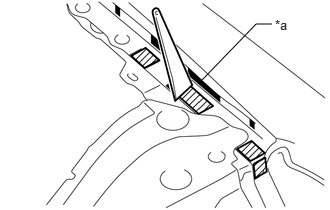
| *a | Marking |
|
|
Adhesive |
Apply adhesive.
Apply adhesive (3MTM AutomixTM Panel Bonding Adhesive #8115) to the bare steel sheet area and use a spatula to make it uniform.
Apply adhesive (3MTM AutomixTM Panel Bonding Adhesive #8115) to the markings on the aluminum roof panel.
- NOTICE:
-
·
Make sure that adhesive does not enter the EASW welding area.
·Remove any adhesive that does enter the EASW welding area.
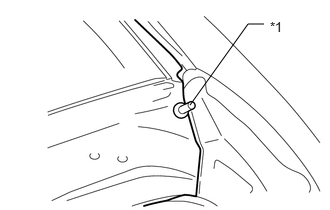
| *1 | Blind Rivet |
Install the aluminum roof panel.
Insert the blind rivet into the blind rivet installation hole opened during positioning.
- NOTICE:
-
Insert the blind rivet only. Do not fasten it.
Use a vise grip on the aluminum roof panel seat to secure the part.
Shape the arc spot nozzle.
- NOTICE:
-
If using a normal nozzle, it must be shaped into an arc spot nozzle. Otherwise, it will not be possible to hold down the element, which could create a gap between the element and panel.
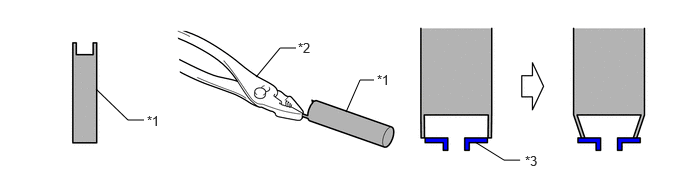
| *1 | Arc Spot Nozzle | *2 | Pliers |
| *3 | Element | - | - |
Using an arc spot nozzle, connect the aluminum roof panel and roof side panel using EASW.
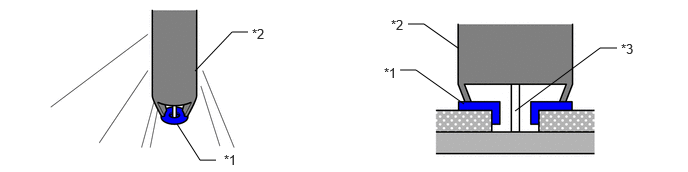
| *1 | EASW | *2 | Arc Spot Nozzle |
| *3 | Wire | - | - |
The following conditions must be met to ensure strength when welding using EASW.
- NOTICE:
-
·
There must be no gap between the element and panel.
·A bead must be formed in the center of the element.
·The element must not burn through.
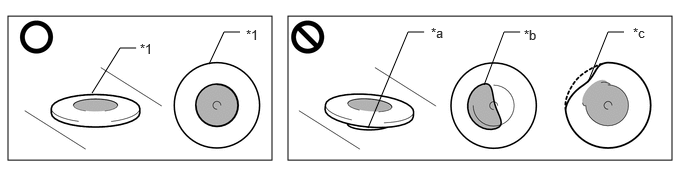
| *1 | EASW | - | - |
| *a | Gap between element and panel | *b | Bead is off-center |
| *c | Element has burnt through | - | - |
- HINT:
-
·
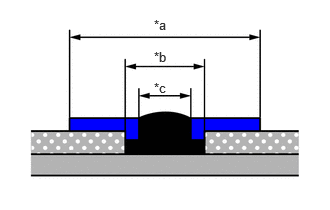 1.604,0.177 1.917,0.333 0.313,0.156 10 false *a 1.604,0.51 1.917,0.667 0.313,0.156 10 false *b 1.604,0.833 1.917,0.99 0.313,0.156 10 false *c
*a φ16 (0.63 in.) +/-0.1 *b φ8.5 (0.33 in.) +0 -0.1 *c φ6 (0.24 in.) +/-0.1
EASW Details
·EASW Welding Area
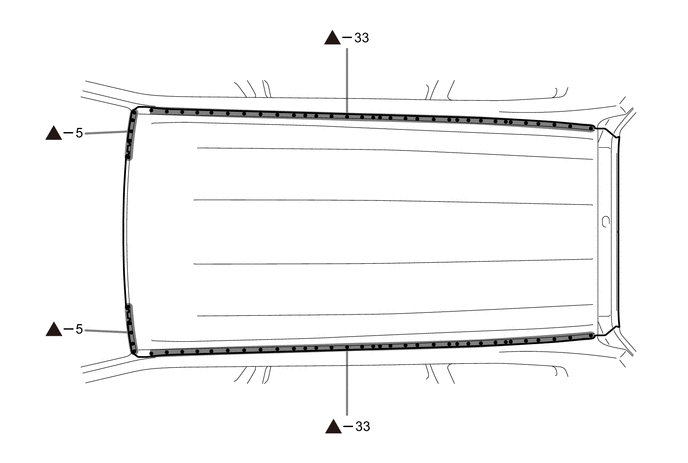 0,0 0,0 false
EASW - -
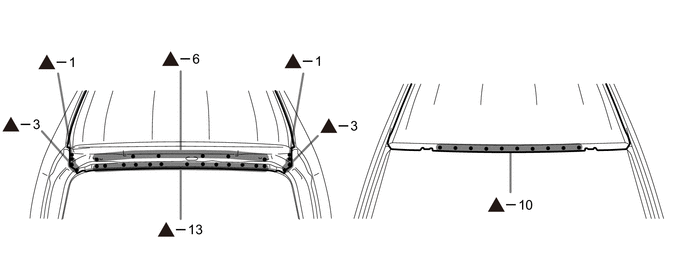
Open a 6.6 mm (0.26 in.) to 7.0 mm (0.28 in.) diameter hole in the blind rivet installation area on the aluminum roof panel.
- HINT:
-
Blind Rivet Installation Area
|
|
Blind Rivet | - | - |
Using a chamfering cutter 120°, taper so that the outer diameter of the taper is 11 mm (0.43 in.) to 12 mm (0.47 in.).
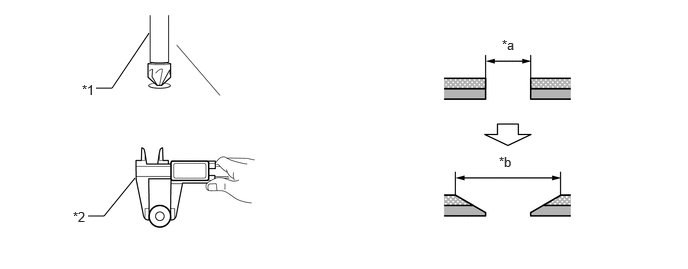
| *1 | Chamfering Cutter 120° | *2 | Vernier Caliper |
| *a | φ6.6 (0.26 in.) to φ7.0 (0.28 in.) | *b | φ11 (0.43 in.) to 12 (0.47 in.) |
Apply anti-rust agent to areas of exposed steel plate after tapering.
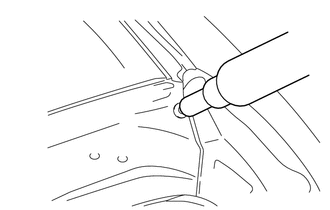
Using a riveter, rivet the blind rivets.
- NOTICE:
-
Blind rivets must not protrude from the surface of the aluminum roof panel.
- HINT:
-
Recommended riveter
-
Pull force: 15.3 kN (0.5 MPa) or more
-
Stroke: 26 mm (1.02 in.) or more
-
Corresponding rivet diameter: φ6.4 (0.25 in.)
The mandrel will interfere with the headlining. Remove it using a punch after riveting the blind rivet indicated with a *a in the illustration.
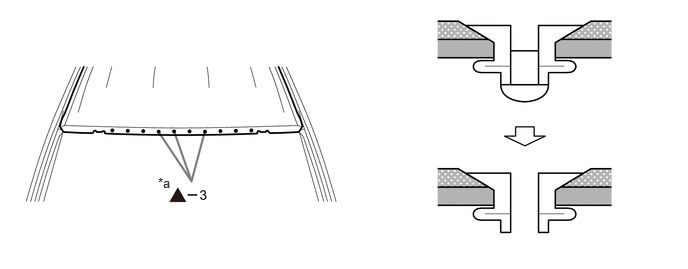
| *a | Repair of the blind rivet installation area | - | - |
|
|
Blind Rivet | - | - |
Open a 5.5 mm diameter hole in the SPR installation area on the aluminum roof panel.
- HINT:
-
SPR Installation Area
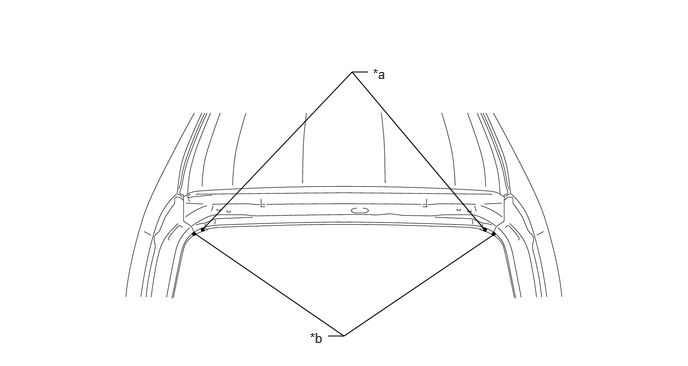
| *a | 90267-05004 | *b | 90267-05002 |
Using a clamping riveter, fasten the SPRs.
- HINT:
-
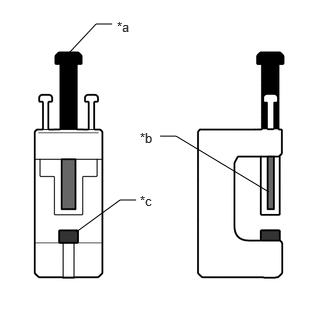 0.698,0.573 1,0.25 1,0.25 1.167,0.25 false 2.802,2 1.833,1.417 1.833,1.417 1.667,1.417 false 0.792,2.417 1.25,2.083 1.25,2.083 1.417,2.083 false 1.219,0.198 1.531,0.354 0.313,0.156 10 false *a 1.458,1.354 1.771,1.51 0.313,0.156 10 false *b 1.458,2.01 1.771,2.167 0.313,0.156 10 false *c
*a Clamping Bolt *b Nose Insert *c φ5 (0.20 in.) Dice
-
Clamping Riveter Part Names
- HINT:
-
Clamping riveter usage method
-
1.
Insert the SPR into the through hole of φ5.5 (0.22 in.) from the aluminum roof panel side.
2.Tighten the clamping bolt until it touches the collar.
3.Using a torque wrench, tighten the clamping bolt to the specified torque.
- Specified torque:
-
50 N*m (510 kgf*cm, 37 ft.*lbf)
- NOTICE:
-
Tighten the torque of 60 N*m (612 kgf*cm, 44 ft.*lbf) or more may damage the clamping riveter.
4.Remove the clamping riveter.
5.Check that the SPR does not protrude from the surface of the aluminum roof panel.
6.If it does protrude, use the clamping riveter once again to tighten it to the point where it is flush.
-
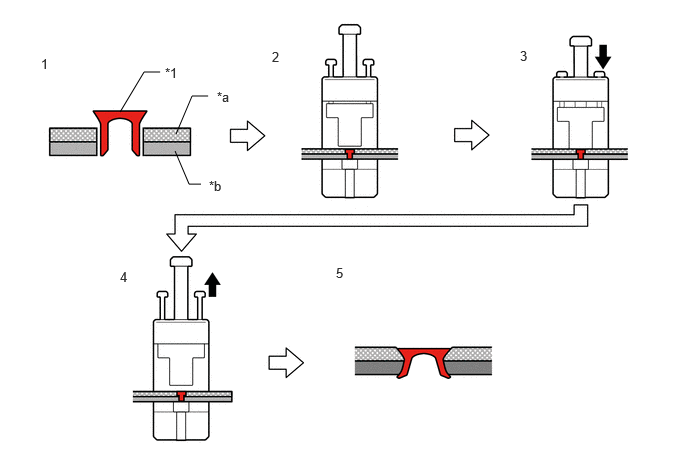 1.823,1.573 1.969,1.917 1.969,1.917 2.094,1.917 false 1.833,1.396 2,1 2,1 2.167,1 false 1.25,1.167 1.5,0.75 1.5,0.75 1.667,0.75 false 0.427,0.583 0.583,0.781 0.156,0.198 10 false 1 2.833,0.51 2.99,0.708 0.156,0.198 10 false 2 5.417,0.5 5.573,0.698 0.156,0.198 10 false 3 1.25,2.802 1.406,3 0.156,0.198 10 false 4 3.5,2.76 3.656,2.958 0.156,0.198 10 false 5 2.26,0.927 2.573,1.083 0.313,0.156 10 false *a 2.177,1.854 2.49,2.01 0.313,0.156 10 false *b 1.719,0.677 2.031,0.833 0.313,0.156 10 false *1
*1 SPR - - *a Upper Panel *b Lower Panel
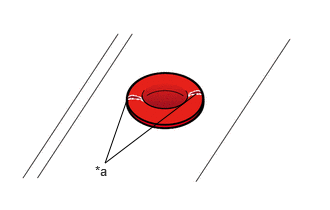
| *a | Cracks or Breaks |
Cracks or breaks may form on the underside of the SPR, as shown in the illustration. However, these will have no impact on strength.
| Manufacture name | Part Name | Part Number |
| YAHATA NEJI CORPORATION | Clamping riveter | SLL0-1432-NS |
Apply adhesive and sand.
|
|
Adhesive |
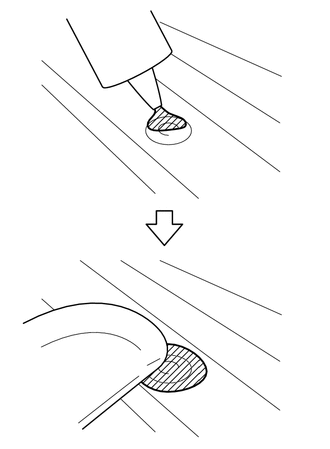
Apply adhesive (3MTM AutomixTM Panel Bonding Adhesive #8115) to the blind rivet installation upper surface, and then use a spatula to smooth it.
- NOTICE:
-
Apply masking tape on the inside of the vehicle before applying adhesive to the area where the mandrel was removed to prevent the adhesive from dripping.
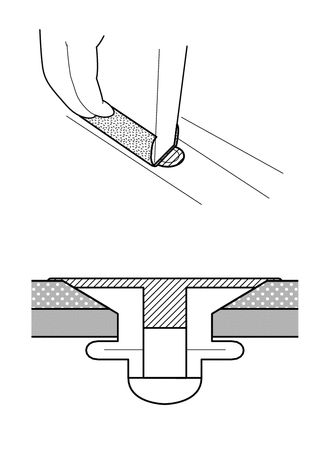
|
|
Adhesive |
Once the adhesive hardens, use sandpaper(#320) to sand the surface of the aluminum roof panel so that it is smooth.
- HINT:
-
If any rivets are exposed or any pinholes have been formed, repair the surface by applying putty.
Apply primer surfacer.
Use a wire brush, etc. to remove burns caused by welding.
Clean and degrease the primer surfacer application area.
Mask the area other than the primer surfacer application area.
Make sure that the vehicle is appropriately protected. Apply primer surfacer.
Apply the foamed sealing material to the corresponding parts. (See the painting/coating)
Apply body sealer.
Use masking tape, etc. to protect areas where body sealer must not be applied.
- NOTICE:
-
Applying body sealer to the following prohibited areas could impair work, such as preventing the installation of equipment parts.
-
·
roof drip side finish moulding clip installation area
·roof rack bracket installation area
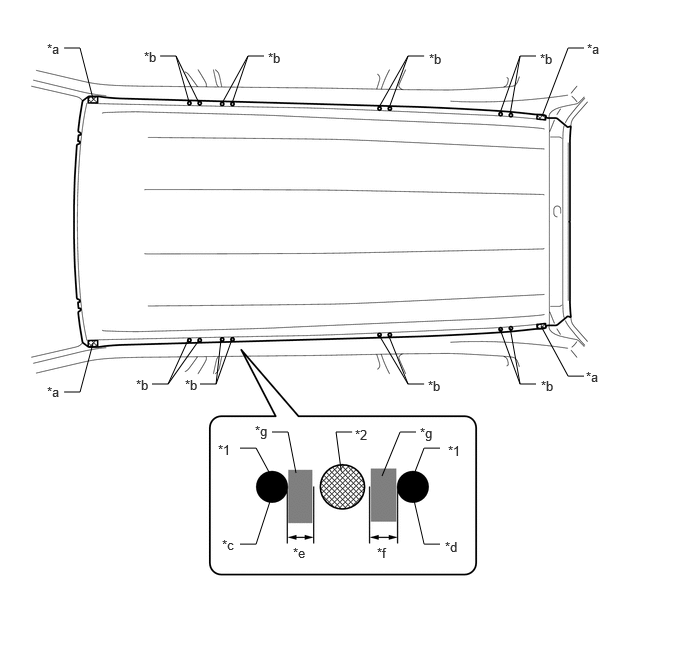
| *1 | roof rack bracket installation hole | *2 | EASW |
| *a | roof drip side finish moulding clip installation area | *b | roof rack bracket installation area |
| *c | φ10 (0.39 in.) | *d | φ11 (0.43 in.) |
| *e | 10.9 mm (0.43 in.) | *f | 10.4 mm (0.41 in.) |
| *g | body sealer application prohibited areas | - | - |
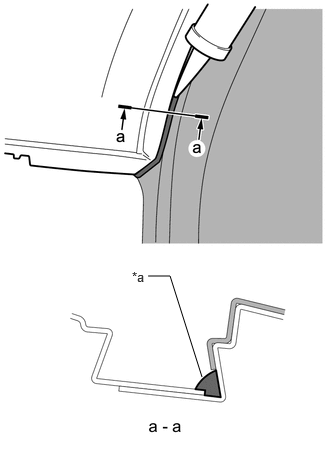
Apply body sealer to the *a.
- HINT:
-
Body sealer application areas. (See the painting/coating)
Apply body sealer to the SPR and EASW entire circumference, and smooth it using a spatula.
- NOTICE:
-
The entire circumference must be completely sealed.
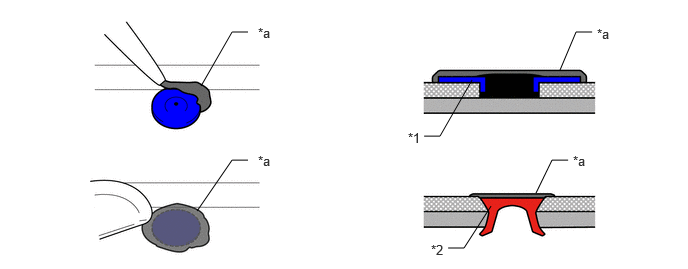
| *1 | EASW | *2 | SPR |
| *a | Body Sealer | - | - |
Remove the protection tape.
After applying the top coat, apply anti-rust agent to the internal panel portion of the closed section structural weld points.