LIGHTING (INT) PERSONAL LIGHT INSPECTION
PROCEDURE

 81260A 1.INSPECT MAP LIGHT ASSEMBLY
Inspect the map light assembly.
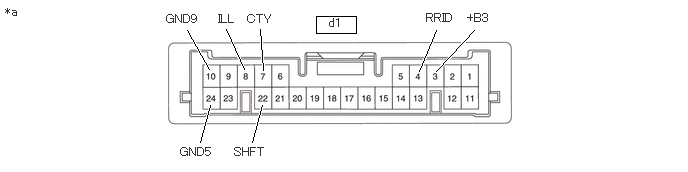
| *a | Component without harness connected (Map Light Assembly) |
- | - |
Apply battery voltage to the connector and check the light illumination condition.
- OK:
-
Tester Connection Switch Condition Specified Condition Click Location & Routing(d1)Location & Routingewd_type=routing;type=c;code=d1
Click Connector(d1)Body>No. 1 Roof Wire>Map Light Assembly (Front)ewd_type=component;type=c;code=d1;pinno=3,10,24
d1-3 (+B3) - Battery positive (+)
d1-10 (GND9) - Battery negative (-)Map light switch LH ON Map light LH illuminates Map light switch RH ON Map light RH illuminates d1-3 (+B3) - Battery positive (+)
d1-24 (GND5) - Battery negative (-)Map light switch LH ON Map light LH illuminates Map light switch RH ON Map light RH illuminates
- HINT:
-
The map light switch is a capacitive touch switch. Therefore, the illumination turns on or off each time the lens around the light emitting area is touched.
If the result is not as specified, replace the map light assembly.
Inspect the door switch.
Measure the resistance according to the value(s) in the table below.
- Standard Resistance:
-
Tester Connection Switch Condition Specified Condition Click Location & Routing(d1)Location & Routingewd_type=routing;type=c;code=d1
Click Connector(d1)Body>No. 1 Roof Wire>Map Light Assembly (Front)ewd_type=component;type=c;code=d1;pinno=3,7
d1-3 (+B3) - d1-7 (CTY) DOOR switch ON Below 1 Ω DOOR switch OFF 10 kΩ or higher
If the result is not as specified, replace the map light assembly.
Inspect the night illumination.
Apply battery voltage to the connector and check the light illumination condition.
- OK:
-
Tester Connection Specified Condition Click Location & Routing(d1)Location & Routingewd_type=routing;type=c;code=d1
Click Connector(d1)Body>No. 1 Roof Wire>Map Light Assembly (Front)ewd_type=component;type=c;code=d1;pinno=4,8
d1-4 (RRID) - Battery positive (+)
d1-8 (ILL) - Battery negative (-)Night illumination illuminates
If the result is not as specified, replace the map light assembly.
Inspect the down light.
Apply battery voltage to the connector and check the light illumination condition.
- OK:
-
Tester Connection Specified Condition Click Location & Routing(d1)Location & Routingewd_type=routing;type=c;code=d1
Click Connector(d1)Body>No. 1 Roof Wire>Map Light Assembly (Front)ewd_type=component;type=c;code=d1;pinno=22,10,24
d1-22 (SHFT) - Battery positive (+)
d1-10 (GND9) - Battery negative (-)Down light illuminates d1-22 (SHFT) - Battery positive (+)
d1-24 (GND5) - Battery negative (-)
If the result is not as specified, replace the map light assembly.