HEATING / AIR CONDITIONING AIR CONDITIONING SYSTEM B14B97F Ion Generator Actuator Stuck Off
DESCRIPTION
The ion generator sub-assembly operates when the blower switch is on.
The air conditioning amplifier assembly sends a drive signal to the ion generator sub-assembly.
| DTC No. | Detection Item | DTC Detection Condition | Trouble Area | Memory | DTC Output from | Priority |
|---|---|---|---|---|---|---|
| B14B97F | Ion Generator Actuator Stuck Off | Diagnosis Condition: Ignition switch is ON and blower switch is on Malfunction Status: Open or short in ion generator circuit Detection Time: Continuously for 12 seconds or more |
·
Ion generator sub-assembly
·
Harness or connector
·
Air conditioning amplifier assembly |
Memorized | Air Conditioner | A |
WIRING DIAGRAM
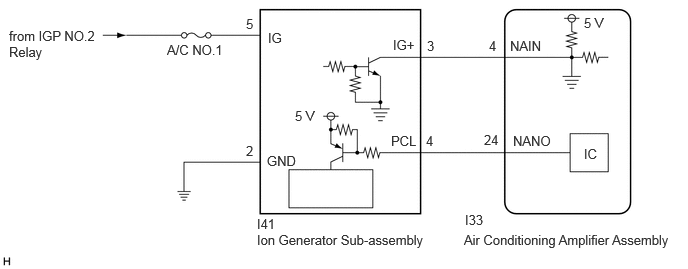
CAUTION / NOTICE / HINT
- NOTICE:
-
Inspect the fuses for circuits related to this system before performing the following procedure.
PROCEDURE
Perform the Active Test according to the display on the GTS.
- Body Electrical > Air Conditioner > Active Test
-
Tester Display Measurement Item Control Range Diagnostic Note Ion Generator Ion generator sub-assembly operation OFF / ON -
- Body Electrical > Air Conditioner > Active Test
-
Tester Display Ion Generator - 50004 450 14
- HINT:
-
Check the blower switch OFF state.
- OK:
-
The ion generator sub-assembly operating sound can be heard for 12 seconds or more according to the Active Test.
- Result:
-
Proceed to OK NG
OK
NG
Pre-procedure1
Disconnect the I41 ion generator sub-assembly connector.
Procedure1
Measure the voltage according to the value(s) in the table below.
- Standard Voltage:
-
Tester Connection Switch Condition Specified Condition Click Location & Routing(I41)Location & Routingewd_type=routing;type=c;code=I41
I41-5 (IG) - Body ground Ignition switch ON 11 to 14 V
- Result:
-
Proceed to OK NG
Post-procedure1
None
OK
NG
Pre-procedure1
Disconnect the I41 ion generator sub-assembly connector.
Procedure1
Measure the resistance according to the value(s) in the table below.
- Standard Resistance:
-
Tester Connection Condition Specified Condition Click Location & Routing(I41)Location & Routingewd_type=routing;type=c;code=I41
I41-2 (GND) - Body ground Always Below 1 Ω
- Result:
-
Proceed to OK NG
Post-procedure1
None
OK
NG
Pre-procedure1
Disconnect the I41 ion generator sub-assembly connector.
Disconnect the I33 air conditioning amplifier assembly connector.
Procedure1
Measure the resistance according to the value(s) in the table below.
- Standard Resistance:
-
Tester Connection Condition Specified Condition Click Location & Routing(I41,I33)Location & Routingewd_type=routing;type=c,c;code=I41,I33
I41-3 (IG+) - I33-4 (NAIN) Always Below 1 Ω I41-4 (PCL) - I33-24 (NANO) Always Below 1 Ω I41-3 (IG+) or I33-4 (NAIN) - Other terminals and body ground Always 10 kΩ or higher I41-4 (PCL) or I33-24 (NANO) - Other terminals and body ground Always 10 kΩ or higher
- Result:
-
Proceed to OK NG
Post-procedure1
None
OK
NG
Pre-procedure1
Disconnect the I33 air conditioning amplifier assembly connector.
Procedure1
Measure the voltage according to the value(s) in the table below.
- Standard Voltage:
-
Tester Connection Switch Condition Specified Condition Click Location & Routing(I33)Location & Routingewd_type=routing;type=c;code=I33
I33-24 (NANO) - Body ground Ignition switch ON 4.75 to 5.25 V
- Result:
-
Proceed to OK NG
Post-procedure1
None
OK
NG
Pre-procedure1
None.
Procedure1
Measure the voltage according to the value(s) in the table below.
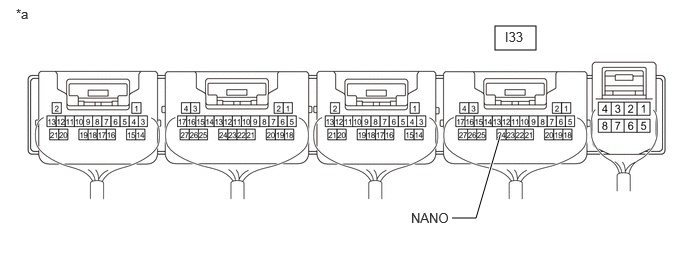
| *a | Component with harness connected (Air Conditioning Amplifier Assembly) |
- | - |
- Standard Voltage:
-
Tester Connection Condition Specified Condition Click Location & Routing(I33)Location & Routingewd_type=routing;type=c;code=I33
I33-24 (NANO) - Body ground ·Ignition switch ON
·Blower switch: LO
·Ion generator: On
Below 1 V
- Result:
-
Proceed to OK NG
Post-procedure1
None
OK
NG
Pre-procedure1
Disconnect the I41 ion generator sub-assembly connector.
Procedure1
Measure the voltage according to the value(s) in the table below.
- Standard Voltage:
-
Tester Connection Condition Specified Condition Click Location & Routing(I41)Location & Routingewd_type=routing;type=c;code=I41
I41-3 (IG+) - Body ground ·Ignition switch ON
·Blower switch: Off
·Ion generator: On
4.75 to 5.25 V
- Result:
-
Proceed to OK NG
Post-procedure1
None
OK
NG
Pre-procedure1
None.
Procedure1
Measure the voltage according to the value(s) in the table below.
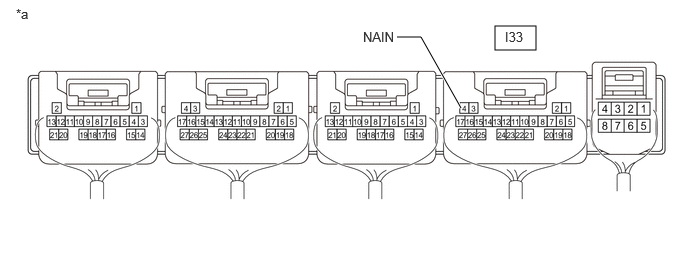
| *a | Component with harness connected (Air Conditioning Amplifier Assembly) |
- | - |
- Standard Voltage:
-
Tester Connection Condition Specified Condition Click Location & Routing(I33)Location & Routingewd_type=routing;type=c;code=I33
I33-4 (NAIN) - Body ground ·Ignition switch ON
·Blower switch: Off
·Ion generator: On
Below 2.2 V
- Result:
-
Proceed to OK NG
Post-procedure1
None
OK
NG