AUDIO / VIDEO INSTRUMENT PANEL SPEAKER INSPECTION
PROCEDURE

 86160J 1.INSPECT FRONT NO. 3 SPEAKER ASSEMBLY (for LH Side)
With the speaker in the installed condition, check there are no abnormalities such looseness or rattling.
Check that there is no foreign matter inside the speaker.
Check that the speaker cone is not damaged.
Measure the resistance according to the value(s) in the table below.
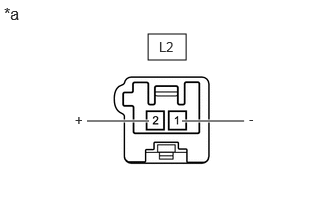
| *a | Component without harness connected (Front No. 3 Speaker Assembly) |
for 14 Speakers:
- Standard Resistance:
-
Tester Connection Condition Specified Condition Click Location & Routing(L2)Location & Routingewd_type=routing;type=c;code=L2
Click Connector(L2)Instrument Panel>No. 4 Instrument Panel Wire>Front No. 2 Speaker Assembly LHewd_type=component;type=c;code=L2;pinno=1,2
L2-1 (-) - L2-2 (+) Always 2.8 to 3.8 Ω
If the result is not as specified, replace the front No. 3 speaker assembly.
except 14 Speakers:
When there is a malfunction such as noise from a speaker or no sound at all, replace the speaker with a new one and check that the malfunction disappears.
- OK:
-
Malfunction disappears.
- HINT:
-
·
When there is a possibility that either the right or left front No. 3 speaker assembly is defective, inspect by interchanging the right one with the left one.
·Perform the inspection above on both the LH and RH sides.
If the result is not as specified, replace the front No. 3 speaker assembly.
86160J 2.INSPECT FRONT NO. 3 SPEAKER ASSEMBLY (for RH Side)
With the speaker in the installed condition, check there are no abnormalities such looseness or rattling.
Check that there is no foreign matter inside the speaker.
Check that the speaker cone is not damaged.
Measure the resistance according to the value(s) in the table below.
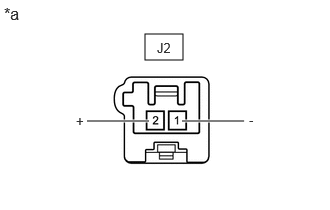
| *a | Component without harness connected (Front No. 3 Speaker Assembly) |
for 14 Speakers:
- Standard Resistance:
-
Tester Connection Condition Specified Condition Click Location & Routing(J2)Location & Routingewd_type=routing;type=c;code=J2
Click Connector(J2)Instrument Panel>No. 2 Instrument Panel Wire>Front No. 2 Speaker Assembly RHewd_type=component;type=c;code=J2;pinno=1,2
J2-1 (-) - J2-2 (+) Always 2.8 to 3.8 Ω
If the result is not as specified, replace the front No. 3 speaker assembly.
except 14 Speakers:
When there is a malfunction such as noise from a speaker or no sound at all, replace the speaker with a new one and check that the malfunction disappears.
- OK:
-
Malfunction disappears
- HINT:
-
·
When there is a possibility that either the right or left front No. 3 speaker assembly is defective, inspect by interchanging the right one with the left one.
·Perform the inspection above on both the LH and RH sides.
If the result is not as specified, replace the front No. 3 speaker assembly.
86160L 3.INSPECT FRONT NO. 4 SPEAKER ASSEMBLY (for Center)
With the speaker in the installed condition, check there are no abnormalities such looseness or rattling.
Check that there is no foreign matter inside the speaker.
Check that the speaker cone is not damaged.
Measure the resistance according to the value(s) in the table below.
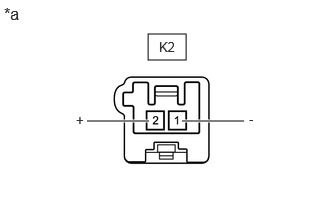
| *a | Component without harness connected (Front No. 4 Speaker Assembly) |
for 14 Speakers:
- Standard Resistance:
-
Tester Connection Condition Specified Condition Click Location & Routing(K2)Location & Routingewd_type=routing;type=c;code=K2
Click Connector(K2)Instrument Panel>No. 3 Instrument Panel Wire>Front No. 4 Speaker Assemblyewd_type=component;type=c;code=K2;pinno=1,2
K2-1 (-) - K2-2 (+) Always 2.8 to 3.8 Ω
If the result is not as specified, replace the front No. 4 speaker assembly.
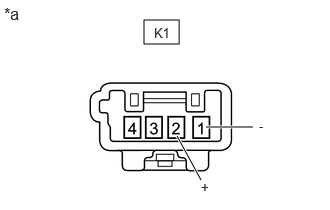
| *a | Component without harness connected (Front No. 4 Speaker Assembly) |
for 10 Speakers:
- Standard Resistance:
-
Tester Connection Condition Specified Condition Click Location & Routing(K1)Location & Routingewd_type=routing;type=c;code=K1
Click Connector(K1)Instrument Panel>No. 3 Instrument Panel Wire>Front No. 4 Speaker Assemblyewd_type=component;type=c;code=K1;pinno=1,2
K1-1 (-) - K1-2 (+) Always 4 Ω
If the result is not as specified, replace the front No. 4 speaker assembly.