DOOR / HATCH POWER BACK DOOR SYSTEM Power Back Door cannot be Operated Using Kick Sensor
DESCRIPTION
When the kick door control sensor assembly detects a kick operation, it sends an operation signal to the multiplex network door ECU.
WIRING DIAGRAM
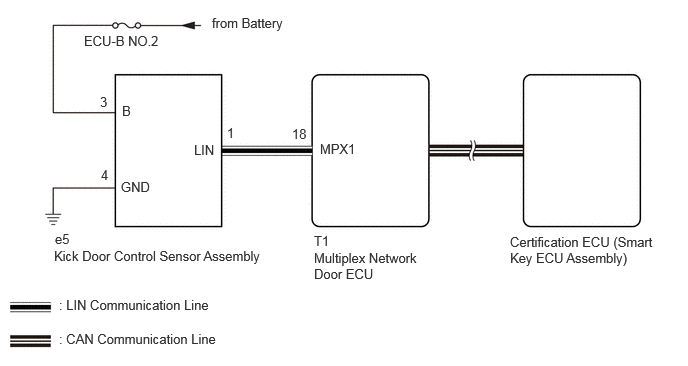
CAUTION / NOTICE / HINT
- NOTICE:
-
·
Before troubleshooting, make sure that the "Kick Sensor Function" customize setting is set to "ON" (The default is "ON").
Click hereVehicle Exterior>DOOR / HATCH>POWER BACK DOOR SYSTEM>CUSTOMIZE PARAMETERS
·Before troubleshooting, be sure to read Precautions for Hands Free Power Back Door.
Click hereVehicle Exterior>DOOR / HATCH>POWER BACK DOOR SYSTEM>PRECAUTION
·If the multiplex network door ECU has been removed and installed or replaced, or if any of the connectors has been disconnected, initialize the power back door system.
Click hereVehicle Exterior>DOOR / HATCH>POWER BACK DOOR SYSTEM>INITIALIZATION
·Inspect the fuses for circuits related to this system before performing the following inspection procedure.
PROCEDURE
Operate the multi-information display in the combination meter assembly and check the customization status.
- HINT:
-
Select the setting tab to check this.
| Display | Description | Default | Setting | Relevant ECU |
|---|---|---|---|---|
| System Settings | Function that enables or disables the power back door operation. | On | On or Off | Multiplex network door ECU |
| Hands Free | Function that can be used to set the hands free power back door. | On | On or Off | Multiplex network door ECU |
Customizing with the GTS.
- PSD & PBD operation
-
Tester Display Description Default Setting ECU PBD Walk Away Kick Sensor Function Power back door walk away kick sensor function OFF $00:OFF,$01:ON Multiplex network door ECU - 50006 21
- Result:
-
Result Proceed to Customization item is "ON" or "On" A Customization item is "OFF" or "Off" B
A
B
Check the power back door system condition.
- Result:
-
Result Proceed to The malfunction symptom reproduces A The malfunction symptom does not reproduce B
A
B
Click hereVehicle Exterior>DOOR / HATCH>POWER BACK DOOR SYSTEM>Power Back Door cannot be Operated Frequently
Clear the DTCs.
- Body Electrical > Back Door > Clear DTCs
- 50002 489
- Result:
-
Proceed to NEXT
NEXT
Turn the ignition switch to ON and wait for at least 10 seconds.
- Body Electrical > Back Door > Trouble Codes
- 50001 489
- Result:
-
Proceed to NEXT
NEXT
Check for DTCs.
- Body Electrical > Back Door > Trouble Codes
- 50001 489
- OK:
-
DTC is not output.
- Result:
-
Proceed to OK NG
OK
NG
Disconnect the e5 kick door control sensor assembly connector.
Measure the resistance according to the value(s) in the table below.
- Standard Resistance:
-
Tester Connection Condition Specified Condition Click Location & Routing(e5)Location & Routingewd_type=routing;type=c;code=e5
Click Connector(e5)Body>Rear Bumper Wire>Kick Door Control Sensor Assemblyewd_type=component;type=c;code=e5;pinno=4
e5-4 (GND) - Body ground Always Below 1 Ω
Measure the voltage according to the value(s) in the table below.
- Standard Voltage:
-
Tester Connection Condition Specified Condition Click Location & Routing(e5)Location & Routingewd_type=routing;type=c;code=e5
Click Connector(e5)Body>Rear Bumper Wire>Kick Door Control Sensor Assemblyewd_type=component;type=c;code=e5;pinno=3
e5-3 (B) - Body ground Always 11 to 14 V
- Result:
-
Proceed to OK NG
OK
NG