AUDIO / VIDEO AUDIO AND VISUAL SYSTEM(for Radio Receiver Type) Illumination Circuit
DESCRIPTION
The radio receiver assembly and steering pad switch assembly illuminates when the headlight dimmer switch is in the tail or head position.
WIRING DIAGRAM
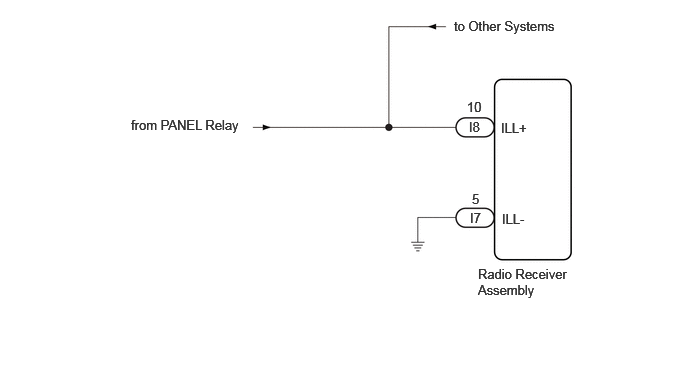
CAUTION / NOTICE / HINT
- NOTICE:
-
·
The vehicle is equipped with a supplemental restraint system (SRS) which includes components such as airbags. Before servicing (including removal or installation of parts), be sure to read the precaution for supplemental restraint system.
Click hereVehicle Interior>SUPPLEMENTAL RESTRAINT SYSTEMS>AIRBAG SYSTEM>PRECAUTION
·When replacing the combination meter assembly, always replace it with a new one. If a combination meter assembly which was installed to another vehicle is used, the information stored in it will not match the information from the vehicle and a DTC may be stored.
PROCEDURE
Check if the illumination for the radio receiver assembly or others (hazard switch etc.) comes on when the turn signal switch is turned to the head or tail position.
- Result:
-
Result Proceed to Illumination comes on for all components except radio receiver assembly. A No illumination comes on (radio receiver assembly, hazard switch, heater control switch, etc.). B
A
B
Disconnect the I7 and I8 radio receiver assembly connector.
Measure the voltage according to the value(s) in the table below.
- Standard Voltage:
-
Tester Connection Switch Condition Specified Condition Click Location & Routing(I8)Location & Routingewd_type=routing;type=c;code=I8
I8-10 (ILL+) - Body ground Ignition switch ON
Light control switch in tail or head11 to 14 V
Measure the resistance according to the value(s) in the table below.
- Standard Resistance:
-
Tester Connection Condition Specified Condition Click Location & Routing(I7)Location & Routingewd_type=routing;type=c;code=I7
I7-5 (ILL-) - Body ground Always Below 1 Ω
- Result:
-
Proceed to OK NG
OK
NG