NAVIGATION / MULTI INFO DISPLAY NAVIGATION SYSTEM Display does not Dim when Light Control Switch is Turned ON
DESCRIPTION
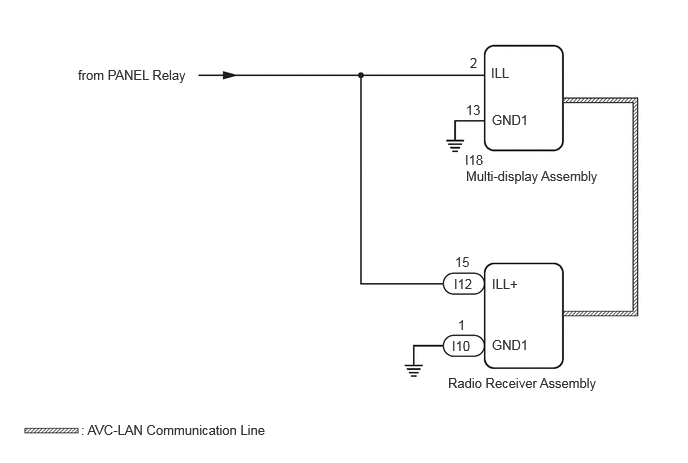
When the navigation system is activated with the light control switch in the tail or head, before AVC-LAN communication is established, the multi-display assembly dims the display according to the illumination signal received via a direct line.
After AVC-LAN communication is established, the multi-display assembly dims the display according to a dimmer signal sent via AVC-LAN communication.
The radio receiver assembly switches between the daytime screen and night screen on the multi-display assembly according to the illumination signal input.
WIRING DIAGRAM
PROCEDURE
Check the symptoms that occur by viewing the display.
- HINT:
-
·
When the navigation system is activated with the light control switch in the tail or head, before AVC-LAN communication is established, the multi-display assembly dims the display according to the illumination signal received via a direct line.
·After AVC-LAN communication is established, the multi-display assembly dims the display according to a dimmer signal sent via AVC-LAN communication.
·The radio receiver assembly switches between the daytime screen and night screen on the multi-display assembly according to the illumination signal input.
- Result:
-
Result Proceed to There is a delay until the display dims after the navigation system is activated with the light control switch in the tail or head. A The display dims for a moment and then becomes bright after the navigation system is activated with the light control switch in the tail or head. B When the light control switch is set to the tail or head, the display dims but does not switch to the night screen. When the light control switch is set to the tail or head, the display neither dims nor switches to the night screen. C
A
B
C
Disconnect the I18 multi-display assembly connector.
Measure the resistance according to the value(s) in the table below.
- Standard Resistance:
-
Tester Connection Condition Specified Condition Click Location & Routing(I18)Location & Routingewd_type=routing;type=c;code=I18
I18-13 (GND1) - Body ground Always Below 1 Ω
Measure the voltage according to the value(s) in the table below.
- Standard Voltage:
-
Tester Connection Condition Specified Condition Click Location & Routing(I18)Location & Routingewd_type=routing;type=c;code=I18
I18-2 (ILL) - I18-13 (GND1) Ignition switch off
Light control switch in tail or head11 to 14 V
- Result:
-
Proceed to OK NG
OK
Click hereAudio / Visual / Telematics>NAVIGATION / MULTI INFO DISPLAY>NAVIGATION SYSTEM>PROBLEM SYMPTOMS TABLE
NG
Turn the light control switch to the tail or head position.
Check that the daytime screen setting on the display adjustment screen is set to on.
- Result:
-
Result Proceed to Daytime screen setting is set to on. A Daytime screen setting is set to off. B
A
B
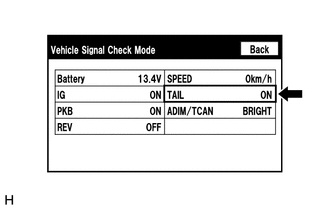
Enter the "Vehicle Signal Check Mode" screen. Refer to Check Vehicle Signal in Operation Check.
Click hereAudio / Visual / Telematics>NAVIGATION / MULTI INFO DISPLAY>NAVIGATION SYSTEM>OPERATION CHECK
Check that the display changes between ON and OFF according to the light control switch operation.
- OK:
-
Light Control Switch Display Tail or head ON except Tail or head OFF
- HINT:
-
·
This display is updated once per second. As a result, it is normal for the display to lag behind the actual switch operation.
·Make sure to move the vehicle to a bright area before performing an operation check with the light control switch in the AUTO position.
- Result:
-
Proceed to OK NG
OK
Click hereAudio / Visual / Telematics>NAVIGATION / MULTI INFO DISPLAY>NAVIGATION SYSTEM>PROBLEM SYMPTOMS TABLE
NG
Disconnect the I12 and I10 radio receiver assembly connectors.
Measure the resistance according to the value(s) in the table below.
- Standard Resistance:
-
Tester Connection Condition Specified Condition Click Location & Routing(I10)Location & Routingewd_type=routing;type=c;code=I10
I10-1 (GND1) - Body ground Always Below 1 Ω
Measure the voltage according to the value(s) in the table below.
- Standard Voltage:
-
Tester Connection Condition Specified Condition Click Location & Routing(I12,I10)Location & Routingewd_type=routing;type=c,c;code=I12,I10
I12-15 (ILL+) - I10-1 (GND1) Ignition switch off
Light control switch in tail or head11 to 14 V
- Result:
-
Proceed to OK NG
OK
Click hereAudio / Visual / Telematics>NAVIGATION / MULTI INFO DISPLAY>NAVIGATION SYSTEM>PROBLEM SYMPTOMS TABLE
NG