RM38G0E _56 Audio / Visual / Telematics _100607 NAVIGATION / MULTI INFO DISPLAY _0467503 NAVIGATION SYSTEM J
NAVIGATION / MULTI INFO DISPLAY NAVIGATION SYSTEM Radio Receiver Power Source Circuit
DESCRIPTION
This is the power source circuit to operate the radio receiver assembly.
WIRING DIAGRAM
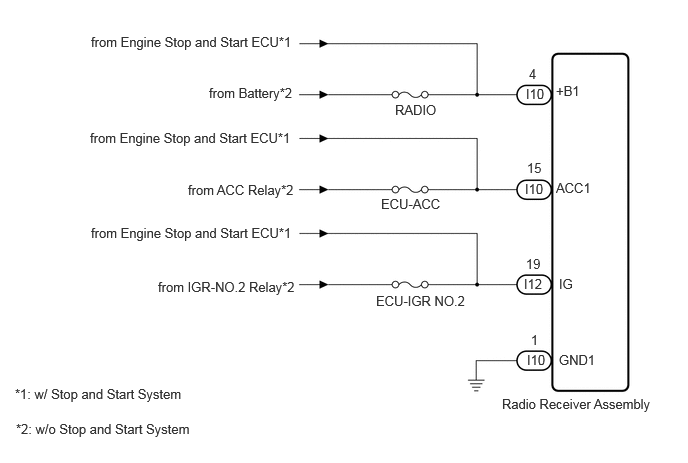
2.177,0.885 3.208,1.125 1.031,0.24 10 false from Battery*2 1.958,1.896 3.26,2.146 1.302,0.25 10 false from ACC Relay*2 1.646,2.906 3.344,3.177 1.698,0.271 10 false from IGR-NO.2 Relay*2 4.115,1.063 5.063,1.323 0.948,0.26 10 false RADIO 3.969,2.042 5.042,2.24 1.073,0.198 10 false ECU-ACC 3.917,3.052 5.906,3.25 1.99,0.198 10 false ECU-IGR NO.2 5.479,0.896 5.792,1.094 0.313,0.198 10 false I10 5.458,2.875 5.771,3.073 0.313,0.198 10 false I12 5.51,0.688 5.667,0.885 0.156,0.198 10 false 4 5.49,1.667 5.802,1.865 0.313,0.198 10 false 15 5.479,2.667 5.792,2.865 0.313,0.198 10 false 19 5.531,3.458 5.688,3.656 0.156,0.198 10 false 1 5.792,0.865 6.125,1.042 0.333,0.177 10 false +B1 5.792,1.875 6.24,2.052 0.448,0.177 10 false ACC1 5.823,2.875 6.031,3.052 0.208,0.177 10 false IG 5.823,3.667 6.229,3.854 0.406,0.188 10 false GND1 5.229,4.125 6.958,4.51 1.729,0.385 10 false Radio Receiver Assembly 5.49,3.667 5.802,3.865 0.313,0.198 10 false I10 0.948,0.354 5.844,0.552 4.896,0.198 10 false from Engine Stop and Start ECU*1 0.938,1.354 5.833,1.552 4.896,0.198 10 false from Engine Stop and Start ECU*1 0.948,2.344 5.844,2.542 4.896,0.198 10 false from Engine Stop and Start ECU*1 5.469,1.885 5.781,2.083 0.313,0.198 10 false I10 0.167,4.385 4.448,4.583 4.281,0.198 10 false *2: w/o Stop and Start System 0.156,4.021 4.438,4.219 4.281,0.198 10 false *1: w/ Stop and Start System
CAUTION / NOTICE / HINT
- NOTICE:
-
Inspect the fuses for circuits related to this system before performing the following procedure.
PROCEDURE
1.CHECK HARNESS AND CONNECTOR (RADIO RECEIVER ASSEMBLY POWER SOURCE)
a.
Disconnect the I10 and I12 radio receiver assembly connectors.
b.
Measure the resistance according to the value(s) in the table below.
- Standard Resistance:
-
Tester Connection Condition Specified Condition Click Location & Routing(I10)Location & Routingewd_type=routing;type=c;code=I10
I10-1 (GND1) - Body ground Always Below 1 Ω
c.
Measure the voltage according to the value(s) in the table below.
- Standard Voltage:
-
Tester Connection Condition Specified Condition Click Location & Routing(I10,I12)Location & Routingewd_type=routing;type=c,c;code=I10,I12
I10-4 (+B1) - I10-1 (GND1) Always 10.5 to 16 V*1 11 to 14 V*2 I10-15 (ACC1) - I10-1 (GND1) Ignition switch ACC 10.5 to 16 V*1 11 to 14 V*2 I12-19 (IG) - I10-1 (GND1) Ignition switch ON 10.5 to 16 V*1 11 to 14 V*2
*1: w/ Stop and Start System
*2: w/o Stop and Start System
- Result:
-
Proceed to OK NG
OK
PROCEED TO NEXT SUSPECTED AREA SHOWN IN PROBLEM SYMPTOMS TABLE
Click hereAudio / Visual / Telematics>NAVIGATION / MULTI INFO DISPLAY>NAVIGATION SYSTEM>PROBLEM SYMPTOMS TABLE
NG
REPAIR OR REPLACE HARNESS OR CONNECTOR