NAVIGATION / MULTI INFO DISPLAY NAVIGATION SYSTEM B1535 NTSC Disconnected (from Park Assist/Monitoring ECU) C1622 Back Camera Disconnected
DESCRIPTION
These DTCs are stored if the radio receiver assembly judges that the signals or signal lines between the rear television camera assembly and the multi-display assembly are not normal as a result of its self check.
| DTC No. | Detection Item | DTC Detection Condition | Trouble Area | DTC Output from | Priority |
|---|---|---|---|---|---|
| B1535 | NTSC Disconnected (from Park Assist/Monitoring ECU) | Open or short in the rear television camera assembly signal circuit |
·
Harness or connector
·
Rear television camera assembly
·
Multi-display assembly
·
Radio receiver assembly |
Navigation System | A |
| C1622 | Back Camera Disconnected | Open or short in the rear television camera assembly signal circuit |
·
Harness or connector
·
Rear television camera assembly
·
Multi-display assembly
·
Radio receiver assembly |
Navigation System | A |
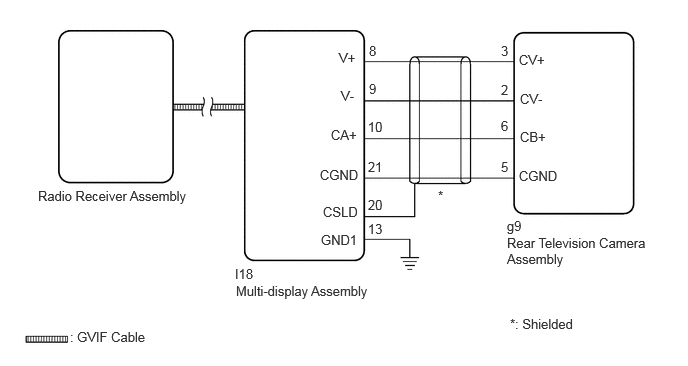
WIRING DIAGRAM
CAUTION / NOTICE / HINT
- NOTICE:
-
·
If the cable was disconnected from and reconnected to the negative (-) battery terminal, the estimated course lines may not be displayed on the image of the area behind the vehicle. In this case, perform "Correct the Steering Angle Neutral Point".
Click hereAudio / Visual / Telematics>PARK ASSIST / MONITORING>PARKING ASSIST MONITOR SYSTEM>INITIALIZATION
·Depending on the parts that are replaced or operations that are performed during vehicle inspection or maintenance, calibration of other systems as well as the parking assist monitor system may be needed.
Click hereAudio / Visual / Telematics>PARK ASSIST / MONITORING>PARKING ASSIST MONITOR SYSTEM>CALIBRATION
·Depending on the parts that are replaced during vehicle inspection or maintenance, performing initialization, registration or calibration may be needed. Refer to Precaution for Navigation System.
Click hereAudio / Visual / Telematics>NAVIGATION / MULTI INFO DISPLAY>NAVIGATION SYSTEM>PRECAUTION
PROCEDURE
Pre-procedure1
Clear the DTCs.
- Body Electrical > Navigation System > Clear DTCs
- 50002 212
Turn the ignition switch off.
Turn the ignition switch to ON.
Procedure1
Change the shift position to R and check for DTCs.
- Body Electrical > Navigation System > Trouble Codes
- 50001 212
- Result:
-
Result Proceed to DTCs are not output A DTCs are output B
Post-procedure1
None
A
Click hereGeneral>INTRODUCTION>HOW TO TROUBLESHOOT ECU CONTROLLED SYSTEMS>HOW TO PROCEED WITH TROUBLESHOOTING
B
Pre-procedure1
Disconnect the I18 multi-display assembly connector.
Disconnect the g9 rear television camera assembly connector.
Procedure1
Measure the resistance according to the value(s) in the table below.
- Standard Resistance:
-
Tester Connection Condition Specified Condition Click Location & Routing(I18,g9)Location & Routingewd_type=routing;type=c,c;code=I18,g9
Click Connector(g9)Body>No. 1 Rear Window Wire / No. 2 Back Door Wire>Rear Television Camera Assemblyewd_type=component;type=c;code=g9;pinno=3,2,6,5
I18-8 (V+) - g9-3 (CV+) Always Below 1 Ω I18-9 (V-) - g9-2 (CV-) Always Below 1 Ω I18-10 (CA+) - g9-6 (CB+) Always Below 1 Ω I18-21 (CGND) - g9-5 (CGND) Always Below 1 Ω I18-8 (V+) or g9-3 (CV+) - Body ground Always 10 kΩ or higher I18-9 (V-) or g9-2 (CV-) - Body ground Always 10 kΩ or higher I18-10 (CA+) or g9-6 (CB+) - Body ground Always 10 kΩ or higher I18-21 (CGND) or g9-5 (CGND) - Body ground Always 10 kΩ or higher I18-20 (CSLD) - Body ground Always 10 kΩ or higher
- Result:
-
Proceed to OK NG
Post-procedure1
None
OK
NG
Pre-procedure1
Reconnect the I18 multi-display assembly connector.
Procedure1
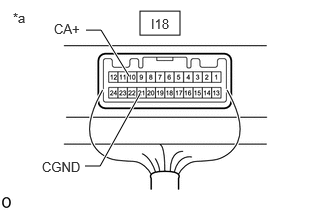
| *a | Component with harness connected (Multi-display Assembly) |
Measure the resistance according to the value(s) in the table below.
- Standard Resistance:
-
Tester Connection Condition Specified Condition Click Location & Routing(I18)Location & Routingewd_type=routing;type=c;code=I18
I18-21 (CGND) - Body ground Always Below 1 Ω
Measure the voltage according to the value(s) in the table below.
- Standard Voltage:
-
Tester Connection Switch Condition Specified Condition Click Location & Routing(I18)Location & Routingewd_type=routing;type=c;code=I18
I18-10 (CA+) - I18-21 (CGND) Ignition switch ACC 5.5 to 7.05 V
- Result:
-
Proceed to OK NG
Post-procedure1
None
OK
NG
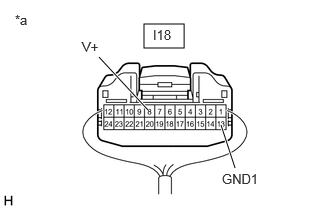
| *a | Component with harness connected (Multi-display Assembly) |
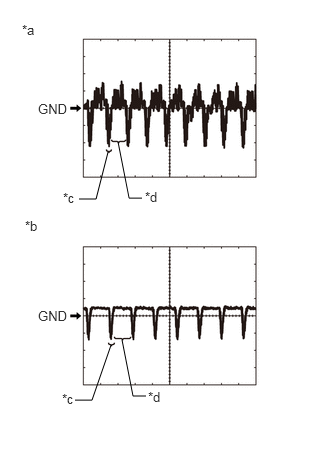
| *a | Waveform 1 (camera lens not covered, displaying an image) |
| *b | Waveform 2 (camera lens covered, blacking out the screen) |
| *c | Synchronization Signal |
| *d | Video Waveform |
Using an oscilloscope, check the waveform of the rear television camera assembly.
- HINT:
-
A waterproof connector is used for the rear television camera assembly. Therefore, inspect the waveform at the multi-display assembly with the connector connected.
| Item | Condition |
| Measurement terminal | I18-8 (V+) - I18-13 (GND1) |
| Tool setting | 200 mV/DIV., 50 μs./DIV. |
| Condition | Ignition switch ON, shift lever in R |
- OK:
-
The waveform is similar to that shown in the illustration.
- HINT:
-
·
The video waveform changes according to the image sent by the rear television camera assembly.
·The video waveform is constantly output when the ignition switch is turned to ACC.
- Result:
-
Proceed to OK NG
OK
NG
Replace the multi-display assembly with a new or known good one.
- Result:
-
Proceed to NEXT
NEXT
Pre-procedure1
Clear the DTCs.
- Body Electrical > Navigation System > Clear DTCs
- 50002 212
Turn the ignition switch off.
Turn the ignition switch to ON.
Procedure1
Change the shift position to R and check for DTCs.
- Body Electrical > Navigation System > Trouble Codes
- 50001 212
- Result:
-
Result Proceed to DTCs are not output A DTCs are output B
Post-procedure1
None
A
B
Click hereAudio / Visual / Telematics>AUDIO / VIDEO>RADIO RECEIVER (for Radio Receiver Type)>REMOVAL