V35A-FTS STARTING STARTER(w/o Stop And Start System) INSPECTION
PROCEDURE

 28100 1.INSPECT STARTER ASSEMBLY
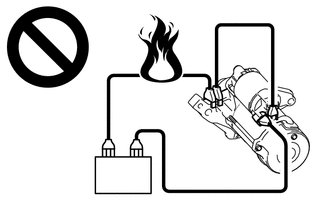
- CAUTION:
-
-
·
Do not use a thin cable to perform the inspection.
·If a thin cable is used, the large electric current passing through the cable could cause it to overheat and catch fire, possibly resulting in injuries.
- NOTICE:
-
Perform each of the following tests within 3 to 5 seconds to prevent the coil from burning out.
Perform a no-load performance test.
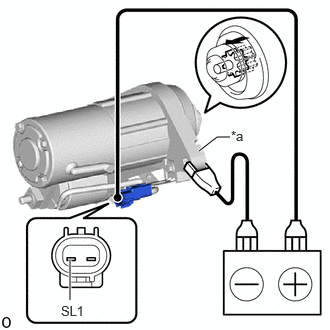
| *a | Starter Body |

|
Moves Outward |
Connect the positive (+) lead to terminal SL1.
Connect the negative (-) lead to the starter body and check that the clutch pinion gear moves outward.
- NOTICE:
-
If the positive (+) and negative (-) leads are connected incorrectly, the IC inside of the starter inrush current reduction relay will be damaged. Be sure to connect them correctly.
If the result is not as specified, replace the starter assembly.
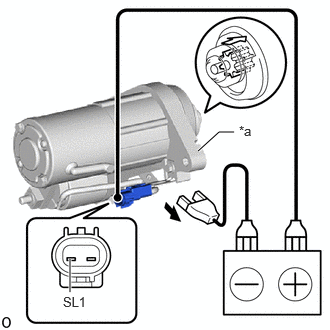
| *a | Starter Body |

|
Moves Outward |
With the clutch pinion gear in the outward position, disconnect the negative (-) lead and check that the clutch pinion gear returns inward.
If the result is not as specified, replace the starter assembly.
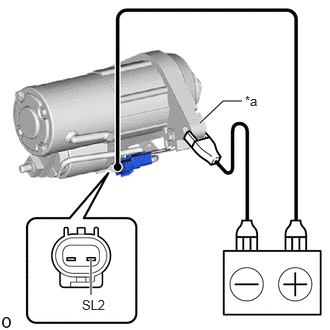
| *a | Starter Body |
Connect the positive (+) lead to terminal SL2 of the connector and the negative (-) lead to the starter body. Check that a clicking sound is heard from the magnet switch.
If the result is not as specified, replace the starter assembly.
Hold the starter assembly in a vise between aluminum plates.
- NOTICE:
-
Ensure that the starter assembly is secured in the vise to prevent it from falling out.
Connect the battery and an ammeter (AC/DC 400A probe) to the starter assembly as shown in the illustration.
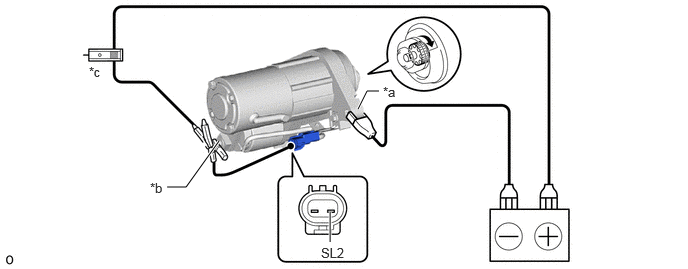
| *a | Starter Body | *b | Terminal 30 |
| *c | AC/DC 400 A Probe | - | - |
Connect terminal SL2 and measure the current after the ammeter (AC/DC 400A probe) reading has stabilized.
- Standard current:
-
90 A or less at 11.0 V
If the starter assembly does not operate when terminal SL2 is connected, replace the starter assembly.