MAINTENANCE F33A-FTV OIL AND OIL FILTER REPLACEMENT
CAUTION / NOTICE / HINT
- CAUTION:
-
·
Prolonged and repeated contact with engine oil will cause removal of natural oils from the skin, leading to dryness, irritation and dermatitis. In addition, used engine oil contains potentially harmful contaminants which may cause skin cancer.
·Precautions should be taken when replacing engine oil to minimize the risk of your skin making contact with used engine oil. Wear protective clothing and gloves. Wash your skin thoroughly with soap and water, or use a waterless hand cleaner to remove any used engine oil. Do not use gasoline, thinners or solvents.
·For environmental protection, used oil and used oil filters must be disposed of at designated disposal sites.
PROCEDURE

 12180E 1.REMOVE OIL FILLER CAP ASSEMBLY
Remove the oil filler cap assembly.
51410 2.REMOVE NO. 1 ENGINE UNDER COVER ASSEMBLY
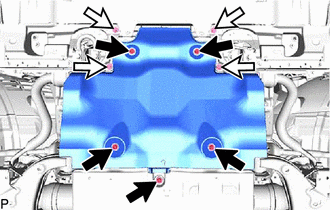

|
Bolt A |

|
Bolt B |
Remove the 5 bolts (A) and 4 bolts (B).
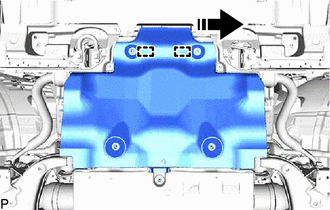

|
Remove in this Direction |
Move the side of the No. 1 engine under cover assembly facing the front of the vehicle toward the LH side and detach the temporary holding guide.
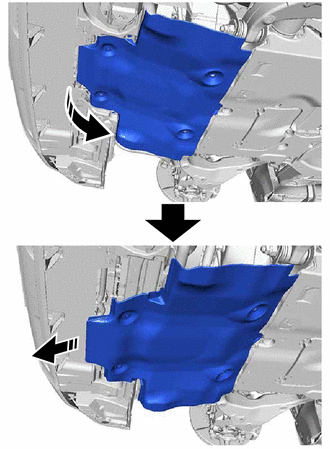
|
|
Remove in this Direction |
Remove the No. 1 engine under cover assembly facing the front of the vehicle while pulling the engine side cover sub-assembly RH and engine side cover sub-assembly LH, and then remove the No. 1 engine under cover assembly while detaching the 2 temporary holding guides facing the rear of the vehicle as shown in the illustration.
51455C 3.REMOVE NO. 2 ENGINE UNDER COVER SEAL
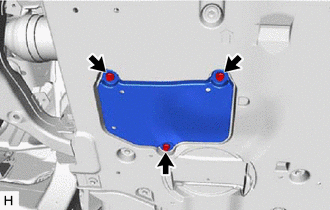
Remove the 3 bolts and No. 2 engine under cover seal.
4.DRAIN ENGINE OIL
Remove the oil pan drain plug and gasket, and drain the engine oil into a container.
Install a new gasket and the drain plug.
- Torque:
- 40 N*m (408 kgf*cm, 30 ft.*lbf)
15601 5.REMOVE OIL FILTER SUB-ASSEMBLY
- HINT:
-
Remove any dirt and foreign matter from the oil filter receiver, and check that the oil drain hole is not blocked.
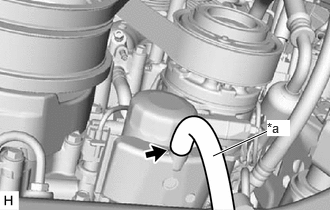
| *a | Hose |
Connect a hose with an inside diameter of 16 mm (0.630 in.) to the oil filter receiver as shown in the illustration.
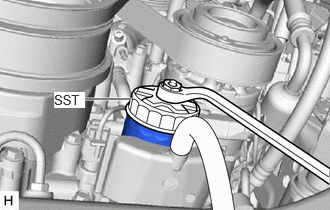
Using SST, remove the oil filter sub-assembly.
- SST
-
09228-06502
15601 6.INSTALL OIL FILTER SUB-ASSEMBLY
Check and clean the oil filter sub-assembly installation surface.
Remove any oil adhered to the oil filter receiver.
Apply clean engine oil to the gasket of a new oil filter sub-assembly.
Lightly screw the oil filter sub-assembly into place by hand. Tighten it until the gasket contacts the seat.
Using SST, tighten the oil filter sub-assembly.
- SST
-
09228-06502
Depending on the work space available, choose from the following.
If enough space is available, use a torque wrench to tighten the oil filter sub-assembly.
- Torque:
- 17.5 N*m (178 kgf*cm, 13 ft.*lbf)
If enough space is not available to use a torque wrench, tighten the oil filter sub-assembly a 3/4 turn by hand or use a common wrench.
7.ADD ENGINE OIL
Add clean engine oil.
- Standard Oil Grade:
-
Item Oil Grade Oil Viscosity (SAE) w/ DPF ACEA C5
(Using engine oil other than ACEA C5 may damage the catalytic converter)- 0W-20 ACEA C2
(Using engine oil other than ACEA C2 may damage the catalytic converter)- 0W-30
- 5W-30w/o DPF API CF-4, CF or ACEA B3, B4, B5 or JASO DL-0 - 5W-30
- 10W-30
- Standard Capacity:
-
Item Specified Condition Drain and refill without oil filter change 6.2 liters (6.6 US qts, 5.5 Imp. qts) Drain and refill with oil filter change 6.6 liters (7.0 US qts, 5.8 Imp. qts) Dry fill 7.6 liters (8.0 US qts, 6.7 Imp. qts)
12180E 8.INSTALL OIL FILLER CAP ASSEMBLY
Install the oil filler cap assembly.
9.INSPECT ENGINE OIL LEVEL
10.INSPECT FOR OIL LEAK
Start the engine. Make sure that no oil leaks from the connection point of the oil filter cap assembly.
51455C 11.INSTALL NO. 2 ENGINE UNDER COVER SEAL
Install the No. 2 engine under cover seal with the 3 bolts.
- Torque:
- 5.0 N*m (51 kgf*cm, 44 in.*lbf)
51410 12.INSTALL NO. 1 ENGINE UNDER COVER ASSEMBLY
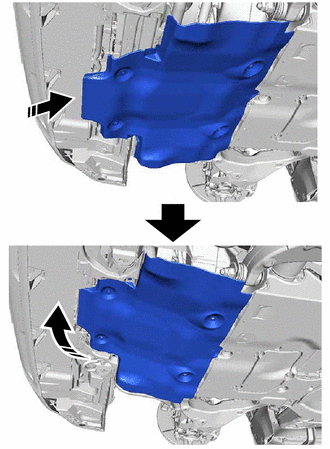
|
|
Install in this Direction |
After attaching the 2 temporary holding guides of the No. 1 engine under cover assembly to the vehicle frame, set the No. 1 engine under cover assembly to the vehicle side while pulling the engine side cover sub-assembly RH and engine side cover sub-assembly LH as shown in the illustration.
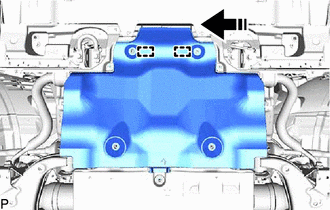
|
|
Install in this Direction |
Move the side of the No. 1 engine under cover assembly facing the front of the vehicle and attach the 2 temporary holding guides to the vehicle frame.
|
|
Bolt A |
|
|
Bolt B |
Install the 5 bolts (A) and 4 bolts (B).
- Torque:
- for bolt (A) : 29 N*m (296 kgf*cm, 21 ft.*lbf)