SEAT SEAT HEATER SYSTEM B14B587 Lost Communication with Front Seat Temperature Adjustment Switch LIN Missing Message
DESCRIPTION
The air conditioning control assembly communicates with the air conditioning amplifier assembly via LIN communication.
| DTC No. | Detection Item | DTC Detection Condition | Trouble Area | DTC Output from | Priority |
|---|---|---|---|---|---|
| B14B587 | Lost Communication with Front Seat Temperature Adjustment Switch LIN Missing Message | A communication error or interruption between the refreshing seat switch and air conditioning amplifier assembly continues for 10 seconds or more. |
·
Harness or connector
·
Air conditioning control assembly
·
Air conditioning amplifier assembly |
Air Conditioner | A |
WIRING DIAGRAM
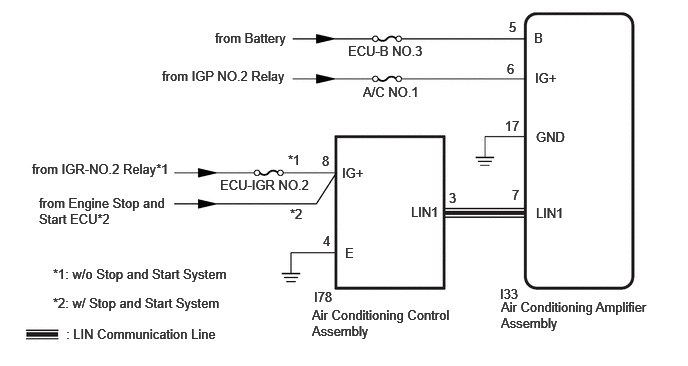
CAUTION / NOTICE / HINT
- NOTICE:
-
Inspect the fuses for circuits related to this system before performing the following procedure.
PROCEDURE
- Result:
-
Result Proceed to w/o Stop and Start System A w/ Stop and Start System B
A
B
Pre-procedure1
Disconnect the I78 air conditioning control assembly connector.
Procedure1
Measure the voltage according to the value(s) in the table below.
- Standard Voltage:
-
Tester Connection Switch Condition Specified Condition Click Location & Routing(I78)Location & Routingewd_type=routing;type=c;code=I78
I78-8 (IG+) - Body ground Ignition switch ON 11 to 14 V
- Result:
-
Proceed to OK NG
Post-procedure1
None
OK
NG
Pre-procedure1
Disconnect the I78 air conditioning control assembly connector.
Procedure1
Measure the resistance according to the value(s) in the table below.
- Standard Resistance:
-
Tester Connection Condition Specified Condition Click Location & Routing(I78)Location & Routingewd_type=routing;type=c;code=I78
I78-4 (E) - Body ground Always Below 1 Ω
- Result:
-
Proceed to OK NG
Post-procedure1
None
OK
NG
Pre-procedure1
Disconnect the I33 air conditioning amplifier assembly connector.
Disconnect the I78 air conditioning control assembly connector.
Procedure1
Measure the resistance according to the value(s) in the table below.
- Standard Resistance:
-
Tester Connection Condition Specified Condition Click Location & Routing(I33,I78)Location & Routingewd_type=routing;type=c,c;code=I33,I78
I33-7 (LIN1) - I78-3 (LIN1) Always Below 1 Ω I33-7 (LIN1) or I78-3 (LIN1) - Other terminals and body ground Always 10 kΩ or higher
- Result:
-
Proceed to OK NG
Post-procedure1
None
OK
NG
Using an oscilloscope, check the waveform.
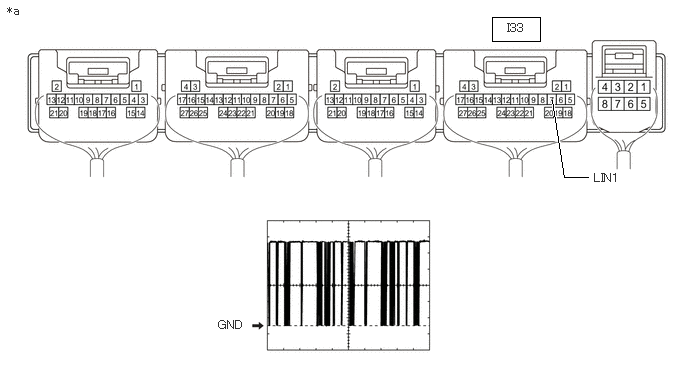
| *a | Component with harness connected (Air Conditioning Amplifier Assembly) |
- | - |
| Tester Connection | Tool Setting | Switch Condition |
|---|---|---|
Click Location & Routing(I33)Location & Routingewd_type=routing;type=c;code=I33 |
||
| I33-7 (LIN1) - Body ground | 2 V/DIV., 20 ms/DIV. | Ignition switch ON |
- OK:
-
The waveform displays properly.
- Result:
-
Proceed to OK NG
OK
NG
Click hereVehicle Interior>HEATING / AIR CONDITIONING>AIR CONDITIONING PANEL (for Front Side)>REMOVAL
Pre-procedure1
Disconnect the I78 air conditioning control assembly connector.
Procedure1
Measure the voltage according to the value(s) in the table below.
- Standard Voltage:
-
Tester Connection Condition Specified Condition Click Location & Routing(I78)Location & Routingewd_type=routing;type=c;code=I78
I78-8 (IG+) - Body ground Ignition switch ON 10.5 to 16 V
- Result:
-
Proceed to OK NG
Post-procedure1
None
OK
NG
Click hereEngine / Hybrid System>STOP AND START>STOP AND START SYSTEM>HOW TO PROCEED WITH TROUBLESHOOTING
Pre-procedure1
Disconnect the I78 air conditioning control assembly connector.
Procedure1
Measure the resistance according to the value(s) in the table below.
- Standard Resistance:
-
Tester Connection Switch Condition Specified Condition Click Location & Routing(I78)Location & Routingewd_type=routing;type=c;code=I78
I78-4 (E) - Body ground Always Below 1 Ω
- Result:
-
Proceed to OK NG
Post-procedure1
None
OK
NG
Pre-procedure1
Disconnect the I33 air conditioning amplifier assembly connector.
Disconnect the I78 air conditioning control assembly connector.
Procedure1
Measure the resistance according to the value(s) in the table below.
- Standard Resistance:
-
Tester Connection Condition Specified Condition Click Location & Routing(I33,I78)Location & Routingewd_type=routing;type=c,c;code=I33,I78
I33-7 (LIN1) - I78-3 (LIN1) Always Below 1 Ω I33-7 (LIN1) or I78-3 (LIN1) - Other terminals and body ground Always 10 kΩ or higher
- Result:
-
Proceed to OK NG
Post-procedure1
None
OK
NG
Using an oscilloscope, check the waveform.
| *a | Component with harness connected (Air Conditioning Amplifier Assembly) |
- | - |
| Tester Connection | Tool Setting | Switch Condition |
|---|---|---|
Click Location & Routing(I33)Location & Routingewd_type=routing;type=c;code=I33 |
||
| I33-7 (LIN1) - Body ground | 2 V/DIV., 20 ms/DIV. | Ignition switch ON |
- OK:
-
The waveform displays properly.
- Result:
-
Proceed to OK NG
OK
NG
Click hereVehicle Interior>HEATING / AIR CONDITIONING>AIR CONDITIONING PANEL (for Front Side)>REMOVAL