Home › Audio / Visual / Telematics › AUDIO / VIDEO › AUDIO AND VISUAL SYSTEM (for Radio and Display Type, except 12.3 Inch Display) › from 2021.07
RM38G0E _56 Audio / Visual / Telematics _100606 AUDIO / VIDEO _0467497 AUDIO AND VISUAL SYSTEM(for Radio and Display Type, except 12.3 Inch Display) C

AUDIO / VIDEO  AUDIO AND VISUAL SYSTEM(for Radio and Display Type, except 12.3 Inch Display)  B15DB  Telematics Transceiver Disconnected  


DESCRIPTION

If the radio receiver assembly cannot detect the telephone transceiver assembly for a certain period of time (90 seconds) after the ignition switch is turned to ON and the radio receiver assembly confirms that the information is missing by checking past telephone transceiver assembly recognition information (registered information), this DTC will be stored.

HINT:

The telematics system uses USB communication between devices. If an open, short, short to +B or short to ground occurs in the USB circuit, communication is interrupted and the telematics system will not operate normally.


DTC No. Detection Item DTC Detection Condition Trouble Area DTC Output from Priority
B15DB Telematics Transceiver Disconnected Telephone transceiver assembly disconnected
·

Harness or connector

·

Telephone transceiver assembly

·

Radio receiver assembly

·

Navigation ECU


Navigation System A

HINT:

This DTC may be stored due to environmental reasons such as electrical noise or interference.


WIRING DIAGRAM
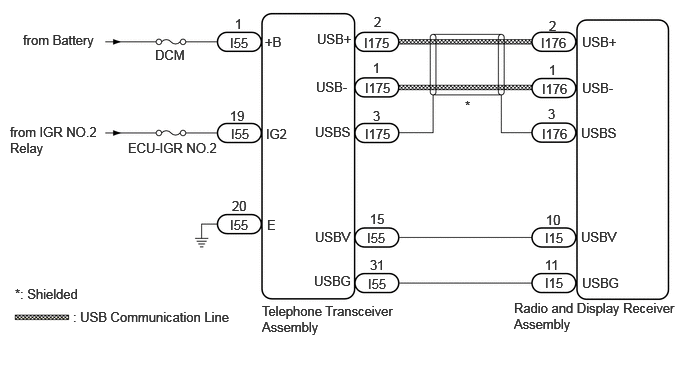
E427424E39
5.354,3.125 7.052,3.563 1.698,0.438 10 false Radio and Display Receiver Assembly 2.729,3.156 4.115,3.604 1.385,0.448 10 false Telephone Transceiver Assembly 0.76,3.219 2.646,3.521 1.885,0.302 10 false : USB Communication Line 0.24,0.333 1.698,0.615 1.458,0.281 10 false from Battery 0.104,1.292 1.031,1.781 0.927,0.49 10 false from IGR NO.2 Relay 1.333,1.458 2.313,2.031 0.979,0.573 10 false ECU-IGR NO.2 1.615,0.49 2.625,1 1.01,0.51 10 false DCM 3.792,0.365 4.146,0.625 0.354,0.26 10 false I175 3.823,2.396 4.177,2.594 0.354,0.198 10 false I55 2.76,0.354 3.302,0.677 0.542,0.323 10 false +B 2.771,1.313 3.313,1.635 0.542,0.323 10 false IG2 2.781,2.26 3.115,2.583 0.333,0.323 10 false E 3.302,0.323 3.854,0.615 0.552,0.292 10 false USB+ 3.292,0.823 3.844,1.115 0.552,0.292 10 false USB- 3.281,1.292 3.833,1.583 0.552,0.292 10 false USBS 6.052,2.385 6.604,2.677 0.552,0.292 10 false USBV 3.271,2.844 3.823,3.135 0.552,0.292 10 false USBG 6.063,2.865 6.615,3.156 0.552,0.292 10 false USBG 6.063,0.354 6.615,0.646 0.552,0.292 10 false USB+ 6.063,0.833 6.615,1.125 0.552,0.292 10 false USB- 6.052,1.302 6.604,1.594 0.552,0.292 10 false USBS 4.844,1.021 5.604,1.333 0.76,0.313 10 false * 3.281,2.385 3.833,2.677 0.552,0.292 10 false USBV 2.448,0.167 2.865,0.5 0.417,0.333 10 false 1 2.396,1.125 2.813,1.458 0.417,0.333 10 false 19 2.417,2.063 2.833,2.396 0.417,0.333 10 false 20 3.896,0.146 4.313,0.479 0.417,0.333 10 false 2 3.885,0.625 4.302,0.958 0.417,0.333 10 false 1 3.885,1.125 4.302,1.458 0.417,0.333 10 false 3 3.854,2.198 4.167,2.427 0.313,0.229 10 false 15 3.854,2.677 4.271,3.01 0.417,0.333 10 false 31 5.688,2.208 6.104,2.542 0.417,0.333 10 false 10 5.677,2.677 6.094,3.01 0.417,0.333 10 false 11 5.719,0.188 6.135,0.521 0.417,0.333 10 false 2 5.719,0.646 6.135,0.979 0.417,0.333 10 false 1 5.708,1.104 6.125,1.438 0.417,0.333 10 false 3 3.833,2.875 4.188,3.073 0.354,0.198 10 false I55 2.396,2.26 2.75,2.458 0.354,0.198 10 false I55 2.406,1.313 2.76,1.51 0.354,0.198 10 false I55 2.396,0.365 2.75,0.563 0.354,0.198 10 false I55 3.802,0.833 4.156,1.094 0.354,0.26 10 false I175 5.635,0.365 5.99,0.625 0.354,0.26 10 false I176 5.646,0.844 6,1.104 0.354,0.26 10 false I176 5.646,1.313 6,1.573 0.354,0.26 10 false I176 5.677,2.865 6.135,3.063 0.458,0.198 10 false I15 5.677,2.396 6.135,2.594 0.458,0.198 10 false I15 0.156,2.979 2.042,3.281 1.885,0.302 10 false *: Shielded 3.802,1.313 4.156,1.573 0.354,0.26 10 false I175

CAUTION / NOTICE / HINT

NOTICE:
·

When replacing the telephone transceiver assembly, make sure to replace it with a new one.

·

Inspect the fuses for circuits related to this system before performing the following procedure.


HINT:

Depending on the parts that are replaced during vehicle inspection or maintenance, performing initialization, registration or calibration may be needed. Refer to Precaution for Audio and Visual System.

Click hereAudio / Visual / Telematics>AUDIO / VIDEO>AUDIO AND VISUAL SYSTEM (for Radio and Display Type, except 12.3 Inch Display)>PRECAUTION


PROCEDURE

1.CHECK DTC

b.

Turn the ignition switch off.


c.

Turn the ignition switch to ON and wait for 90 seconds.


d.

Recheck for DTCs and check that no DTCs are output.

Click hereAudio / Visual / Telematics>AUDIO / VIDEO>AUDIO AND VISUAL SYSTEM (for Radio and Display Type, except 12.3 Inch Display)>DTC CHECK / CLEAR

Body Electrical > Navigation System > Trouble Codes
50001 212
OK:

No DTCs are output.


Result:
Proceed to
OK
NG


OK

NG

2.CHECK HARNESS AND CONNECTOR (TELEPHONE TRANSCEIVER ASSEMBLY - BATTERY AND BODY GROUND)
a.

Disconnect the I55 telephone transceiver assembly connector.


b.

Measure the resistance according to the value(s) in the table below.

Standard Resistance:
Tester Connection Condition Specified Condition

Click Location & Routing(I55)Location & Routing

Click Connector(I55)Instrument Panel>Instrument Panel Wire / Mobile Wireless Charger Cord / No. 1 Navigation Wire / No. 2 Instrument Panel Wire / No. 5 Instrument Panel Wire / Telephone Computer Wire>Telematics Transceiver Assembly

I55-20 (E) - Body ground Always Below 1 Ω


c.

Measure the voltage according to the value(s) in the table below.

Standard Voltage:
Tester Connection Condition Specified Condition

Click Location & Routing(I55)Location & Routing

Click Connector(I55)Instrument Panel>Instrument Panel Wire / Mobile Wireless Charger Cord / No. 1 Navigation Wire / No. 2 Instrument Panel Wire / No. 5 Instrument Panel Wire / Telephone Computer Wire>Telematics Transceiver Assembly

I55-1 (+B) - Body ground Always 11 to 14 V
I55-19 (IG2) - Body ground Ignition switch ON 11 to 14 V


Result:
Proceed to
OK
NG


OK

3.CHECK HARNESS AND CONNECTOR (RADIO RECEIVER ASSEMBLY - TELEPHONE TRANSCEIVER ASSEMBLY)

NG

REPAIR OR REPLACE HARNESS OR CONNECTOR

3.CHECK HARNESS AND CONNECTOR (RADIO RECEIVER ASSEMBLY - TELEPHONE TRANSCEIVER ASSEMBLY)
a.

Disconnect the I15 radio receiver assembly connector.


b.

Disconnect the I55 telephone transceiver assembly connector.


c.

Measure the resistance according to the value(s) in the table below.

Standard Resistance:
Tester Connection Condition Specified Condition

Click Location & Routing(I15,I55)Location & Routing

Click Connector(I15)Instrument Panel>Instrument Panel Wire / Mobile Wireless Charger Cord / No. 1 Navigation Wire / No. 2 Instrument Panel Wire / No. 5 Instrument Panel Wire / Telephone Computer Wire>Radio & Display Receiver Assembly

Click Connector(I55)Instrument Panel>Instrument Panel Wire / Mobile Wireless Charger Cord / No. 1 Navigation Wire / No. 2 Instrument Panel Wire / No. 5 Instrument Panel Wire / Telephone Computer Wire>Telematics Transceiver Assembly

I15-10 (USBV) - I55-15 (USBV) Always Below 1 Ω
I15-11 (USBG) - I55-31 (USBG) Always Below 1 Ω
I15-10 (USBV) - Body ground Always 10 kΩ or higher
I15-11 (USBG) - Body ground Always 10 kΩ or higher


Result:
Proceed to
OK
NG


OK

4.CHECK RADIO RECEIVER ASSEMBLY (USBV, USBG)

NG

REPAIR OR REPLACE HARNESS OR CONNECTOR

4.CHECK RADIO RECEIVER ASSEMBLY (USBV, USBG)
a.

Disconnect the I55 telematics transceiver connector.


b.

Measure the resistance according to the value(s) in the table below.

Standard Resistance:
Tester Connection Condition Specified Condition

Click Location & Routing(I55)Location & Routing

Click Connector(I55)Instrument Panel>Instrument Panel Wire / Mobile Wireless Charger Cord / No. 1 Navigation Wire / No. 2 Instrument Panel Wire / No. 5 Instrument Panel Wire / Telephone Computer Wire>Telematics Transceiver Assembly

I55-31 (USBG) - Body ground Always Below 1 Ω


c.

Measure the voltage according to the value(s) in the table below.

Standard Voltage:
Tester Connection Switch Condition Specified Condition

Click Location & Routing(I55)Location & Routing

Click Connector(I55)Instrument Panel>Instrument Panel Wire / Mobile Wireless Charger Cord / No. 1 Navigation Wire / No. 2 Instrument Panel Wire / No. 5 Instrument Panel Wire / Telephone Computer Wire>Telematics Transceiver Assembly

I55-15 (USBV) - I55-31 (USBG) Ignition switch ON 4.75 to 5.25 V


Result:
Proceed to
OK
NG


OK

5.CHECK HARNESS AND CONNECTOR (TELEMATICS TRANSCEIVER - RADIO AND DISPLAY RECEIVER ASSEMBLY)

NG

5.CHECK HARNESS AND CONNECTOR (TELEMATICS TRANSCEIVER - RADIO AND DISPLAY RECEIVER ASSEMBLY)
a.
E427222C17
1.479,0.302 1.927,0.583 0.448,0.281 1.458,2.563 1.906,2.844 0.448,0.281 2.5,0.698 2.313,0.698 2.313,0.698 1.833,1.396 true 1.583,3.406 1.292,2.969 1.292,2.969 1.156,2.969 true 2.208,2.969 2.083,2.969 2.083,2.969 1.813,3.396 true 2.156,4.031 2.01,4.031 2.01,4.031 1.76,3.573 true 1.563,1.417 1.271,0.688 1.271,0.688 1.01,0.688 true 1.26,2.073 1.375,2.073 1.375,2.073 1.604,1.615 true 1.115,0.156 1.427,0.354 0.313,0.198 10 false *a 1.094,2.448 1.406,2.646 0.313,0.198 10 false *b 1.542,0.365 2,0.563 0.458,0.198 10 false I175 1.552,2.625 2.01,2.823 0.458,0.198 10 false I176 0.635,0.604 1.25,0.802 0.615,0.198 10 false USB- 0.76,2.875 1.375,3.073 0.615,0.198 10 false USB- 2.573,0.594 3.188,0.792 0.615,0.198 10 false USB+ 2.271,2.896 2.885,3.094 0.615,0.198 10 false USB+ 2.219,3.969 2.833,4.167 0.615,0.198 10 false USBS 0.823,2 1.438,2.198 0.615,0.198 10 false USBS
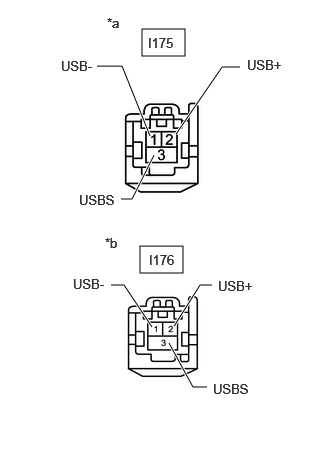
*a Front view of wire harness connector
(to Telephone Transceiver Assembly)
*b Front view of wire harness connector
(to Radio and Display Receiver Assembly)


Disconnect the I175 telematics transceiver connector.


b.

Disconnect the I176 radio and display receiver assembly connector.


c.

Measure the resistance according to the value(s) in the table below.

Standard Resistance:
Tester Connection Condition Specified Condition

Click Location & Routing(I175,I176)Location & Routing

Click Connector(I175)Instrument Panel>Instrument Panel Wire / Mobile Wireless Charger Cord / No. 1 Navigation Wire / No. 2 Instrument Panel Wire / No. 5 Instrument Panel Wire / Telephone Computer Wire>Telematics Transceiver Assembly

Click Connector(I176)Instrument Panel>Instrument Panel Wire / Mobile Wireless Charger Cord / No. 1 Navigation Wire / No. 2 Instrument Panel Wire / No. 5 Instrument Panel Wire / Telephone Computer Wire>Radio & Display Receiver Assembly

I175-2 (USB+) - I176-2 (USB+) Always Below 1 Ω
I175-1 (USB-) - I176-1 (USB-) Always Below 1 Ω
I175-3 (USBS) - I176-3 (USBS) Always Below 1 Ω
I175-2 (USB+) - Body ground Always 10 kΩ or higher
I175-1 (USB-) - Body ground Always 10 kΩ or higher
I175-3 (USBS) - Body ground Always 10 kΩ or higher


Result:
Proceed to
OK
NG


OK

6.CHECK TELEMATICS TRANSCEIVER

NG

REPAIR OR REPLACE HARNESS OR CONNECTOR

6.CHECK TELEMATICS TRANSCEIVER
a.

Replace the telematics transceiver with a new one.

Click hereAudio / Visual / Telematics>TELEMATICS>TELEMATICS TRANSCEIVER>REMOVAL


c.

Turn the ignition switch off.


d.

Turn the ignition switch to ON and wait for 90 seconds.


e.

Recheck for DTCs and check that no DTCs are output.

Click hereAudio / Visual / Telematics>AUDIO / VIDEO>AUDIO AND VISUAL SYSTEM (for Radio and Display Type, except 12.3 Inch Display)>DTC CHECK / CLEAR

Body Electrical > Navigation System > Trouble Codes
50001 212
OK:

No DTCs are output.


Result:
Proceed to
OK
NG


OK

END (TELEMATICS TRANSCEIVER IS DEFECTIVE)

NG