ADVANCED DRIVER ASSISTANCE SYSTEM ADAPTIVE HIGH BEAM SYSTEM B249096 AHS Fan LH Component Internal Failure B249196 AHS Fan RH Component Internal Failure
DESCRIPTION
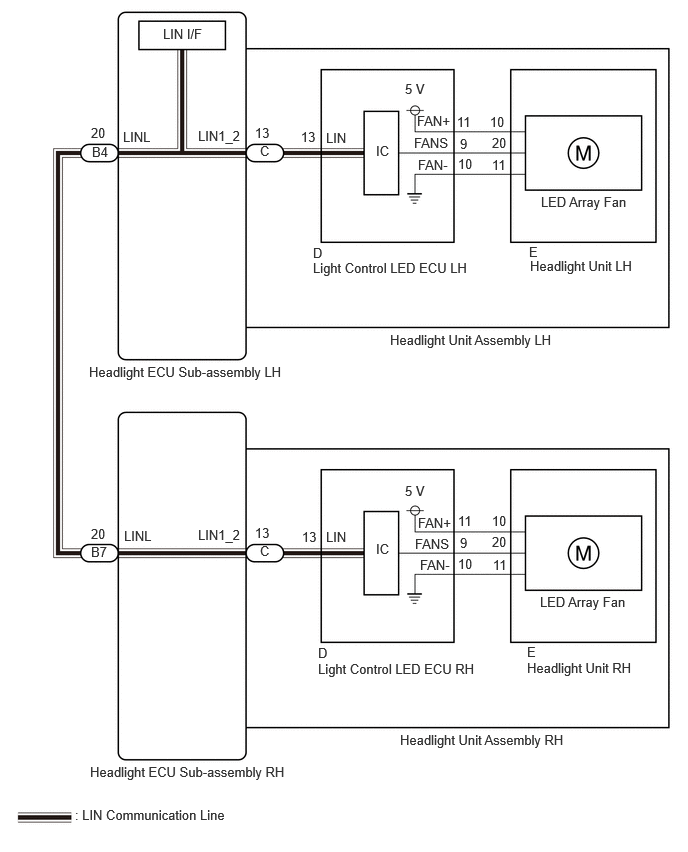
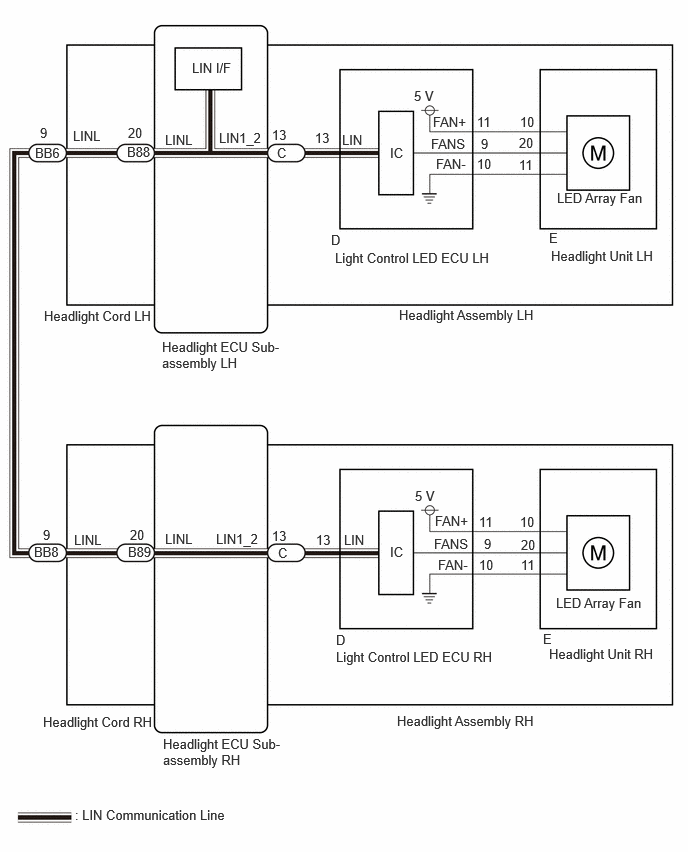
The light control LED ECU receives adaptive high beam system control signals from the headlight ECU sub-assembly via LIN communication and drives the LED array fan to cool LED array to prevent it from overheating.
The LED array fan operates under normal circumstances when the low beam headlights are illuminated.
The light control LED ECU monitors the LED array fan speed signal (FANS terminal pulse signal) and when a malfunction is detected, it outputs a signal to the headlight ECU sub-assembly via LIN communication.
| DTC No. | Detection Item | DTC Detection Condition | Trouble Area | DTC Output from | Priority |
|---|---|---|---|---|---|
| B249096 | AHS Fan LH Component Internal Failure |
Detection condition:
All of the following conditions are met:
-
Ignition switch ON
-
Low beam headlights on
Malfunction status:
LED array fan malfunction signals are received from light control LED ECU LH
Malfunction duration:
- |
·
Headlight unit assembly LH
·
Headlight LED unit assembly LH
·
Light control LED ECU LH |
Headlight Control | A |
| B249196 | AHS Fan RH Component Internal Failure |
Detection condition:
All of the following conditions are met:
-
Ignition switch ON
-
Low beam headlights on
Malfunction status:
LED array fan malfunction signals are received from light control LED ECU RH
Malfunction duration:
- |
·
Headlight unit assembly RH
·
Headlight LED unit assembly RH
·
Light control LED ECU RH |
Headlight Control | A |
WIRING DIAGRAM
for LHD
for RHD
PROCEDURE
Clear the DTCs.
- Body Electrical > Headlight Control > Clear DTCs
- 50002 462
- Result:
-
Proceed to NEXT
NEXT
Pre-procedure1
Turn the ignition switch to ON.
Operate the light control switch to turn on the low beam headlights.
Procedure1
Check for DTCs.
- Body Electrical > Headlight Control > Trouble Codes
- 50001 462
- Result:
-
Result Proceed to B249096 and B249196 are not output A B249096 is output B B249196 is output C
Post-procedure1
None
A
Click hereGeneral>INTRODUCTION>HOW TO TROUBLESHOOT ECU CONTROLLED SYSTEMS>HOW TO PROCEED WITH TROUBLESHOOTING
B
C
Pre-procedure1
Remove the headlight unit assembly LH.
- HINT:
-
Click hereVehicle Exterior>LIGHTING (EXT)>HEADLIGHT ASSEMBLY>DISASSEMBLY
Procedure1
Measure the resistance according to the value(s) in the table below.
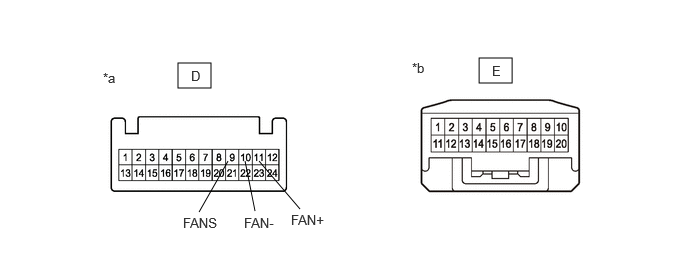
| *a | Component without harness connected (to Light Control LED ECU LH) |
*b | Component without harness connected (to Headlight Unit LH) |
- Standard Resistance:
-
Tester Connection Condition Specified Condition D-11 (FAN+) - E-10 Always Below 1 Ω D-9 (FANS) - E-20 Always Below 1 Ω D-10 (FAN-) - E-11 Always Below 1 Ω
- Result:
-
Proceed to OK NG
Post-procedure1
None
OK
NG
Pre-procedure1
Connect the except headlight unit LH connectors.
Procedure1
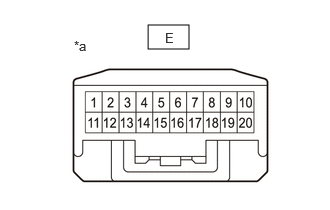
| *a | Component without harness connected (to Headlight Unit LH) |
Measure the voltage according to the value(s) in the table below.
- Standard Voltage:
-
Tester Connection Condition Specified Condition E-10 - E-11 Low beam headlights on 4.75 to 5.25 V E-20 - E-11 Low beam headlights on 4.75 to 5.25 V
- Result:
-
Proceed to OK NG
Post-procedure1
None
OK
NG
Pre-procedure1
Remove the headlight unit assembly RH.
- HINT:
-
Click hereVehicle Exterior>LIGHTING (EXT)>HEADLIGHT ASSEMBLY>DISASSEMBLY
Procedure1
Measure the resistance according to the value(s) in the table below.
| *a | Component without harness connected (to Light Control LED ECU RH) |
*b | Component without harness connected (to Headlight Unit RH) |
- Standard Resistance:
-
Tester Connection Condition Specified Condition D-11 (FAN+) - E-10 Always Below 1 Ω D-9 (FANS) - E-20 Always Below 1 Ω D-10 (FAN-) - E-11 Always Below 1 Ω
- Result:
-
Proceed to OK NG
Post-procedure1
None
OK
NG
Pre-procedure1
Connect the except headlight unit RH connectors.
Procedure1
| *a | Component without harness connected (to Headlight Unit RH) |
Measure the voltage according to the value(s) in the table below.
- Standard Voltage:
-
Tester Connection Condition Specified Condition E-10 - E-11 Low beam headlights on 4.75 to 5.25 V E-20 - E-11 Low beam headlights on 4.75 to 5.25 V
- Result:
-
Proceed to OK NG
Post-procedure1
None
OK
NG