NM25T0E _52 Drivetrain _030651 R151F MANUAL TRANSMISSION / TRANSAXLE _0138329 MANUAL TRANSMISSION SYSTEM DE DETAILS F
R151F MANUAL TRANSMISSION / TRANSAXLE MANUAL TRANSMISSION SYSTEM DETAILS REVERSE SYNCHROMESH MECHANISM
CONSTRUCTION
a.
The reverse synchromesh mechanism consists of 2 shifting keys and a shifting key return spring.
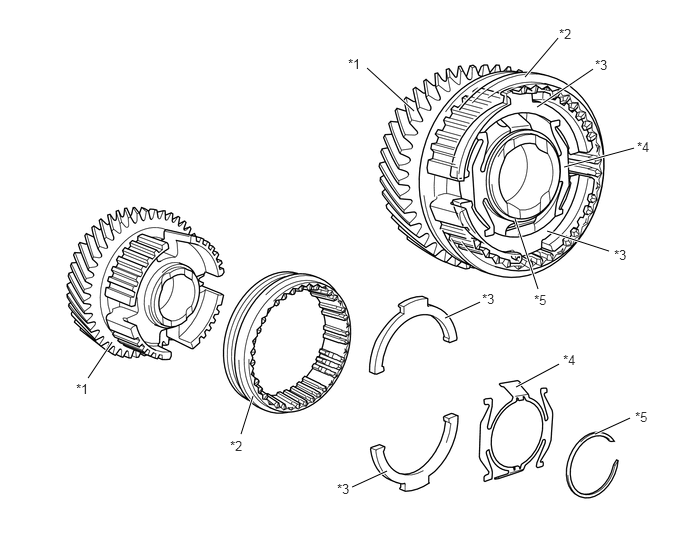
3.667,5.073 4.031,4.906 true 4.635,3.313 5,3.146 true 2.51,4.521 2.635,4.125 true 0.917,3.938 1.167,3.563 true 5.375,4.031 5.823,3.792 true 6.198,4.521 6.563,4.354 true 5.698,2.406 6.344,2.615 true 5.365,2.281 5.604,3.01 true 5.875,1.74 6.604,1.542 true 5.594,1.115 6.177,0.719 true 5.469,0.802 5.813,0.396 true 4.313,1.156 3.823,0.708 true 3.625,0.583 3.938,0.74 0.313,0.156 10 false *1 2.396,4.563 2.708,4.719 0.313,0.156 10 false *2 5.021,3.031 5.333,3.188 0.313,0.156 10 false *3 6.615,4.26 6.927,4.417 0.313,0.156 10 false *5 5.563,3.042 5.875,3.198 0.313,0.156 10 false *5 0.792,3.969 1.104,4.125 0.313,0.156 10 false *1 5.823,0.271 6.135,0.427 0.313,0.156 10 false *2 6.198,0.594 6.51,0.75 0.313,0.156 10 false *3 5.865,3.667 6.177,3.823 0.313,0.156 10 false *4 6.635,1.448 6.948,1.604 0.313,0.156 10 false *4 6.396,2.573 6.708,2.729 0.313,0.156 10 false *3 3.51,5.01 3.823,5.167 0.313,0.156 10 false *3
| *1 | Countershaft 5th Gear | *2 | Hub Sleeve (No. 3 Transmission Hub Sleeve) |
| *3 | Shifting Key (No. 3 Synchromesh Shifting Key) | *4 | Shifting Key Return Spring (No. 3 Synchromesh Shifting Key Spring) |
| *5 | Snap Ring (Shaft Snap Ring) | - | - |
OPERATION
a.
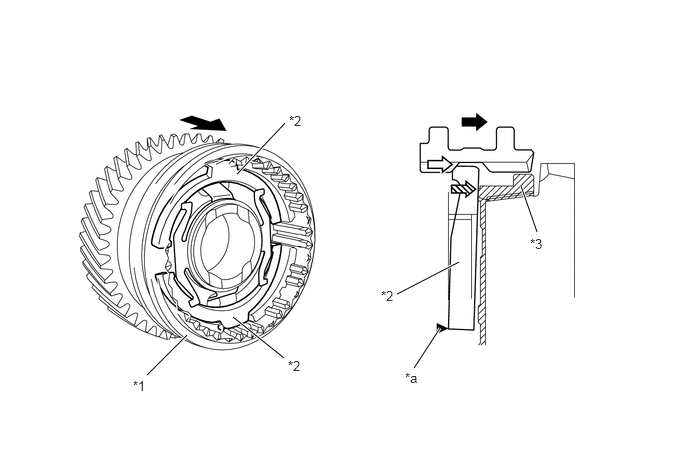
While shifting into 5th, the 2 shifting keys move in unison with the hub sleeve (F1). With "A" acting as the fulcrum, the 2 shifting keys move to push the synchronizer ring only for the amount of the lever ratio (F2). The shift effort can be reduced only by this amount.
1.531,3.906 1.948,3.49 true 2.958,3.729 2.427,3.302 true 2.969,1.281 2.469,1.813 true 4.781,2.729 4.135,3.063 true 4.583,3.417 4.313,3.833 true 5.427,1.938 5.594,2.417 true 1.385,3.938 1.698,4.135 0.313,0.198 10 false *1 3,3.729 3.313,3.927 0.313,0.198 10 false *2 3.01,1.177 3.323,1.375 0.313,0.198 10 false *2 5.521,2.458 5.833,2.656 0.313,0.198 10 false *3 3.969,3 4.281,3.198 0.313,0.198 10 false *2 4.219,3.854 4.531,4.052 0.313,0.198 10 false *a
| *1 | Hub Sleeve (No. 3 Transmission Hub Sleeve) | *2 | Shifting Key (No. 3 Synchromesh Shifting Key) |
| *3 | Synchronizer Ring (No. 3 Counter Synchronizer Ring) | - | - |
| *a | A | - | - |

|
Hub Sleeve Moving Direction |

|
F1 |

|
F2 | - | - |
b.
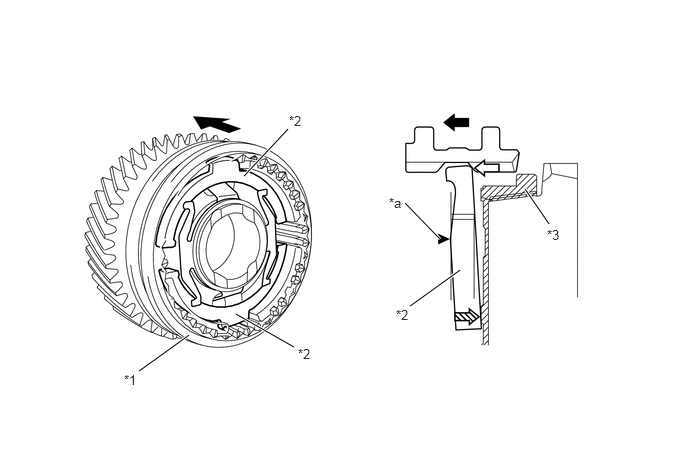
While shifting into reverse, the 2 shifting keys move in unison with the hub sleeve (F1). With "B" acting as the fulcrum, the 2 shifting keys move to push the synchronizer ring (F2). As a result, a brake is applied to the rotation of the counter shaft and gear noise is prevented.
2.542,1.833 3,1.344 true 2.458,3.271 3.063,3.615 true 1.969,3.49 1.448,3.865 true 4.792,2.813 4.271,3.188 true 4.583,2.49 4.219,2.115 true 5.719,2.333 5.469,1.969 true 1.292,3.875 1.604,4.073 0.313,0.198 10 false *1 3.104,3.604 3.417,3.802 0.313,0.198 10 false *2 3.01,1.177 3.323,1.375 0.313,0.198 10 false *2 4.052,2.031 4.365,2.229 0.313,0.198 10 false *a 4.125,3.198 4.438,3.396 0.313,0.198 10 false *2 5.698,2.365 6.01,2.563 0.313,0.198 10 false *3
| *1 | Hub Sleeve (No. 3 Transmission Hub Sleeve) | *2 | Shifting Key (No. 3 Synchromesh Shifting Key) |
| *3 | Synchronizer Ring (No. 3 Counter Synchronizer Ring) | - | - |
| *a | B | - | - |
|
|
Hub Sleeve Moving Direction |
|
F1 |
|
|
F2 | - | - |