1VD-FTV ENGINE MECHANICAL ENGINE UNIT INSPECTION
PROCEDURE

 11101A 1.INSPECT CYLINDER HEAD SET BOLT
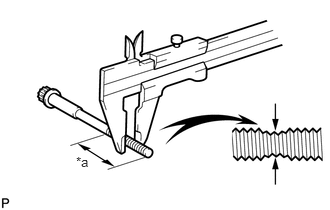
| *a | Measuring Area |
Using a vernier caliper, measure the outside thread diameter of the cylinder head set bolt.
- Standard diameter:
-
12.8 to 13.0 mm (0.504 to 0.512 in.)
- Minimum diameter:
-
12.5 mm (0.492 in.)
- HINT:
-
If a visual check reveals no excessively thin areas, check the center of the cylinder head set bolt (see illustration) and find the area that has the smallest diameter.
If the diameter is less than the minimum, replace the cylinder head set bolt.
13511 2.INSPECT CAMSHAFT
Inspect the camshaft for runout.
Place the camshaft on V-blocks.
Using a dial indicator, measure the runout at the center journal.
- Maximum runout:
-
0.03 mm (0.00118 in.)
If the runout is more than the maximum, replace the camshaft.
Inspect the cam lobe height.
Using a micrometer, measure the cam lobe height.
- Standard Cam Lobe Height:
-
Item Specified Condition No. 2 and No. 3 camshaft
(intake)37.277 to 37.387 mm (1.468 to 1.472 in.) No. 1 and No. 4 camshaft
(exhaust)38.324 to 38.434 mm (1.509 to 1.513 in.)
- Minimum Cam Lobe Height:
-
Item Specified Condition No. 2 and No. 3 camshaft
(intake)37.277 mm (1.468 in.) No. 1 and No. 4 camshaft
(exhaust)38.324 mm (1.509 in.)
If the cam lobe height is less than the minimum, replace the camshaft.
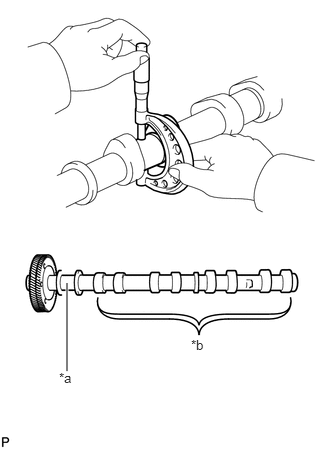
| *a | No. 1 Journal |
| *b | Other Journal |
Inspect the camshaft journal diameter.
Using a micrometer, measure the journal diameter.
- Standard Journal Diameter:
-
Item Specified Condition No. 1 journal 29.969 to 29.985 mm (1.180 to 1.181 in.) Other journal 26.969 to 26.985 mm (1.0618 to 1.0624 in.)
If the journal diameter is not as specified, check the oil clearance.
3.INSPECT CAMSHAFT OIL CLEARANCE
Clean the camshaft bearing caps and camshaft journals.
Place the camshafts on the cylinder head sub-assembly.
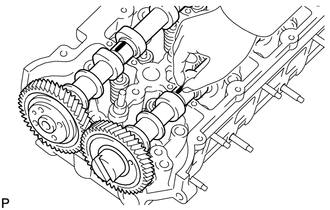
Lay a strip of Plastigage across each of the camshaft journals.
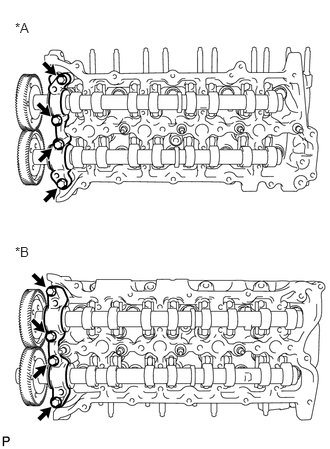
| *A | for Bank 1 |
| *B | for Bank 2 |
Temporarily install the camshaft bearing cap with the 4 bolts by hand.
- NOTICE:
-
Do not turn the camshafts.
Install the No. 3 camshaft bearing caps with the 16 bolts.
Confirm the marks and numbers on the camshaft bearing caps and place them in their proper position and direction.
Temporarily install the 16 bolts.
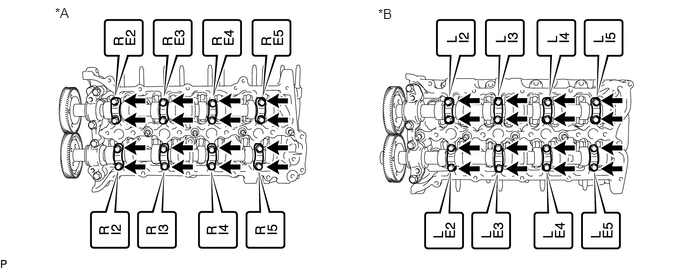
| *A | for Bank 1 | *B | for Bank 2 |
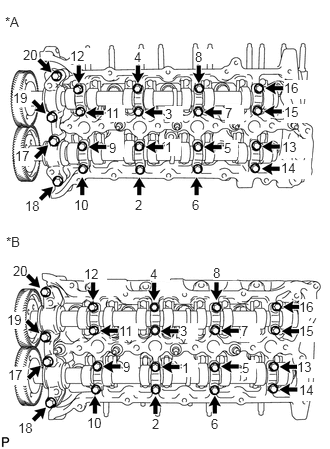
| *A | for Bank 1 |
| *B | for Bank 2 |
Uniformly tighten the 20 bolts in several steps in the order shown in the illustration.
- Torque:
- for 12 mm head bolt of No. 1 and No. 4 camshaft bearing cap : 21 N*m (214 kgf*cm, 15 ft.*lbf)
- for 10 mm head bolt of No. 3 camshaft bearing cap : 10 N*m (102 kgf*cm, 7 ft.*lbf)
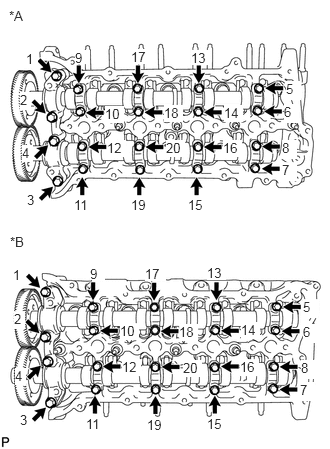
| *A | for Bank 1 |
| *B | for Bank 2 |
Uniformly loosen and remove the 20 bolts in the sequence shown in the illustration.
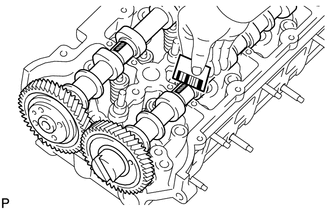
Measure the Plastigage at its widest point.
- Standard oil clearance:
-
0.025 to 0.062 mm (0.000984 to 0.00244 in.)
- Maximum oil clearance:
-
0.072 mm (0.00283 in.)
If the oil clearance is more than the maximum, replace the camshaft.
If necessary, replace the cylinder head sub-assembly.
Remove the Plastigage completely.
Remove the camshafts.
13801 4.INSPECT NO. 1 VALVE ROCKER ARM SUB-ASSEMBLY
Turn the roller by hand to check that it turns smoothly.
If the roller does not turn smoothly, replace the No. 1 valve rocker arm sub-assembly.
13750 5.INSPECT VALVE LASH ADJUSTER ASSEMBLY
- NOTICE:
-
·
Keep the adjuster free from dirt and foreign objects.
·Use only clean engine oil.
Place the valve lash adjuster assembly into a container full of new engine oil.
Insert SST tip into the valve lash adjuster assembly plunger and use the tip to press down on the check ball inside the plunger.
- SST
-
09276-75010
Squeeze SST and the valve lash adjuster assembly together to move the plunger up and down 5 to 6 times.
Check the movement of the plunger and bleed air.
- OK:
-
Plunger moves up and down.
- NOTICE:
-
When bleeding high-pressure air from the compression chamber, make sure that the tip of SST is actually pressing the check ball as shown in the illustration. If the check ball is not pressed, air will not bleed.
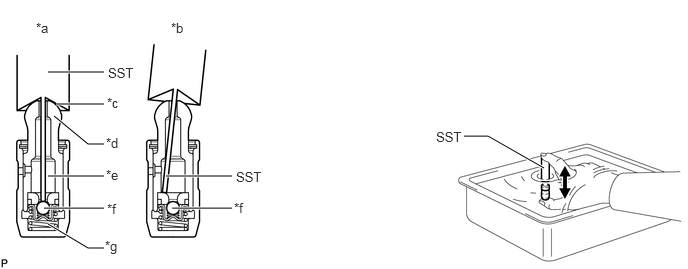
| *a | CORRECT | *b | INCORRECT |
| *c | Taper Part | *d | Plunger |
| *e | Lower Pressure Chamber | *f | Check Ball |
| *g | High Pressure Chamber | - | - |
After bleeding the air, remove SST. Then try to quickly and firmly press the plunger with your fingers.
- OK:
-
Plunger can be pressed 3 times.
If the plunger can still be compressed after pressing it 3 times, replace the valve lash adjuster assembly with a new one.
13506 6.INSPECT NO. 1 CHAIN SUB-ASSEMBLY
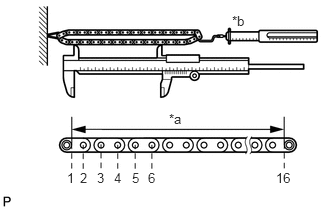
| *a | Measuring Area |
| *b | 147 N (15 kgf, 33.1 lbf) |
Using a spring scale, pull the No. 1 chain sub-assembly with a force of 147 N (15 kgf, 33.1 lbf) and measure the length of the No. 1 chain sub-assembly using a vernier caliper.
- Maximum No. 1 chain sub-assembly elongation:
-
143.95 mm (5.67 in.)
- NOTICE:
-
Perform the measurement at 3 random places.
If the elongation is more than the maximum, replace the No. 1 chain sub-assembly.
13506 7.INSPECT NO. 2 CHAIN SUB-ASSEMBLY
| *a | Measuring Area |
| *b | 147 N (15 kgf, 33.1 lbf) |
Using a spring scale, pull the No. 2 chain sub-assembly with a force of 147 N (15 kgf, 33.1 lbf) and measure the length of the No. 2 chain sub-assembly using a vernier caliper.
- Maximum No. 2 chain sub-assembly elongation:
-
143.95 mm (5.67 in.)
- NOTICE:
-
Perform the measurement at 3 random places.
If the elongation is more than the maximum, replace the No. 2 chain sub-assembly.
13616 8.INSPECT INJECTION PUMP SHAFT SPROCKET
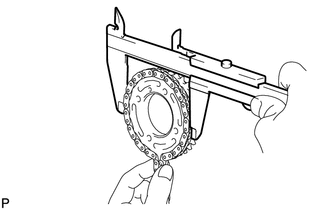
Wrap the No. 1 chain sub-assembly around the injection pump shaft sprocket place for the No. 1 chain sub-assembly.
Using a vernier caliper, measure the injection pump shaft sprocket with the No. 1 chain sub-assembly.
- Minimum gear diameter (with No. 1 chain sub-assembly):
-
101.55 mm (4.00 in.)
- HINT:
-
The vernier caliper must contact the No. 1 chain sub-assembly rollers for the measurement.
If the diameter is less than the minimum, replace the No. 1 chain sub-assembly and injection pump shaft sprocket.
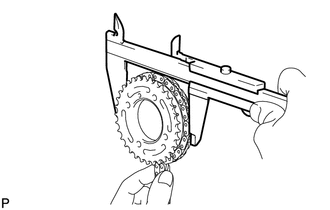
Wrap the No. 2 chain sub-assembly around the injection pump shaft sprocket place for the No. 2 chain sub-assembly.
Using a vernier caliper, measure the injection pump shaft sprocket with the No. 2 chain.
- Minimum gear diameter (with No. 2 chain sub-assembly):
-
101.55 mm (4.00 in.)
- HINT:
-
The vernier caliper must contact the No. 2 chain sub-assembly rollers for the measurement.
If the diameter is less than the minimum, replace the No. 2 chain sub-assembly and injection pump shaft sprocket.
13523 9.INSPECT NO. 1 CAMSHAFT TIMING SPROCKET
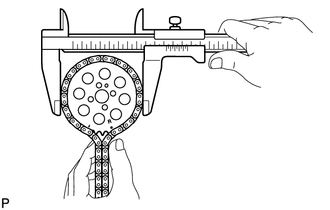
Wrap the No. 1 chain sub-assembly around the No. 1 camshaft timing sprocket.
Using a vernier caliper, measure the No. 1 camshaft timing sprocket diameter with the No. 1 chain sub-assembly.
- Minimum gear diameter (with No. 1 chain sub-assembly):
-
134.90 mm (5.31 in.)
- HINT:
-
The vernier caliper must contact the No. 1 chain sub-assembly rollers for the measurement.
If the diameter is less than the minimum, replace the No. 1 chain sub-assembly and No. 1 camshaft timing sprocket.
13529G 10.INSPECT NO. 2 CAMSHAFT TIMING SPROCKET
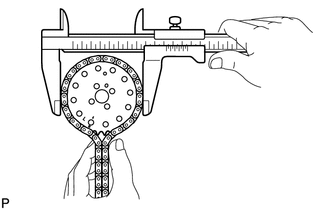
Wrap the No. 2 chain sub-assembly around the sprocket.
Using a vernier caliper, measure the No. 2 camshaft timing sprocket diameter with the No. 2 chain sub-assembly.
- Minimum gear diameter (with No. 2 chain sub-assembly):
-
134.90 mm (5.31 in.)
- HINT:
-
The vernier caliper must contact the No. 2 chain sub-assembly rollers for the measurement.
If the diameter is less than the minimum, replace the No. 2 chain sub-assembly and No. 2 camshaft timing sprocket.
13581 11.INSPECT NO. 1 IDLE GEAR SHAFT OIL CLEARANCE
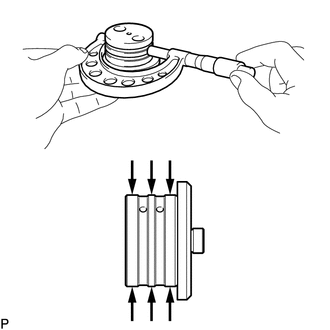
Using a micrometer, measure the No. 1 idle gear shaft diameter.
- Standard No. 1 idle gear shaft diameter:
-
44.947 to 44.975 mm (1.770 to 1.771 in.)
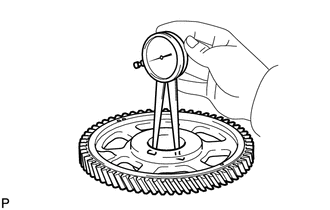
Using a caliper gauge, measure the inside diameter of the No. 1 idle gear.
- Standard No. 1 idle gear inside diameter:
-
45.000 to 45.025 mm (1.772 to 1.773 in.)
Subtract the No. 1 idle gear shaft diameter measurement from the No. 1 idle gear inside diameter measurement.
- Standard oil clearance:
-
0.025 to 0.078 mm (0.000984 to 0.00307 in.)
- Maximum oil clearance:
-
0.078 mm (0.00307 in.)
If the thrust oil clearance is more than the maximum, replace the No. 1 idle gear shaft and No. 1 idle gear as a set.
13540 12.INSPECT NO. 1 CHAIN TENSIONER ASSEMBLY
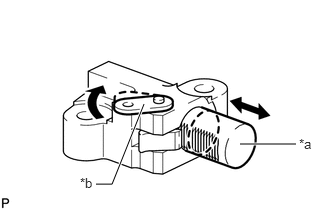
| *a | Plunger |
| *b | Stopper Plate |
Move the stopper plate clockwise to release the lock. Push the plunger and check that it moves smoothly.
If necessary, replace the No. 1 chain tensioner assembly.
13540 13.INSPECT NO. 2 CHAIN TENSIONER ASSEMBLY
| *a | Plunger |
| *b | Stopper Plate |
Move the stopper plate clockwise to release the lock. Push the plunger and check that it moves smoothly.
If necessary, replace the No. 2 chain tensioner assembly.
13559 14.INSPECT NO. 1 CHAIN TENSIONER SLIPPER
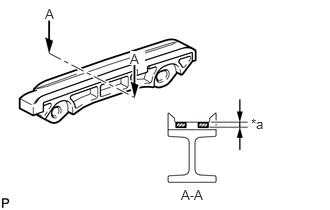
| *a | Depth |
Measure the worn depth of the No. 1 chain tensioner slipper.
- Maximum depth:
-
1.0 mm (0.0394 in.)
If the depth is more than the maximum, replace the No. 1 chain tensioner slipper.
13559 15.INSPECT NO. 2 CHAIN TENSIONER SLIPPER
| *a | Depth |
Measure the worn depth of the No. 2 chain tensioner slipper.
- Maximum depth:
-
1.0 mm (0.0394 in.)
If the depth is more than the maximum, replace the No. 2 chain tensioner slipper.
13561 16.INSPECT NO. 1 CHAIN VIBRATION DAMPER
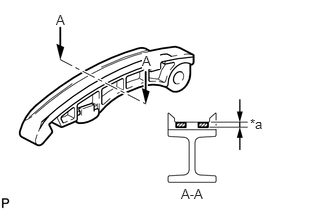
| *a | Depth |
Measure the worn depth of the No. 1 chain vibration damper.
- Maximum depth:
-
1.0 mm (0.0394 in.)
If the depth is more than the maximum, replace the No. 1 chain vibration damper.
13561 17.INSPECT NO. 2 CHAIN VIBRATION DAMPER
| *a | Depth |
Measure the worn depth of the No. 2 chain vibration damper.
- Maximum depth:
-
1.0 mm (0.0394 in.)
If the depth is more than the maximum, replace the No. 2 chain vibration damper.
17111 18.INSPECT NO. 1 INTAKE MANIFOLD FOR FLATNESS
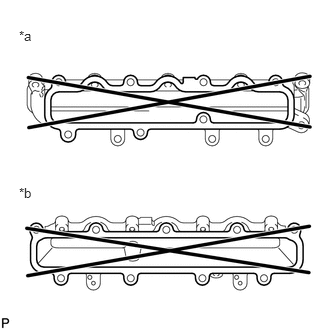
| *a | No. 3 Intake Manifold Side |
| *b | Cylinder Head Sub-assembly RH Side |
Using a precision straightedge and feeler gauge, measure the warpage of the contact surface between the No. 1 intake manifold and No. 3 intake manifold, and the No. 1 intake manifold and cylinder head sub-assembly RH.
- Maximum Warpage:
-
Item Specified Condition No. 3 intake manifold side 0.10 mm (0.00394 in.) Cylinder head sub-assembly RH side 0.10 mm (0.00394 in.)
If the warpage is more than the maximum, replace the No. 1 intake manifold.
17112 19.INSPECT NO. 2 INTAKE MANIFOLD FOR FLATNESS
| *a | No. 3 Intake Manifold Side |
| *b | Cylinder Head Sub-assembly LH Side |
Using a precision straightedge and feeler gauge, measure the warpage of the contact surface between the No. 2 intake manifold and No. 3 intake manifold, and the No. 2 intake manifold and cylinder head sub-assembly LH.
- Maximum Warpage:
-
Item Specified Condition No. 3 intake manifold side 0.10 mm (0.00394 in.) Cylinder head sub-assembly LH side 0.10 mm (0.00394 in.)
If the warpage is more than the maximum, replace the No. 2 intake manifold.
17114D 20.INSPECT NO. 3 INTAKE MANIFOLD FOR FLATNESS
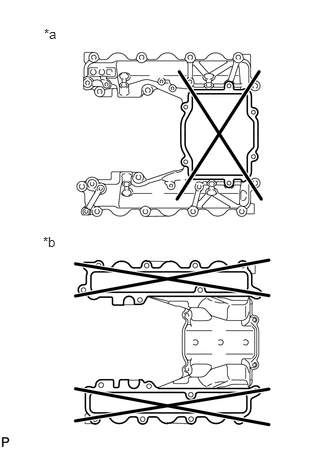
| *a | Intake Pipe Side |
| *b | No. 1 and No. 2 Intake Manifold Side |
Using a precision straightedge and feeler gauge, measure the warpage of the contact surface between the No. 3 intake manifold and No. 1 intake manifold, the No. 3 intake manifold and No. 2 intake manifold, and the No. 3 intake manifold and intake pipe.
- Maximum Warpage:
-
Item Specified Condition Intake pipe side 0.10 mm (0.00394 in.) No. 1 and No. 2 intake manifold side 0.15 mm (0.00591 in.)
If the warpage is more than the maximum, replace the No. 3 intake manifold.
17141 21.INSPECT EXHAUST MANIFOLD FOR FLATNESS
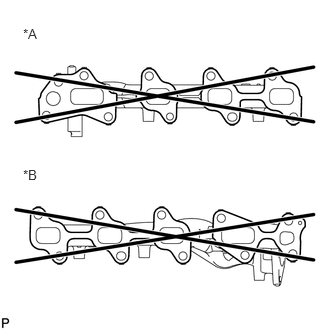
| *A | for Bank 1 |
| *B | for Bank 2 |
Using a precision straightedge and feeler gauge, measure the warpage of the contact surface between the exhaust manifold and cylinder head sub-assembly.
- Maximum warpage:
-
0.80 mm (0.0315 in.)
If the warpage is more than the maximum, replace the exhaust manifold.