1VD-FTV ENGINE MECHANICAL CYLINDER BLOCK INSPECTION
PROCEDURE

 15708 1.INSPECT NO. 1 OIL NOZZLE SUB-ASSEMBLY
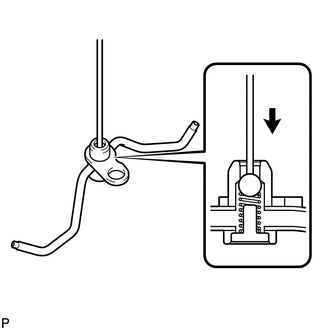
Push the check valve with a pin to check if it is stuck.
If stuck, replace the No. 1 oil nozzle sub-assembly.
Push the check valve with a pin to check if it moves smoothly.

|
Air |
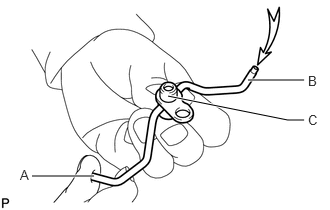
While covering A, apply air into B. Check that air does not leak through C. Perform the check again while covering B and applying air into A.
If air leaks, clean or replace the No. 1 oil nozzle sub-assembly.

|
Push |
|
|
Air |
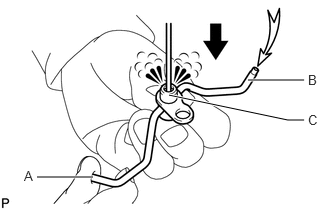
Push the check valve while covering A, and apply air into B. Check that air passes through C. Perform the check again while covering B, pushing the check valve and applying air into A.
If air does not pass through C, clean or replace the No. 1 oil nozzle sub-assembly.
11401 2.CLEAN CYLINDER BLOCK SUB-ASSEMBLY
Using a gasket scraper, remove all the gasket material from the top surface of the cylinder block sub-assembly.
Using a soft brush and solvent, thoroughly clean the cylinder block sub-assembly.
11401 3.VISUALLY CHECK CYLINDER BLOCK SUB-ASSEMBLY
Visually check the cylinder for vertical scratches.
If necessary, replace the cylinder block sub-assembly.
4.INSPECT CYLINDER BLOCK FOR WARPAGE
Using a precision straightedge and feeler gauge, measure the warpage of the surface where the cylinder head gasket contacts the cylinder head sub-assembly.
- Maximum warpage:
-
0.05 mm (0.00197 in.)
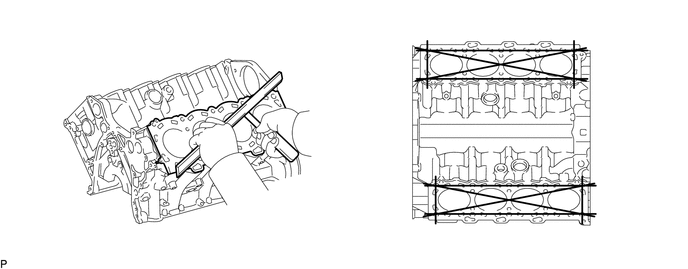
If the warpage is more than the maximum, replace the cylinder block sub-assembly.
5.INSPECT CYLINDER BORE
Using a cylinder gauge, measure the cylinder bore diameter at positions A and B in the thrust and axial directions.
- Reference value (New Parts):
-
86.000 to 86.013 mm (3.3858 to 3.3863 in.)
- Maximum diameter:
-
86.03 mm (3.3870 in.)
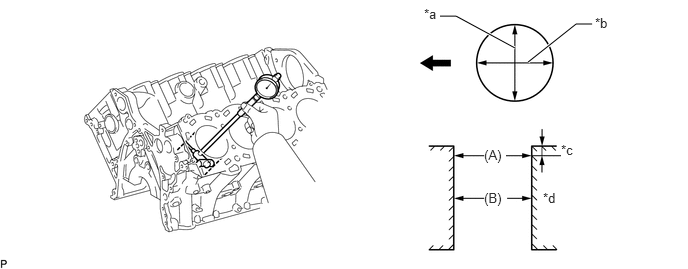
| *a | Thrust Direction | *b | Axial Direction |
| *c | 10 mm (0.394 in.) | *d | Center |
|
|
Front | - | - |
If the diameter is more than the maximum, replace the cylinder block sub-assembly.
6.INSPECT PISTON DIAMETER
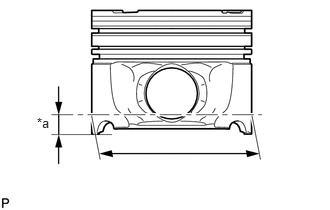
| *a | Measuring Area |
Using a micrometer, measure the piston diameter at a right angle to the piston pin center line, 12 mm (0.472 in.) from the piston skirt.
- Reference value (New Parts):
-
85.932 to 85.966 mm (3.383 to 3.384 in.)
- Minimum piston diameter:
-
85.910 mm (3.382 in.)
If the diameter is less than the minimum, replace the piston with pin sub-assembly.
7.INSPECT PISTON OIL CLEARANCE
Measure the cylinder bore diameter in the thrust direction.
Subtract the piston diameter measurement from the cylinder bore diameter measurement.
- Reference value (New Parts):
-
0.034 to 0.081 mm (0.00134 to 0.00319 in.)
- Maximum oil clearance:
-
0.091 mm (0.00358 in.)
If the oil clearance is more than the maximum, replace all the piston with pin sub-assemblies. If necessary, replace the cylinder block sub-assembly.
8.INSPECT RING GROOVE CLEARANCE
Using a feeler gauge, measure the clearance between a new piston ring and the wall of the ring groove.
- Standard Ring Groove Clearance:
-
Item Specified Condition No. 1 Compression Ring 0.11 to 0.15 mm (0.00433 to 0.00591 in.) No. 2 Compression Ring 0.08 to 0.12 mm (0.00315 to 0.00472 in.) Oil Ring 0.03 to 0.07 mm (0.00118 to 0.00276 in.)
If the clearance is not as specified, replace the piston with pin sub-assembly.
9.INSPECT PISTON RING END GAP
Insert the piston ring into the cylinder bore.
Using a piston, push the piston ring a little beyond the bottom of the ring travel, 60 mm (2.36 in.) from the top of the cylinder block sub-assembly.
Using a feeler gauge, measure the piston ring end gap.
- Standard End Gap:
-
Item Specified Condition No. 1 Compression Ring 0.20 to 0.30 mm (0.00787 to 0.0118 in.) No. 2 Compression Ring 0.47 to 0.62 mm (0.0185 to 0.0244 in.) Oil Ring 0.10 to 0.40 mm (0.00394 to 0.0157 in.)
- Maximum End Gap:
-
Item Specified Condition No. 1 Compression Ring 0.40 mm (0.0157 in.) No. 2 Compression Ring 0.75 mm (0.0295 in.) Oil Ring 0.50 mm (0.0197 in.)
If the end gap is more than the maximum, replace the piston ring set. If the piston ring end gap is more than the maximum even with a new piston ring set, replace the cylinder block sub-assembly.
10.INSPECT PISTON PIN OIL CLEARANCE
Check each mark on the piston, piston pin and connecting rod sub-assembly.
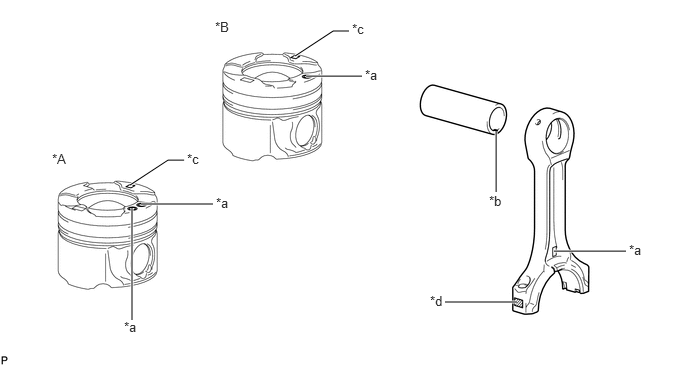
| *A | for Bank 1 | *B | for Bank 2 |
| *a | Front Mark | *b | Paint Mark |
| *c | Piston Pin Hole Inside Diameter Mark | *d | Connecting Rod Bush Inside Diameter Mark |
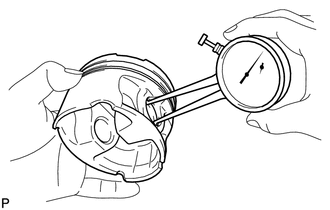
Using a caliper gauge, measure the inside diameter of the piston pin hole.
- Standard Piston Pin Hole Inside Diameter:
-
Item Specified Condition Mark A 29.009 to 29.013 mm (1.1421 to 1.1422 in.) Mark B 29.013 to 29.017 mm (1.1422 to 1.1424 in.) Mark C 29.017 to 29.021 mm (1.1424 to 1.1426 in.)
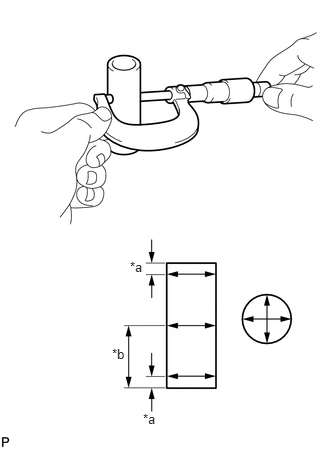
| *a | 5 mm (0.197 in.) |
| *b | 34.5 mm (1.36 in.) |
Using a micrometer, measure the piston pin diameter.
- Standard Piston Pin Diameter:
-
Item Specified Condition Mark A (White) 29.000 to 29.004 mm (1.1417 to 1.1419 in.) Mark B (Pink) 29.004 to 29.008 mm (1.1419 to 1.1420 in.) Mark C (Blue) 29.008 to 29.012 mm (1.1420 to 1.1422 in.)
Subtract the piston pin diameter measurement from the piston pin hole diameter measurement.
- Standard oil clearance:
-
0.005 to 0.013 mm (0.000197 to 0.000512 in.)
- Maximum oil clearance:
-
0.018 mm (0.000709 in.)
If the oil clearance is more than the maximum, replace the piston with pin sub-assembly.
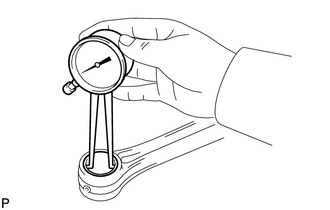
Using a caliper gauge, measure the inside diameter of the connecting rod bush.
- Standard Bush Inside Diameter:
-
Item Specified Condition Mark A 29.019 to 29.023 mm (1.1425 to 1.1426 in.) Mark B 29.023 to 29.027 mm (1.1426 to 1.1428 in.) Mark C 29.027 to 29.031 mm (1.1428 to 1.1430 in.)
Subtract the piston pin diameter measurement from the bush inside diameter measurement.
- Standard oil clearance:
-
0.015 to 0.023 mm (0.000591 to 0.000906 in.)
- Maximum oil clearance:
-
0.028 mm (0.00110 in.)
If the oil clearance is more than the maximum, replace the connecting rod sub-assembly. If necessary, replace the piston with pin sub-assembly.
13201 11.INSPECT CONNECTING ROD SUB-ASSEMBLY
Using a rod aligner and feeler gauge, check the connecting rod sub-assembly alignment.
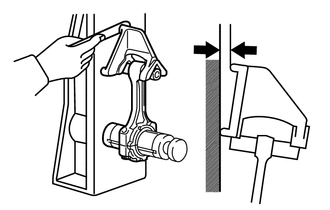
Check for bend.
- Maximum bend:
-
0.07 mm (0.00276 in.) per 100 mm (3.94 in.)
If the bend is more than the maximum, replace the connecting rod sub-assembly.
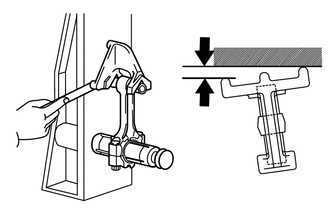
Check for twist.
- Maximum twist:
-
0.15 mm (0.00591 in.) per 100 mm (3.94 in.)
If the twist is more than the maximum, replace the connecting rod sub-assembly.
13265 12.INSPECT CONNECTING ROD BOLT
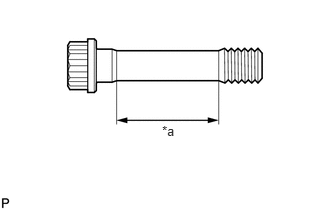
| *a | Tension Portion |
Using a vernier caliper, measure the tension portion diameter of the connecting rod bolt.
- Standard diameter:
-
8.7 to 8.8 mm (0.343 to 0.346 in.)
- Minimum diameter:
-
8.5 mm (0.335 in.)
If the diameter is less than the minimum, replace the connecting rod bolt.
13411 13.INSPECT CRANKSHAFT
Inspect for circle runout.
Place the crankshaft on V-blocks.
Using a dial indicator, measure the circle runout at the center journal.
- Maximum circle runout:
-
0.04 mm (0.00158 in.)
If the circle runout is more than the maximum, replace the crankshaft.
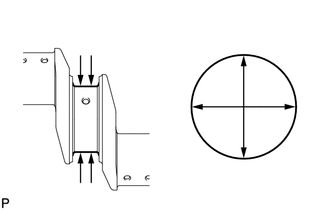
Inspect the main journals.
Using a micrometer, measure the diameter of each main journal.
- Standard diameter:
-
74.982 to 75.000 mm (2.9520 to 2.9528 in.)
If the diameter is not as specified, check the oil clearance. If necessary, replace the crankshaft.
Check each main journal for taper and out-of-round as shown in the illustration.
- Maximum taper and out-of-round:
-
0.01 mm (0.000394 in.)
If the taper and out-of-round is more than the maximum, replace the crankshaft.
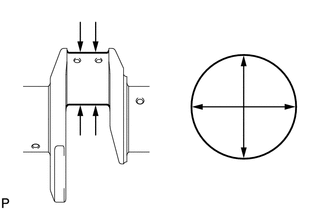
Inspect the crank pin.
Using a micrometer, measure the diameter of each crank pin.
- Standard diameter:
-
54.982 to 55.000 mm (2.1646 to 2.1654 in.)
If the diameter is not as specified, check the oil clearance. If necessary, replace the crankshaft.
Check each crank pin for taper and out-of-round as shown in the illustration.
- Maximum taper and out-of-round:
-
0.01 mm (0.000394 in.)
If the taper and out-of-round is more than the maximum, replace the crankshaft.
14.INSPECT CRANKSHAFT OIL CLEARANCE
- HINT:
-
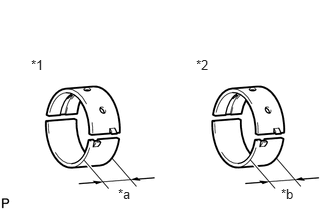 0.323,0.594 0.635,0.75 0.313,0.156 10 false *1 2.042,0.594 2.354,0.75 0.313,0.156 10 false *2 1.229,1.938 1.542,2.094 0.313,0.156 10 false *a 2.927,1.938 3.24,2.094 0.313,0.156 10 false *b
*1 No. 1 and 5 journal bearings *2 No. 2, 3 and 4 journal bearings *a 22.5 mm (0.886 in.) *b 20.5 mm (0.807 in.)
-
Main bearings come in widths of 20.5 mm (0.807 in.) and 22.5 mm (0.886 in.).
-
Standard Bearing Width: Journal Specified Condition No. 1 and No. 5 22.5 mm (0.886 in.) No. 2, No. 3 and No. 4 20.5 mm (0.807 in.)
Clean each main journal and bearing.
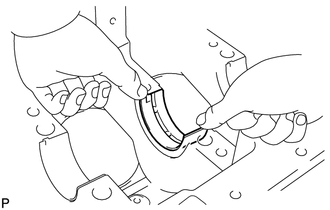
Align the bearing claw with the claw groove of the cylinder block sub-assembly, and push in the 5 upper bearings.
- NOTICE:
-
·
Do not apply engine oil to the bearings and the contact surfaces.
·Do not allow coolant to come into contact with the bearing inner surface. If any coolant comes into contact with the bearing inner surface, replace the bearing with a new one.
·Both sides of the oil groove in the cylinder block sub-assembly should be visible through the oil feed holes in the bearing. The amount visible on each side of the holes should be equal.
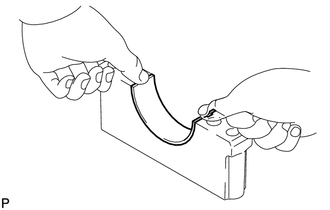
Align the bearing claw with the claw groove of the main bearing cap, and push in the 5 lower bearings.
- NOTICE:
-
·
Do not apply engine oil to the bearings and the contact surfaces.
·Do not allow coolant to come into contact with the bearing inner surface.
·If any coolant comes into contact with the bearing inner surface, replace the bearing with a new one.
- HINT:
-
A number marked on each main bearing cap indicates the installation position.
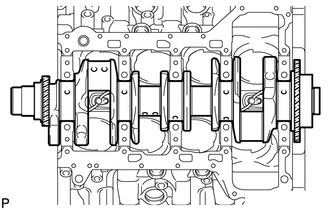
Place the crankshaft on the cylinder block sub-assembly.
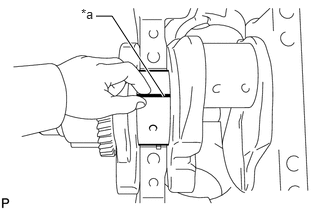
| *a | Plastigage |
Lay a strip of Plastigage across each journal.
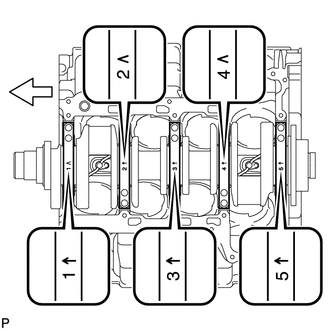
|
|
Front |
Examine the front marks and numbers and install the crankshaft bearing caps on the cylinder block sub-assembly.
- NOTICE:
-
Do not turn the crankshaft.
Apply a light coat of engine oil to the threads of the crankshaft bearing cap set bolts.
Temporarily install the crankshaft bearing cap set bolts to the A or B position.
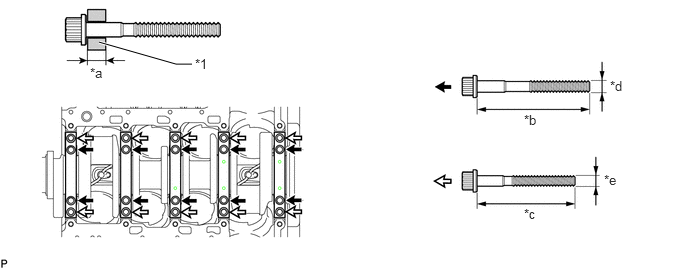
| *1 | Spacer | - | - |
| *a | 8 mm (0.315 in.) | *b | 106 mm (4.17 in.) |
| *c | 90.5 mm (3.56 in.) | *d | 11 mm (0.433 in.) |
| *e | 10 mm (0.394 in.) | - | - |
|
|
Bolt A |
|
Bolt B |
- HINT:
-
In place of cylinder block stiffening plates, install 8 mm (0.315 in.) thick spacers to the crankshaft bearing cap set bolts.
Uniformly tighten the 2 crankshaft bearing cap set bolts for each bearing cap in several passes to ensure a proper fit.
- NOTICE:
-
Do not tap the bearing cap with a plastic-faced hammer.
Remove the crankshaft bearing cap set bolts and spacers.
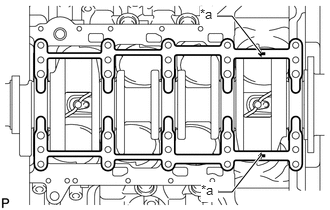
| *a | Front Mark |
Set the 2 cylinder block stiffening plates on the cylinder block sub-assembly.
- HINT:
-
Make sure the arrows on the stiffening plates face the engine front.
Step 1:
- HINT:
-
·
The crankshaft bearing cap set bolts are tightened in 3 progressive steps.
·If any crankshaft bearing cap set bolt is broken or deformed, replace it.
Apply a light coat of engine oil to the threads and under the heads of the 20 crankshaft bearing cap set bolts.
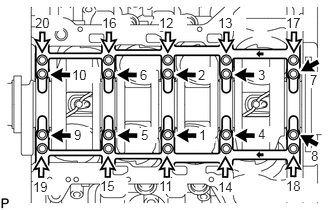
|
|
Bolt A |
|
|
Bolt B |
Install the 20 crankshaft bearing cap set bolts. Using several steps, tighten the bolts uniformly in the sequence shown in the illustration.
- Torque:
- for bolt A : 35 N*m (357 kgf*cm, 26 ft.*lbf)
- for bolt B : 60 N*m (612 kgf*cm, 44 ft.*lbf)
Step 2:
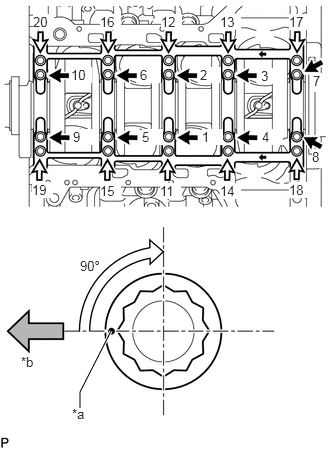
| *a | Painted Mark |
| *b | Front |
|
|
Bolt A |
|
|
Bolt B |
Mark the front side of the crankshaft bearing cap set bolts A and B with paint.
Tighten the crankshaft bearing cap set bolts A and B 90° in the sequence as shown in the illustration.
Step 3:
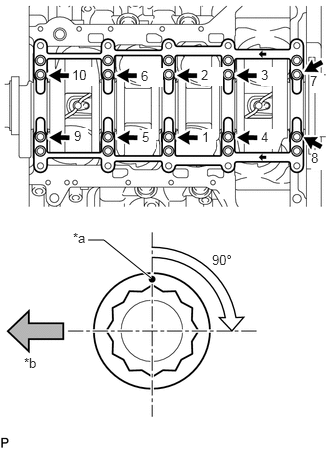
| *a | Painted Mark |
| *b | Front |
|
|
Bolt A |
Tighten the crankshaft bearing cap set bolts A another 90° in the sequence as shown in the illustration.
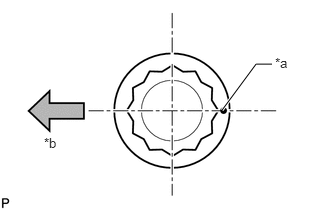
| *a | Painted Mark |
| *b | Front |
Check that the painted marks of bolt A are now at a 180° angle to the front.
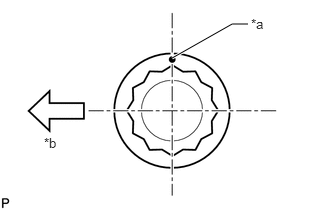
| *a | Painted Mark |
| *b | Front |
Check that the painted marks of bolt B are now at a 90° angle to the front.
- NOTICE:
-
Do not turn the crankshaft.
Step 4:
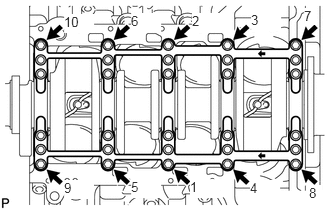
Using several steps, install the 10 crankshaft bearing cap set bolts uniformly in the sequence shown in the illustration.
- Torque:
- 56 N*m (571 kgf*cm, 41 ft.*lbf)
Remove the crankshaft bearing caps.
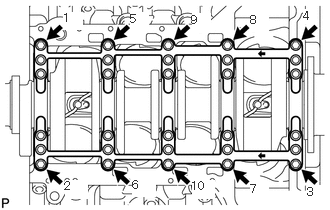
Step 1:
Using several steps, loosen and remove the 10 crankshaft bearing cap set bolts uniformly in the sequence shown in the illustration.
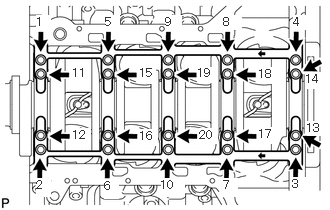
Step 2:
Using several steps, loosen and remove the 20 crankshaft bearing cap set bolts uniformly in the sequence shown in the illustration.
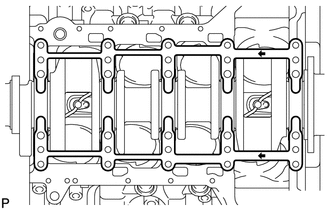
Remove the 2 cylinder block stiffening plates.
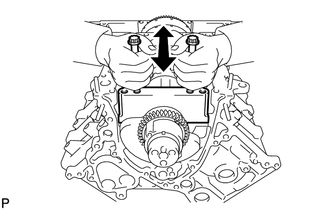
Using 2 crankshaft bearing cap set bolts, pull out the 5 bearing caps.
- NOTICE:
-
Take care not to damage the contact surface of the crankshaft bearing cap and cylinder block sub-assembly.
Measure the Plastigage at its widest point.
- Standard Oil Clearance:
-
Journal Specified Condition No. 1 and No. 3 0.020 to 0.038 mm (0.000787 to 0.00150 in.) No. 2, No. 4 and No. 5 0.032 to 0.050 mm (0.00126 to 0.00197 in.)
- Maximum Clearance:
-
Journal Specified Condition No. 1 and No. 3 0.048 mm (0.00189 in.) No. 2, No. 4 and No. 5 0.060 mm (0.00236 in.)
If the oil clearance is more than the maximum, use an undersize bearing and correct or regrind the crankshaft so that the oil clearance is as shown in the table below.
- Oil Clearance (use for undersize bearing):
-
Journal Specified Condition No. 1 and No. 3 0.021 to 0.061 mm (0.000827 to 0.00240 in.) No. 2, No. 4 and No. 5 0.033 to 0.073 mm (0.00130 to 0.00287 in.)
- HINT:
-
Make sure to replace the upper and lower main bearings as one set.
Completely remove the Plastigage.
If replacing a bearing, replace it with one that has the same number. If the number of the bearing cannot be determined, select the correct bearing by adding together the numbers imprinted on the cylinder block sub-assembly and crankshaft, then refer to the appropriate bearing number. There are 7 sizes of standard bearings, marked "1", "2", "3", "4", "5", "6" and "7" accordingly.
EXAMPLE:
Cylinder block main journal bore diameter "1" (A) + Crankshaft main journal diameter "2" (B) = Total number 3 (use bearing "3" (C))
- No. 1 to No. 5 on Cylinder Block Sub-assembly:
-
Cylinder Block (A) Crankshaft (B) Use Bearing (C) "1" "0" "1" "1" "2" "2" "3" "3" "4" "4" "5" "2" "0" "2" "1" "3" "2" "4" "3" "5" "4" "6" "3" "0" "3" "1" "4" "2" "5" "3" "6" "4" "7"
- Standard Cylinder Block Sub-assembly Main Journal Bore Diameter (A):
-
Journal Mark Specified Condition No. 1 and No. 3 "1" 79.000 to 79.006 mm (3.1102 to 3.1105 in.) "2" 79.006 to 79.012 mm (3.1105 to 3.1107 in.) "3" 79.012 to 79.018 mm (3.1107 to 3.1109 in.) No. 2, No. 4 and No. 5 "1" 79.000 to 79.006 mm (3.1102 to 3.1105 in.) "2" 79.006 to 79.012 mm (3.1105 to 3.1107 in.) "3" 79.012 to 79.018 mm (3.1107 to 3.1109 in.)
- Standard Crankshaft Main Journal Diameter (B):
-
Journal Mark Specified Condition No. 1 and No. 3 "2" 74.994 to 75.000 mm (2.9525 to 2.9528 in.) "3" 74.988 to 74.994 mm (2.9523 to 2.9525 in.) "4" 74.982 to 74.988 mm (2.9520 to 2.9523 in.) No. 2, No. 4 and No. 5 "0" 74.994 to 75.000 mm (2.9530 to 2.9528 in.) "1" 74.988 to 74.994 mm (2.9523 to 2.9525 in.) "2" 74.982 to 74.988 mm (2.9520 to 2.9523 in.)
- Standard Crankshaft Bearing Center Wall Thickness (C):
-
Journal Mark Specified Condition
(for Upper Bearing)Specified Condition
(for Lower Bearing)No. 1 and No. 3 "1" 1.987 to 1.990 mm (0.0782 to 0.0783 in.) 1.975 to 1.978 mm (0.0778 to 0.0779 in.) "2" 1.990 to 1.993 mm (0.0783 to 0.0785 in.) 1.978 to 1.981 mm (0.0779 to 0.0780 in.) "3" 1.993 to 1.996 mm (0.0785 to 0.0786 in.) 1.981 to 1.984 mm (0.0780 to 0.0781 in.) "4" 1.996 to 1.999 mm (0.0786 to 0.0787 in.) 1.984 to 1.987 mm (0.0781 to 0.0782 in.) "5" 1.999 to 2.002 mm (0.0787 to 0.0788 in.) 1.987 to 1.990 mm (0.0782 to 0.0783 in.) "6" 2.002 to 2.005 mm (0.0788 to 0.0789 in.) 1.990 to 1.993 mm (0.0783 to 0.0785 in.) "7" 2.005 to 2.008 mm (0.0789 to 0.0791 in.) 1.993 to 1.996 mm (0.0785 to 0.0786 in.) No. 2, No. 4 and No. 5 "1" 1.975 to 1.978 mm (0.0778 to 0.0779 in.) 1.987 to 1.990 mm (0.0782 to 0.0783 in.) "2" 1.978 to 1.981 mm (0.0779 to 0.0780 in.) 1.990 to 1.993 mm (0.0783 to 0.0785 in.) "3" 1.981 to 1.984 mm (0.0780 to 0.0781 in.) 1.993 to 1.996 mm (0.0785 to 0.0786 in.) "4" 1.984 to 1.987 mm (0.0781 to 0.0782 in.) 1.996 to 1.999 mm (0.0786 to 0.0787 in.) "5" 1.987 to 1.990 mm (0.0782 to 0.0783 in.) 1.999 to 2.002 mm (0.0787 to 0.0788 in.) "6" 1.990 to 1.993 mm (0.0783 to 0.0785 in.) 2.002 to 2.005 mm (0.0788 to 0.0789 in.) "7" 1.993 to 1.996 mm (0.0785 to 0.0786 in.) 2.005 to 2.008 mm (0.0789 to 0.0791 in.)
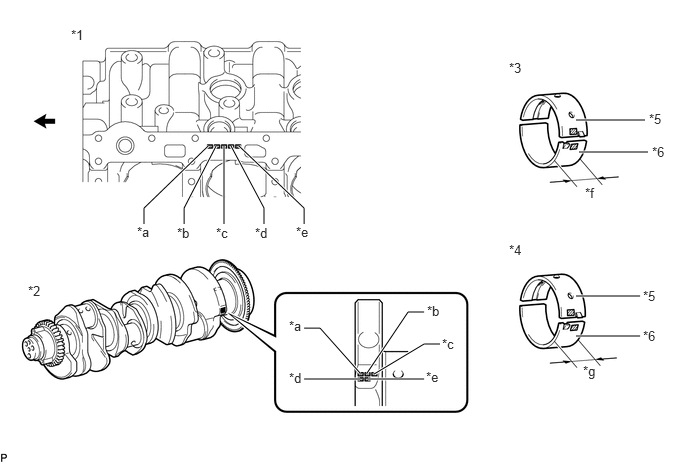
| *1 | Cylinder Block Sub-assembly | *2 | Crankshaft |
| *3 | No. 1 and No. 5 Journal Bearings | *4 | No. 2, No. 3 and No. 4 Journal Bearings |
| *5 | Upper Crankshaft Bearing | *6 | Lower Crankshaft Bearing |
| *a | No. 1 | *b | No. 2 |
| *c | No. 3 | *d | No. 4 |
| *e | No. 5 | *f | 22.5 mm (0.886 in.) |
| *g | 20.5 mm (0.807 in.) | - | - |
|
|
Front | - | - |

|
Number Mark | - | - |
15.INSPECT CRANKSHAFT BEARING CAP SET BOLT
Using a vernier caliper, measure the tension portion diameter of bolt A and B.
- Bolt Length:
-
Item Specified Condition Bolt A 106 mm (4.17 in.) Bolt B 90.5 mm (3.56 in.)
- Measuring Point:
-
Item Specified Condition Bolt A 73 mm (2.87 in.) Bolt B 63 mm (2.48 in.)
- Standard diameter:
- for bolt A:
-
10.8 to 11.0 mm (0.425 to 0.433 in.)
- for bolt B:
-
9.8 to 10.0 mm (0.386 to 0.394 in.)
- Minimum diameter:
- for bolt A:
-
10.5 mm (0.413 in.)
- for bolt B:
-
9.5 mm (0.374 in.)
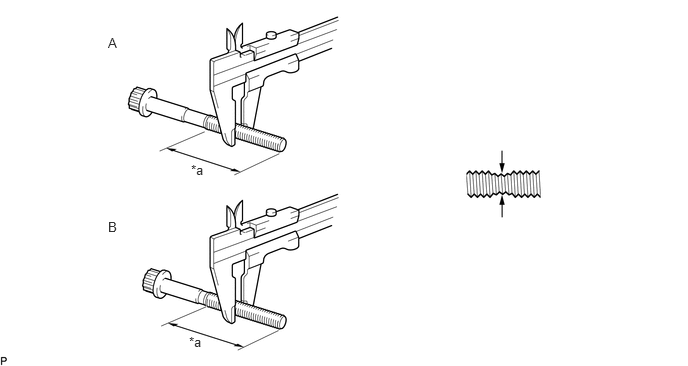
| *a | Measuring Area | - | - |
- HINT:
-
If a visual check reveals no excessively thin areas, check the center of the crankshaft bearing cap set bolt (see illustration) and find the area that has the lowest diameter.
If the diameter is less than the minimum, replace the crankshaft bearing cap set bolt.