SEAT FRONT SEAT ASSEMBLY(for Bench Seat Type) REASSEMBLY
CAUTION / NOTICE / HINT
- CAUTION:
-
Wear protective gloves. Sharp areas on the parts may injure your hands.
- NOTICE:
-
If the seat is set down in another location after removing it from the vehicle, the seat may tilt and damage the front inner seat track assembly RH or front outer seat track assembly RH due to the difference in shape between the left and right seat tracks.
- HINT:
-
·
Use the same procedure for RHD and LHD vehicles.
·The procedure listed below is for LHD vehicles.
·A bolt without a torque specification is showing the standard bolt chart
(See page)
PROCEDURE

 72053C 1.INSTALL RECLINING REMOTE CONTROL LEVER SUB-ASSEMBLY RH
Install the reclining remote control lever sub-assembly RH to bench type front seat cushion spring assembly with the 2 bolts.
71537A 2.INSTALL FRONT SEAT CUSHION PROTECTOR
Install the front seat cushion protector.
71521A 3.INSTALL FRONT SEAT CUSHION SILENCER PAD
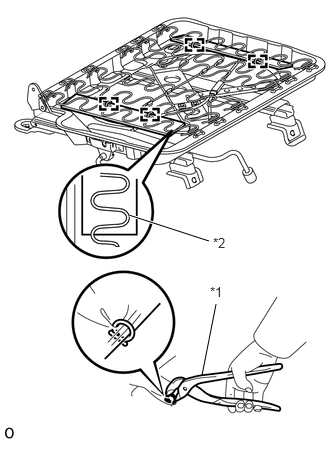
| *1 | Hog Ring Pliers |
| *2 | S spring |
Set the 2 front seat cushion silencer pads in bench type front seat cushion spring assembly.
- HINT:
-
Install the front seat cushion silencer pad so that the edge is located one wind inside along the S spring.
Using hog ring pliers, install the 2 front seat cushion silencer pads to the bench type front seat cushion spring assembly with 4 new hog rings as shown in the illustration.
71512S 4.INSTALL BENCH TYPE FRONT SEAT CUSHION PAD
Install the bench type front seat cushion pad to the bench type front seat cushion spring assembly.
71071S 5.INSTALL BENCH TYPE FRONT SEAT CUSHION COVER
Set the bench type front seat cushion cover with pad in place.
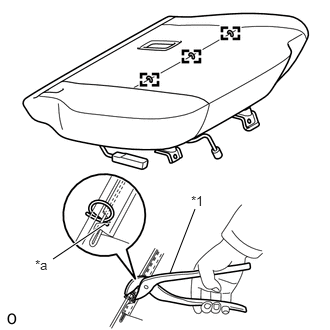
| *1 | Hog Ring Pliers |
| *a | Cutout |
Using hog ring pliers, install the bench type front seat cushion cover with pad to the bench type front seat cushion spring assembly (S spring) with 3 new hog rings as shown in the illustration.
- NOTICE:
-
·
Be careful not to damage the bench type front seat cushion cover.
·Be sure to securely install the hog rings as shown in the illustration while preventing wrinkles from forming on the bench type front seat cushion cover.
- HINT:
-
Install the hog rings at the cutouts if they are there.
except Walk in Seat Type:
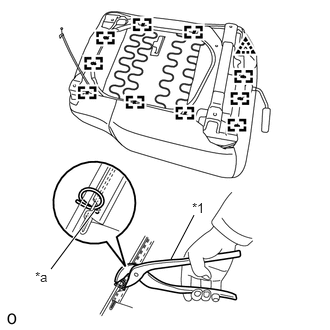
| *1 | Hog Ring Pliers |
| *a | Cutout |
Using hog ring pliers, install 10 new hog rings as shown in the illustration.
- NOTICE:
-
·
Be careful not to damage the bench type front seat cushion cover.
·Be sure to securely install the hog rings as shown in the illustration while preventing wrinkles from forming on the bench type front seat cushion cover.
- HINT:
-
Install the hog rings at the cutouts if they are there.
Attach the clip.
for Walk in Seat Type:
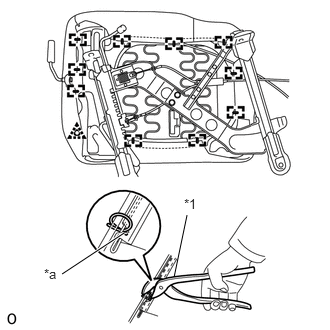
| *1 | Hog Ring Pliers |
| *a | Cutout |
Using hog ring pliers, install 10 new hog rings as shown in the illustration.
- NOTICE:
-
·
Be careful not to damage the bench type front seat cushion cover.
·Be sure to securely install the hog rings as shown in the illustration while preventing wrinkles from forming on the bench type front seat cushion cover.
- HINT:
-
Install the hog rings at the cutouts if they are there.
Attach the clip.
72130A 6.INSTALL FRONT INNER SEAT TRACK ASSEMBLY RH (except Walk in Seat Type)
Move the front inner seat track assembly RH to the foremost position.
Install the front inner seat track assembly RH with the bolt.
- Torque:
- 25.5 N*m (260 kgf*cm, 19 ft.*lbf)
Move the front inner seat track assembly RH to the rearmost position.
Install the bolt.
- Torque:
- 25.5 N*m (260 kgf*cm, 19 ft.*lbf)
72110A 7.INSTALL FRONT OUTER SEAT TRACK ASSEMBLY RH (except Walk in Seat Type)
Operate the seat track adjusting handle to move the front outer seat track assembly RH to the foremost position.
Install the front outer seat track assembly RH with the bolt.
- Torque:
- 25.5 N*m (260 kgf*cm, 19 ft.*lbf)
Operate the seat track adjusting handle to move the front outer seat track assembly RH to the rearmost position.
Install the bolt.
- Torque:
- 25.5 N*m (260 kgf*cm, 19 ft.*lbf)
Install a new pin to the front outer seat track assembly RH.
72510D 8.INSTALL OUTER RECLINING SEAT ADJUSTER ASSEMBLY RH
Install the outer reclining seat adjuster assembly RH to the front seatback frame sub-assembly RH with the 2 bolts.
- Torque:
- 52 N*m (530 kgf*cm, 38 ft.*lbf)
71551S 9.INSTALL BENCH TYPE FRONT SEATBACK PAD
Install the bench type front seatback pad to the front seatback frame sub-assembly RH.
71073S 10.INSTALL BENCH TYPE FRONT SEATBACK COVER
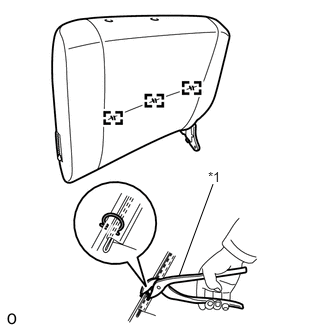
| *1 | Hog Ring Pliers |
Using hog ring pliers, install the bench type front seatback cover to the bench type front seatback pad with 3 new hog rings as shown in the illustration.
- NOTICE:
-
·
Be careful not to damage the bench type front seatback cover.
·Be sure to securely install the hog rings as shown in the illustration while preventing wrinkles from forming on the bench type front seatback cover.
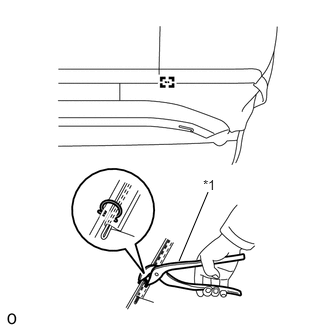
| *1 | Hog Ring Pliers |
Using hog ring pliers, install the bench type front seatback cover with a new hog ring as shown in the illustration.
- NOTICE:
-
·
Be careful not to damage the bench type front seatback cover.
·Be sure to securely install the hog rings as shown in the illustration while preventing wrinkles from forming on the bench type front seatback cover.
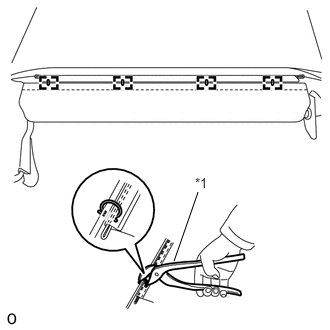
| *1 | Hog Ring Pliers |
Using hog ring pliers, install 4 new hog rings as shown in the illustration.
- NOTICE:
-
·
Be careful not to damage the bench type front seatback cover.
·Be sure to securely install the hog rings as shown in the illustration while preventing wrinkles from forming on the bench type front seatback cover.
Attach the 4 claws to install the 2 front seat headrest support assemblies.
11.INSTALL FRONT SEATBACK ASSEMBLY
Install the collar and bush and washer to the front seatback frame sub-assembly.
Install the front seatback assembly with the 2 bolts.
- Torque:
- 52 N*m (530 kgf*cm, 38 ft.*lbf)
Install the bolt.
Lift up the seatback and check that the outer reclining adjuster assembly is fixed in place.
for Walk in Seat Type:
Using pliers, stake the stake part of the front outer seat track assembly RH.
Tighten the 2 nuts to connect the seat track control cable assembly.
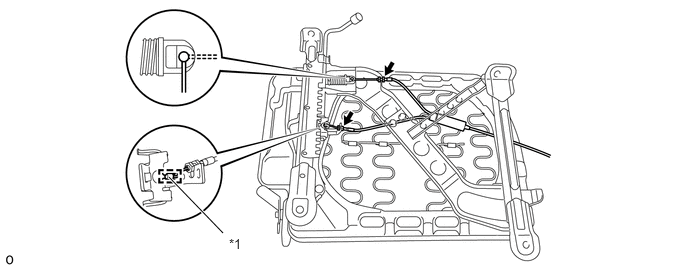
| *1 | Stake Part | - | - |
Install the tension spring.
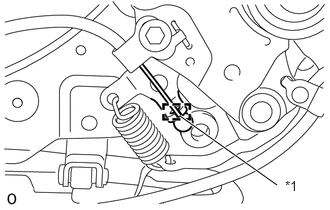
| *1 | Stake Part |
Using pliers, stake the stake part of the outer reclining seat adjuster assembly RH.
Connect the reclining remote control cable and install the bolt as shown in the illustration.
71811C 12.INSTALL RECLINING ADJUSTER COVER RH
Install the reclining adjuster cover RH with the 2 screws.