SEAT REAR NO. 1 SEAT ASSEMBLY(for Bench Reclining Fold Down Seat Type) REASSEMBLY
CAUTION / NOTICE / HINT
- CAUTION:
-
Wear protective gloves. Sharp areas on the seat frame may injure your hands.
- NOTICE:
-
If the seat is set down in another location after removing it from the vehicle, the seat may tilt and damage the outer rear seat lower front track bracket or rear seatback lock cover due to the difference in shape between the left and right seat tracks.
PROCEDURE

 1.INSTALL CLIP
Attach the 2 claws to install the 2 clips.
72650F 2.INSTALL REAR SEAT LOCK ASSEMBLY LH
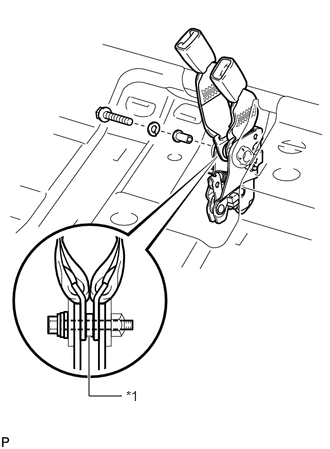
| *1 | Collar |
Install the rear seat lock assembly LH with the seat inner belt sub-assembly, rear seat 3 point type belt assembly LH, a new collar, bush, washer and bolt to the rear seat cushion frame sub-assembly.
- Torque:
- 41 N*m (418 kgf*cm, 30 ft.*lbf)
- HINT:
-
Make sure the collar is in the position shown in the illustration.
72660F 3.INSTALL REAR SEAT LOCK ASSEMBLY RH
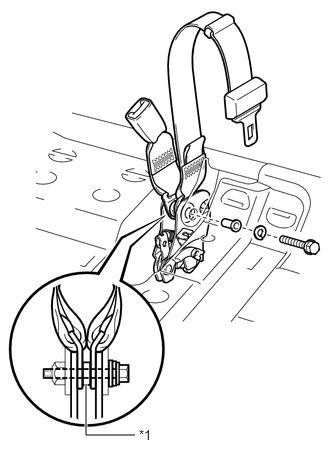
| *1 | Collar |
Install the rear seat lock assembly RH with the rear seat outer belt sub-assembly, rear 3 point type belt assembly RH, a new collar, bush , washer and bolt to the rear seat cushion frame sub-assembly.
- Torque:
- 41 N*m (418 kgf*cm, 30 ft.*lbf)
- HINT:
-
Make sure the collar is in the position shown in the illustration.
78920 4.INSTALL NO. 2 FOLD SEAT LOCK CONTROL CABLE ASSEMBLY
Connect the 4 cable ends.
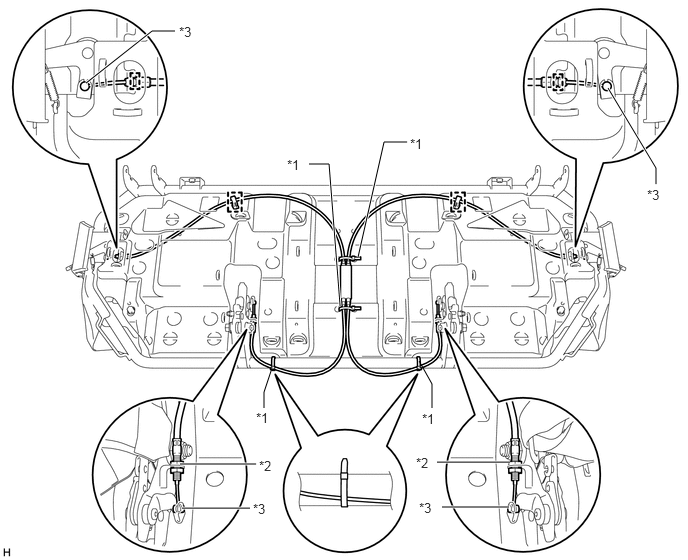
| *1 | Cable Tie | *2 | Nut |
| *3 | Cable End | - | - |
Install the No. 2 fold seat lock control cable assembly with 4 new cable ties.
Attach the 4 clamps.
Tighten the left and right lock part nuts.
- HINT:
-
Make sure that the end of the cable tie faces the rear seat cushion frame sub-assembly as shown in the illustration.
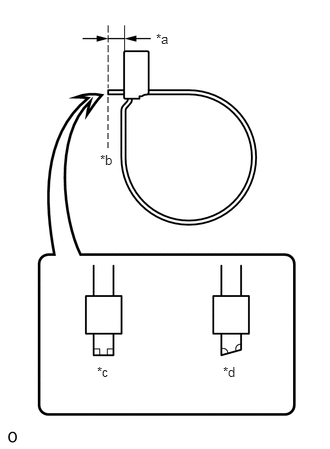
| *a | 5.0 mm (0.1969 in.) or more |
| *b | Cut Here |
| *c | Correct |
| *d | Incorrect |
Cut off the end of the rear seat cushion band RH as shown in the illustration.
- HINT:
-
Cut the band so 5 mm or more remains.
72666 5.INSTALL REAR SEATBACK LOCK COVER LH
Install the rear seatback lock cover LH with the screw.
72665 6.INSTALL REAR SEATBACK LOCK COVER RH
- HINT:
-
Use the same procedure described for the LH side.
71075B 7.INSTALL BENCH TYPE REAR SEAT CUSHION COVER
Set the bench type rear seat cushion cover in place.
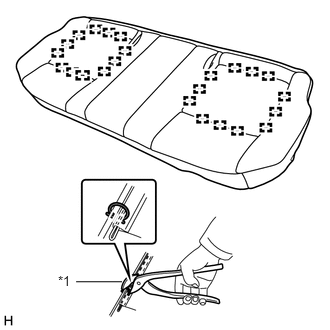
| *1 | Hog Ring Pliers |
Using hog ring pliers, install the bench type rear seat cushion cover to the rear seat cushion pad with 24 new hog rings as shown in the illustration.
- NOTICE:
-
·
Be careful not to damage the bench type rear seat cushion cover.
·Be sure to securely install the hog rings as shown in the illustration while preventing wrinkles from forming on the bench type rear seat cushion cover.
8.INSTALL BENCH TYPE REAR SEAT CUSHION COVER WITH PAD
Set the bench type rear seat cushion cover with pad in place.
Using hog ring pliers, install the 4 new hog rings as shown in the illustration.
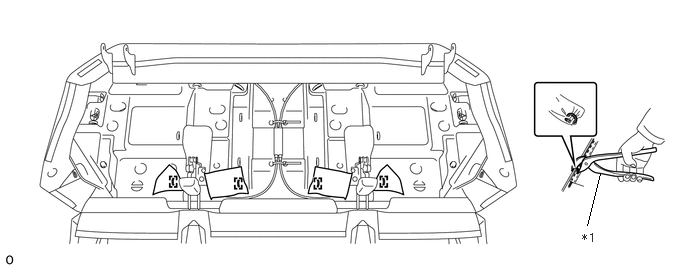
| *1 | Hog Ring Pliers | - | - |
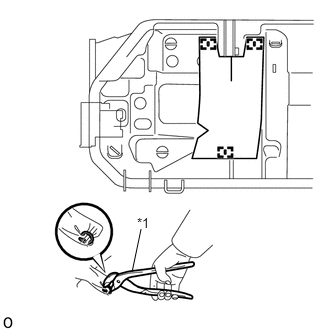
| *1 | Hog Ring Pliers |
Using a hog ring pliers, install the rear seat cushion carpet with 3 new hog rings.
- HINT:
-
Use same procedure to install the rear seat cushion carpet on the other side.
Using hog ring pliers, install the bench type rear seat cushion cover with pad to the rear seat cushion frame sub-assembly with 28 new hog rings as shown in the illustration.
- NOTICE:
-
·
Be careful not to damage the seat cushion cover with pad.
·Be sure to securely install the hog rings as shown in the illustration while preventing wrinkles from forming on the seat cushion cover with pad.
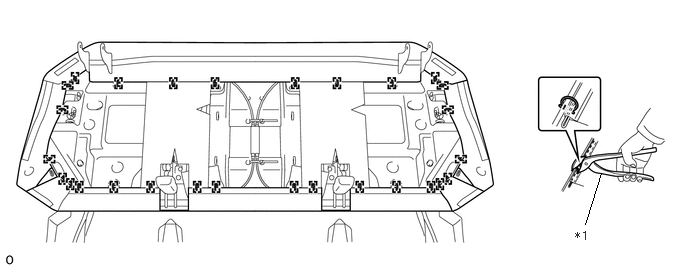
| *1 | Hog Ring Pliers | - | - |
Attach the 9 pieces of fastening tape to close the fastening tape on the backside of the bench type rear seat cushion cover.
71324A 9.INSTALL REAR SEAT CUSHION
for Semi-long Body:
Install the 2 rear seat cushions with the 2 screws.
for Double Cab:
Install the 4 rear seat cushions with the 4 screws.
72598 10.INSTALL RECLINING REMOTE CONTROL LEVER BEZEL LH
Attach the claw to install the reclining remote control lever bezel LH.
Install the screw.
72597A 11.INSTALL RECLINING REMOTE CONTROL LEVER BEZEL RH
- HINT:
-
Use the same procedure described for the LH side.
72594 12.INSTALL REMOTE CONTROL LEVER KNOB LH
Install the remote control lever knob LH with the screw.
72593A 13.INSTALL REMOTE CONTROL LEVER KNOB RH
- HINT:
-
Use the same procedure described for the LH side.
72181 14.INSTALL OUTER REAR SEAT LOWER FRONT TRACK BRACKET RH
Install the outer rear seat lower front track bracket RH with the lower rear seat hinge RH and a new E-ring.
72182 15.INSTALL OUTER REAR SEAT LOWER FRONT TRACK BRACKET LH
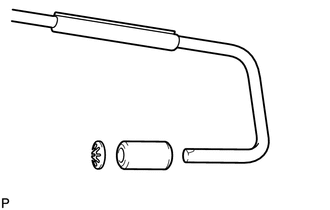
When replacing the guide roller and spring nut:
Install the guide roller and a new spring nut to the seat cushion spring.
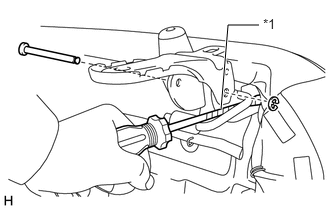
| *1 | Protective Tape |
Using a screwdriver, push and hold the seat cushion spring to release the tension on the outer rear seat lower front track bracket LH, and then install the outer rear seat lower front track bracket LH with the lower rear seat hinge LH and a new E-ring.
- HINT:
-
Tape the screwdriver tip before use.
Release the seat cushion spring.
71336A 16.INSTALL REAR SEAT CUSHION LINK STAY LH
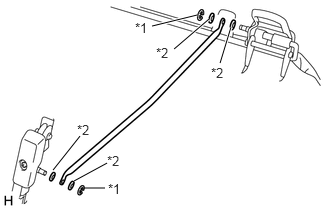
| *1 | E-ring |
| *2 | Washer |
Install the 2 washers.
Install the rear seat cushion link stay LH with 2 washers and 2 new E-rings.
71335C 17.INSTALL REAR SEAT CUSHION LINK STAY RH
- HINT:
-
Use the same procedure described for the LH side.
72501C 18.INSTALL RECLINING CONNECTING PIPE SUB-ASSEMBLY
Install the reclining connecting pipe sub-assembly to the rear seatback frame sub-assembly.
71651 19.INSTALL REAR NO. 1 SEATBACK PAD
Install the rear No. 1 seatback pad to the rear seatback frame sub-assembly.
71077B 20.INSTALL BENCH TYPE REAR SEATBACK COVER
Set the bench type rear seatback cover in place.
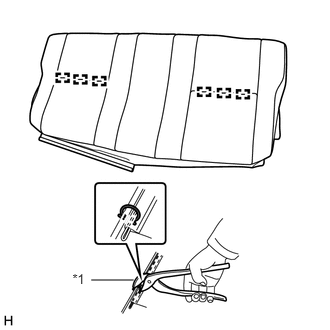
| *1 | Hog Ring Pliers |
Using hog ring pliers, install the bench type rear seatback cover to the rear No. 1 seatback pad with 6 new hog rings as shown in the illustration.
- NOTICE:
-
·
Be careful not to damage the bench type rear seatback cover.
·Be sure to securely install the hog rings as shown in the illustration while preventing wrinkles from forming on the bench type rear seatback cover.
71931A 21.INSTALL REAR SEAT HEADREST SUPPORT
Attach the 8 claws to install the 4 rear seat headrest supports.
78950 22.INSTALL NO. 1 FOLD SEAT STOPPER BAND ASSEMBLY
Install the No. 1 fold seat stopper band assembly with the screw.
Close the 2 fasteners and attach the 2 hooks.
72604 23.INSTALL REAR SEATBACK LOCK SUB-ASSEMBLY LH
Attach the guide to install the rear seatback lock sub-assembly LH to the bench type rear seatback assembly with the 2 bolts.
- Torque:
- 52 N*m (530 kgf*cm, 38 ft.*lbf)
72603 24.INSTALL REAR SEATBACK LOCK SUB-ASSEMBLY RH
- HINT:
-
Use the same procedure described for LH side.
25.INSTALL BENCH TYPE REAR SEAT CUSHION ASSEMBLY
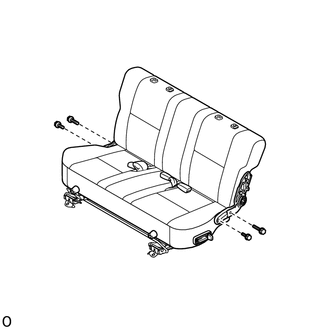
Install the bench type rear seat cushion assembly with the 4 bolts.
- Torque:
- for Front Side : 52 N*m (530 kgf*cm, 38 ft.*lbf)
- for Rear Side : 41 N*m (418 kgf*cm, 30 ft.*lbf)
71834A 26.INSTALL REAR NO. 1 SEAT RECLINING COVER LH
Attach the claw to install the rear No. 1 seat reclining cover LH.
Install the screw.
71833A 27.INSTALL REAR NO. 1 SEAT RECLINING COVER RH
- HINT:
-
Use the same procedure described for the LH side.
72524 28.INSTALL RECLINING ADJUSTER RELEASE HANDLE
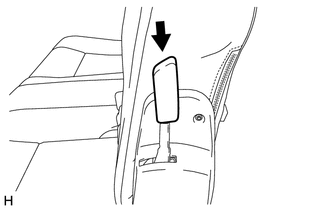
Install the reclining adjuster release handle as shown in the illustration.
- HINT:
-
Use the same procedure to install the reclining adjuster release handle on the other side.