SEAT REAR NO. 1 SEAT ASSEMBLY(for Model Code #J78 Series) REASSEMBLY
CAUTION / NOTICE / HINT
- CAUTION:
-
Wear protective gloves. Sharp areas on the seat frame may injure your hands.
- HINT:
-
A bolt without a torque specification is shown in the standard bolt chart.
-
Click hereGeneral>SPECIFICATIONS>STANDARD BOLT>SPECIFIED TORQUE FOR STANDARD BOLTS
PROCEDURE

 1.INSTALL CLIP
Attach the 3 claws to install the 3 clips to the rear seat cushion frame sub-assembly.
71611 2.INSTALL REAR SEAT CUSHION PAD
Install the rear seat cushion pad to the bench type rear seat cushion frame sub-assembly.
71075B 3.INSTALL BENCH TYPE REAR SEAT CUSHION COVER
Set the bench type rear seat cushion cover in place.
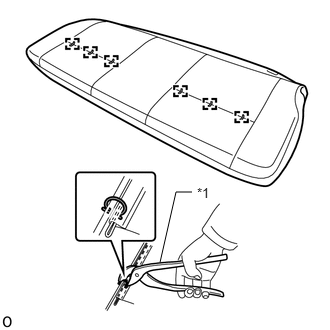
| *1 | Hog Ring Pliers |
Using hog ring pliers, install 6 new hog rings.
- NOTICE:
-
·
Be careful not to damage the bench type rear seat cushion cover.
-
·
Be sure to securely install the hog rings as shown in the illustration while preventing wrinkles from forming on the bench type rear seat cushion cover.
Using hog ring pliers, install 22 new hog rings to the bench type rear seat cushion cover.
- NOTICE:
-
·
Be careful not to damage the bench type rear seat cushion cover.
-
·
Be sure to securely install the hog rings as shown in the illustration while preventing wrinkles from forming on the bench type rear seat cushion cover.
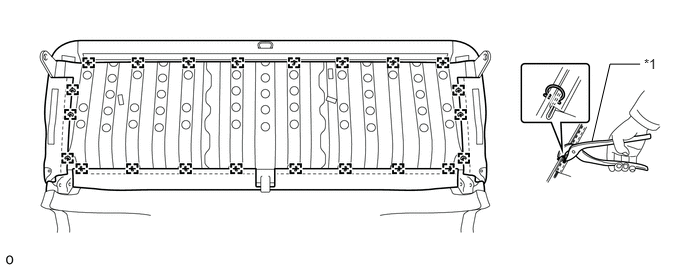
| *1 | Hog Ring Pliers | - | - |
78920 4.INSTALL NO. 2 FOLD SEAT LOCK CONTROL CABLE ASSEMBLY
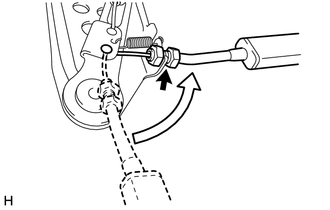
Connect the No. 2 fold seat lock control cable assembly as shown in the illustration.
Tighten the nut.
78910 5.INSTALL NO. 1 FOLD SEAT LOCK CONTROL CABLE ASSEMBLY
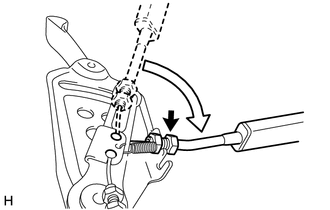
Connect the No. 1 fold seat lock control cable assembly as shown in the illustration.
Tighten the nut.
Install the 2 fold seat lock control cable assemblies together with the rear seat lock release strap assembly with the 2 bolts.
- Torque:
- 8.0 N*m (82 kgf*cm, 71 in.*lbf)
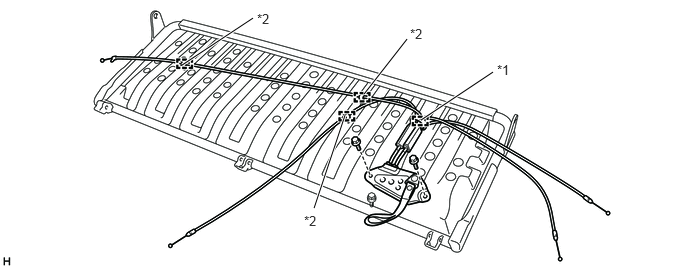
| *1 | Clamp B | *2 | Clamp A |
Attach the 3 clamp B to connect the 2 fold seat lock control cable assemblies.
Install the clamp A.
Close the fastening tape on the backside of the bench type rear seat cushion cover.
Attach the 5 pieces of fastening tape to close the bench type rear seat cushion cover.
71033 6.INSTALL REAR SEAT CUSHION LEG SUB-ASSEMBLY
Install the rear seat cushion leg sub-assembly with the 3 rear seat cushion leg pins and 3 new e-rings.
Attach the 2 clamps to connect the No. 2 fold seat lock control cable assembly.
71382A 7.INSTALL REAR SEAT CUSHION SET BRACKET LH
Install the rear seat cushion set bracket LH with the bolt and nut.
- Torque:
- 52 N*m (530 kgf*cm, 38 ft.*lbf)
71381A 8.INSTALL REAR SEAT CUSHION SET BRACKET RH
- HINT:
-
Use the same procedure for the LH side.
79929 9.INSTALL FOLD SEAT LEG STOPPER FRAME
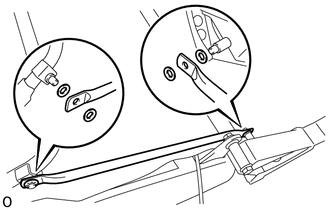
Temporarily install the fold seat leg stopper frame and 4 washers.
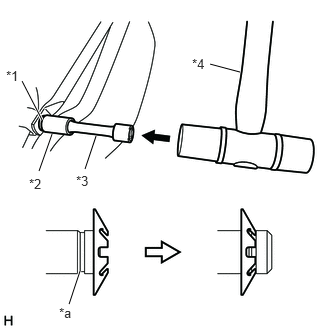
| *1 | Spring Nut |
| *2 | 12 mm Socket Wrench |
| *3 | Extension Bar |
| *4 | Plastic-faced Hammer |
| *a | Groove |
Set a new spring nut, 12 mm socket wrench and extension bar as shown in the illustration.
Using a plastic-faced hammer, tap the extension bar to insert the spring nut into the groove and install the fold seat leg stopper frame.
- HINT:
-
Use the same procedure for the other side.
78960 10.INSTALL NO. 2 FOLD SEAT STOPPER BAND ASSEMBLY
- HINT:
-
Use the same procedure for the other side.
Install the No. 2 fold seat stopper band assembly with 2 bolts.
72604 11.INSTALL REAR SEATBACK LOCK SUB-ASSEMBLY LH
Connect the No. 1 seat lock control cable assembly with the screw.
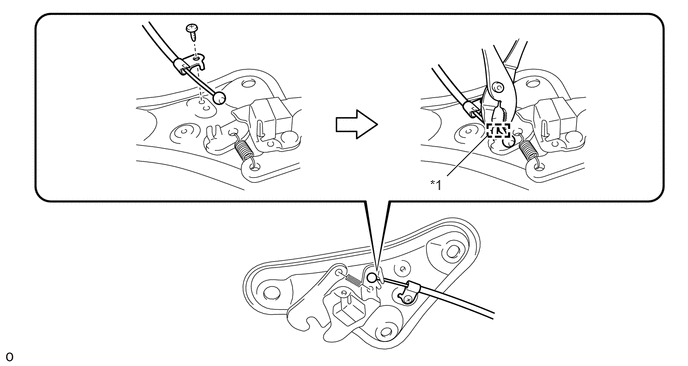
| *1 | Stake Part | - | - |
Using pliers, stake the stake part of the rear seatback lock sub-assembly LH.
Install the rear seatback lock cover with the 2 screws.
Install the rear seatback lock sub-assembly LH with the 2 bolts.
- Torque:
- 52.2 N*m (532 kgf*cm, 39 ft.*lbf)
Install the bush to the rear seatback lock sub-assembly LH.
72603 12.INSTALL REAR SEATBACK LOCK SUB-ASSEMBLY RH
- HINT:
-
Use the same procedure for the LH side.
71671 13.INSTALL REAR SEATBACK SILENCER PAD A
- NOTICE:
-
·
As the rear seatback silencer pad A is affixed to the rear seatback frame sub-assembly, do not remove the rear seatback silencer pad A from the rear seatback frame sub-assembly unless it is necessary to replace the rear seatback silencer pad A. If the rear seatback silencer pad A is removed from the rear seatback frame sub-assembly, make sure to replace the rear seatback silencer pad A.
·Perform the following only when replacing the rear seatback silencer pad A or rear seatback frame sub-assembly.
When reusing the rear seatback frame sub-assembly:
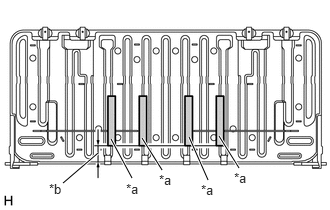
| *a | Adhesive Area |
| *b | 65 mm (2.56 in.) |
Remove any adhesive remaining in the area shown in the illustration.
Apply adhesive to the rear seatback frame sub-assembly in the location shown in the illustration.
Install 4 new rear seatback silencer pad A to the rear seatback frame sub-assembly.
71651 14.INSTALL REAR NO. 1 SEATBACK PAD
- NOTICE:
-
·
As the rear No. 1 seatback pad is affixed to the rear seatback frame sub-assembly, do not remove the rear No. 1 seatback pad from the rear seatback frame sub-assembly unless it is necessary to replace the rear No. 1 seatback pad. If the rear No. 1 seatback pad is removed from the rear seatback frame sub-assembly, make sure to replace the rear No. 1 seatback pad.
·Perform the following only when replacing the rear No. 1 seatback pad or rear seatback frame sub-assembly.
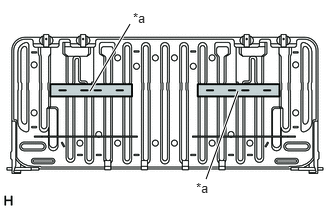
| *a | Adhesive Area |
When reusing the rear seatback frame sub-assembly:
Remove any adhesive remaining in the area shown in the illustration.
Apply adhesive to the rear seatback frame sub-assembly in the location shown in the illustration.
Install 2 new rear No. 1 seatback pads to the rear seatback frame sub-assembly.
71663 15.INSTALL REAR LOWER SEATBACK PAD
- NOTICE:
-
·
As the rear lower seatback pad is affixed to the rear seatback frame sub-assembly, do not remove the rear lower seatback pad from the rear seatback frame sub-assembly unless it is necessary to replace the rear lower seatback pad. If the rear lower seatback pad is removed from the rear seatback frame sub-assembly, make sure to replace the rear lower seatback pad.
·Perform the following only when replacing the rear lower seatback pad or rear seatback frame sub-assembly.
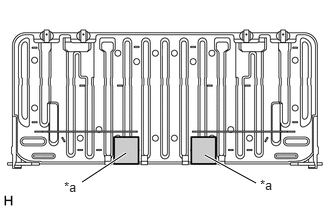
| *a | Adhesive Area |
When reusing the rear seatback frame sub-assembly:
Remove any adhesive remaining in the area shown in the illustration.
Apply adhesive to the rear seatback frame sub-assembly in the location shown in the illustration.
Install 2 new rear lower seatback pads to the rear seatback frame sub-assembly.
71651B 16.INSTALL BENCH TYPE REAR SEATBACK PAD
- NOTICE:
-
·
As the bench type rear seatback pad is affixed to the rear seatback frame sub-assembly, do not remove the bench type rear seatback pad from the rear seatback frame sub-assembly unless it is necessary to replace the bench type rear seatback pad. If the bench type rear seatback pad is removed from the rear seatback frame sub-assembly, make sure to replace the bench type rear seatback pad.
·Perform the following only when replacing the bench type rear seatback pad or rear seatback frame sub-assembly.
When reusing the rear seatback frame sub-assembly:
Remove any adhesive remaining in the area shown in the illustration.
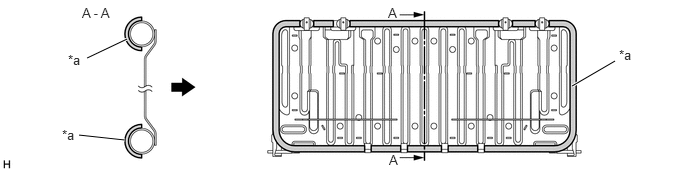
| *a | Adhesive Area | - | - |

|
Front Side | - | - |
Apply adhesive to the rear seatback frame sub-assembly in the location shown in the illustration.
Install a new bench type rear seatback pad to the rear seatback frame sub-assembly.
71077B 17.INSTALL BENCH TYPE REAR SEATBACK COVER
Install the bench type rear seatback cover to the bench type rear seatback pad.
71955A 18.INSTALL REAR SEAT HEADREST SUPPORT
Attach the 8 claws to install the 4 rear seat headrest supports.
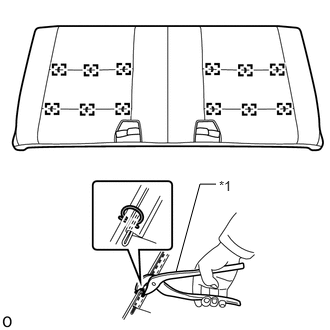
| *1 | Hog Ring Pliers |
Using hog ring pliers, install the bench type rear seatback pad with 12 new hog rings.
- NOTICE:
-
·
Be careful not to damage the bench type rear seatback cover.
-
·
When installing the hog rings, avoid wrinkling the bench type rear seatback cover.
71931A 19.INSTALL REAR SEAT HEADREST SUPPORT
Attach the 8 claws to install the 4 rear seat headrest supports.
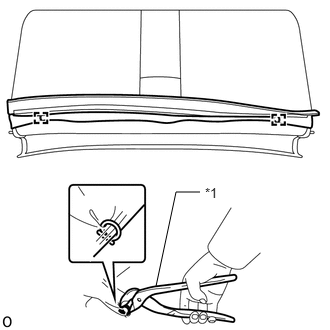
| *1 | Hog Ring Pliers |
Using hog ring pliers, install the 2 new hog rings.
- NOTICE:
-
·
Be careful not to damage the bench type rear seatback cover.
-
·
Be sure to securely install the hog rings as shown in the illustration while preventing wrinkles from forming on the bench type rear seatback cover.
78950 20.INSTALL NO. 1 FOLD SEAT STOPPER BAND ASSEMBLY
Install the No. 1 fold seat stopper band assembly with the bolt.
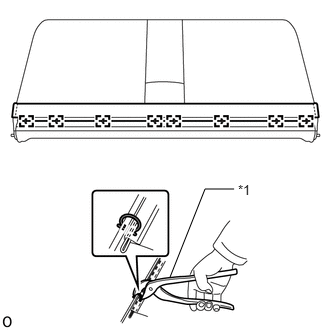
| *1 | Hog Ring Pliers |
Using hog ring pliers, install new 8 hog rings.
- NOTICE:
-
·
Be careful not to damage the bench type rear seatback cover.
-
·
Be sure to securely install the hog rings as shown in the illustration while preventing wrinkles from forming on the bench type rear seatback cover.
Attach the fastening tape to close the bench type rear seatback cover.
21.INSTALL BENCH TYPE REAR SEATBACK ASSEMBLY
Install the bench type rear seatback assembly with the 2 bolts.
- Torque:
- 52 N*m (530 kgf*cm, 38 ft.*lbf)
73390 22.INSTALL REAR SEAT 3 POINT TYPE BELT ASSEMBLY LH
73380 23.INSTALL REAR SEAT 3 POINT TYPE BELT ASSEMBLY RH
73350 24.INSTALL REAR CENTER SEAT LAP TYPE BELT ASSEMBLY
72660A 25.INSTALL REAR SEAT CUSHION SUPPORT ASSEMBLY
- HINT:
-
Use the same procedure for the other side.
Attach the clamp to connect the No. 2 fold seat lock control cable assembly as shown in the illustration.
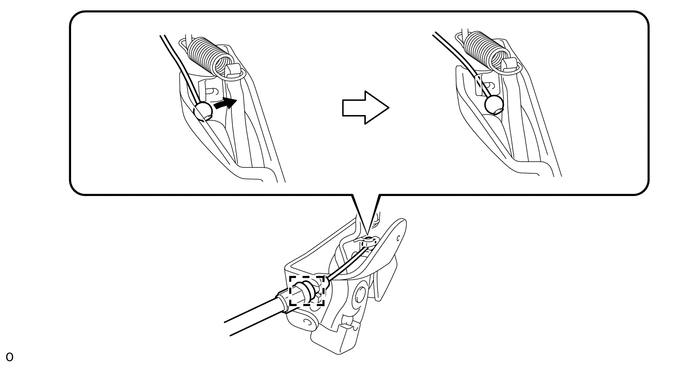
Install the rear seat cushion support assembly together with the rear seat 3 point type belt assembly and rear center lap type belt assembly with the 2 bolts.
- Torque:
- 41 N*m (418 kgf*cm, 30 ft.*lbf)
72694 26.INSTALL REAR SEAT CUSHION LOCK COVER
- HINT:
-
Use the same procedure for the other side.
Install the rear seat cushion lock cover with 2 screws.