EXTERIOR PANELS / TRIM NAME PLATE INSTALLATION
PROCEDURE

 75303A 1.INSTALL HOOD EMBLEM SUB-ASSEMBLY
Install the bush.
Attach the clip to install the hood emblem sub-assembly.
Install the nut.
75441B 2.INSTALL BACK DOOR NAME PLATE
- HINT:
-
When installing the back door name plate, heat the vehicle body and back door name plate using a heat light.
- Standard:
-
Item Temperature Vehicle Body 40 to 60°C (104 to 140°F) Back Door Name Plate 20 to 30°C (68 to 86°F)
- NOTICE:
-
Do not heat the vehicle body or back door name plate excessively.
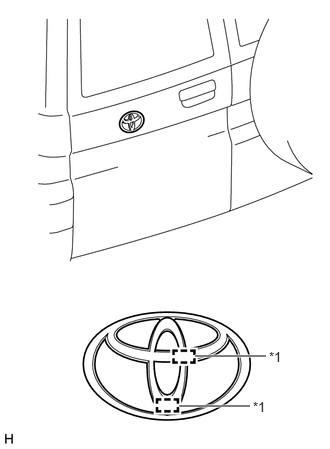
| *1 | Boss |
Clean the back door panel surface.
Using a heat light, heat the vehicle body surface.
Remove the double-sided tape from the vehicle body.
Wipe off any tape adhesive residue with cleaner.
Install a new back door name plate.
Using a heat light, heat the vehicle body and a new back door name plate.
Remove the peeling paper from the face of the back door name plate.
- HINT:
-
After removing the peeling paper, keep the exposed adhesive free from foreign matter.
Align the boss positions and install the back door name plate.
- HINT:
-
Press the back door name plate firmly to install it.
75463 3.INSTALL REAR NO. 4 NAME PLATE
- HINT:
-
When installing the rear No. 4 name plate, heat the vehicle body and rear No. 4 name plate using a heat light.
- Standard:
-
Item Temperature Vehicle Body 40 to 60°C (104 to 140°F) Rear No. 4 Name Plate 20 to 30°C (68 to 86°F)
- NOTICE:
-
Do not heat the vehicle body or rear No. 4 name plate excessively.
except Model Code #J79 Series, w/o Auxiliary Tank:
Clean the vehicle body surface.
Using a heat light, heat the vehicle body surface.
Remove the double-sided tape from the vehicle body.
Wipe off any tape adhesive residue with cleaner.
Install a new rear No. 4 name plate.
Using a heat light, heat the vehicle body and a new rear No. 4 name plate.
Remove the peeling paper from the face of the rear No. 4 name plate.
- HINT:
-
After removing the peeling paper, keep the exposed adhesive free from foreign matter.
Install the rear No. 4 name plate in the position shown in the installation.
- HINT:
-
Press the rear No. 4 name plate firmly to install it.
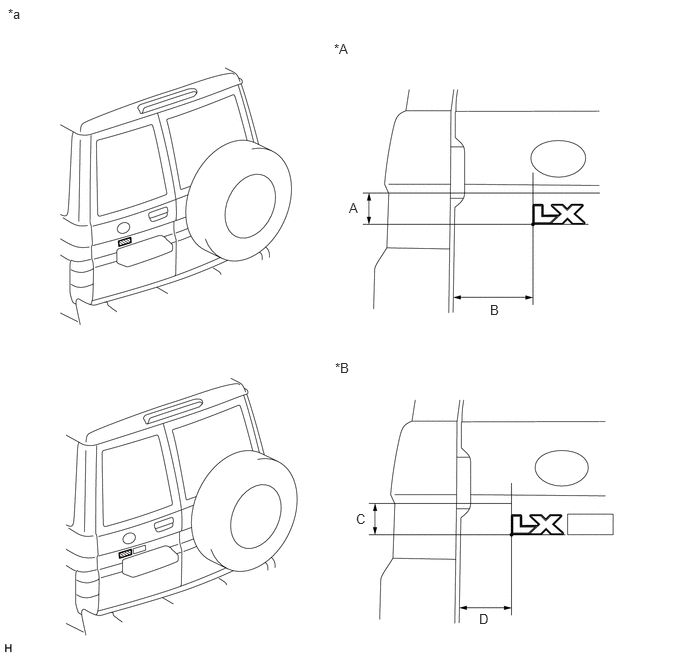
| *A | w/o No. 5 Back Door Name Plate | *B | w/ No. 5 Back Door Name Plate |
| *a | Reference Values | - | - |
- Standard:
-
Area Specified Condition Area Specified Condition A 52 mm (2.05 in.) B 135 mm (5.31 in.) C 52 mm (2.05 in.) D 90 mm (3.54 in.)
except Model Code #J79 Series, w/ Auxiliary Tank:
Clean the vehicle body surface.
Using a heat light, heat the vehicle body surface.
Remove the double-sided tape from the vehicle body.
Wipe off any tape adhesive residue with cleaner.
Install a new rear No. 4 name plate.
Using a heat light, heat the vehicle body and a new rear No. 4 name plate.
Remove the peeling paper from the face of the rear No. 4 name plate.
- HINT:
-
After removing the peeling paper, keep the exposed adhesive free from foreign matter.
Install the rear No. 4 name plate in the position shown in the installation.
- HINT:
-
Press the rear No. 4 name plate firmly to install it.
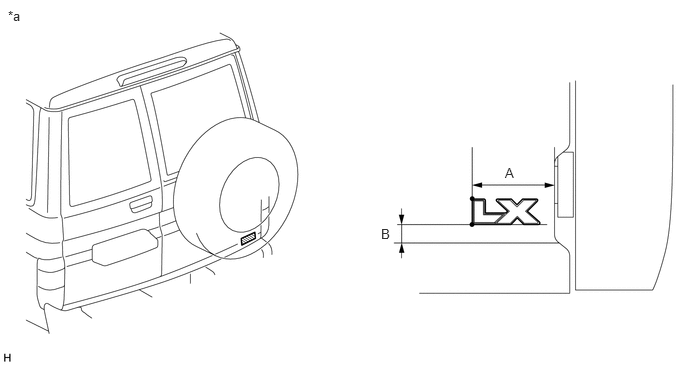
| *a | Reference Values | - | - |
- Standard:
-
Area Specified Condition Area Specified Condition A 107.5 mm (4.23 in.) B 25.4 mm (1.00 in.)
for Model Code #J79 Series:
Clean the vehicle body surface.
Using a heat light, heat the vehicle body surface.
Remove the double-sided tape from the vehicle body.
Wipe off any tape adhesive residue with cleaner.
Install a new rear No. 4 name plate.
Using a heat light, heat the vehicle body and a new rear No. 4 name plate.
Remove the peeling paper from the face of the rear No. 4 name plate.
- HINT:
-
After removing the peeling paper, keep the exposed adhesive free from foreign matter.
Install the rear No. 4 name plate in the position shown in the installation.
- HINT:
-
Press the rear No. 4 name plate firmly to install it.
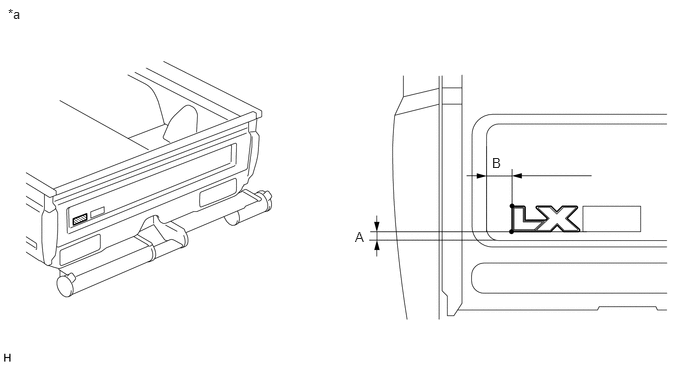
| *a | Reference Values | - | - |
- Standard:
-
Area Specified Condition Area Specified Condition A 14 mm (0.551 in.) B 33 mm (1.30 in.)
75465 4.INSTALL REAR NO. 5 NAME PLATE
- HINT:
-
When installing the rear No. 5 name plate, heat the vehicle body and rear No. 5 name plate using a heat light.
- Standard:
-
Item Temperature Vehicle Body 40 to 60°C (104 to 140°F) Rear No. 5 Name Plate 20 to 30°C (68 to 86°F)
- NOTICE:
-
Do not heat the vehicle body or rear No. 5 name plate excessively.
Clean the vehicle body surface.
Using a heat light, heat the vehicle body surface.
Wipe off any tape adhesive residue with cleaner.
Install a new rear No. 5 name plate.
Refer to the illustration to position a new rear No. 5 name plate.
Remove the application tape and apply the rear No. 5 name plate.
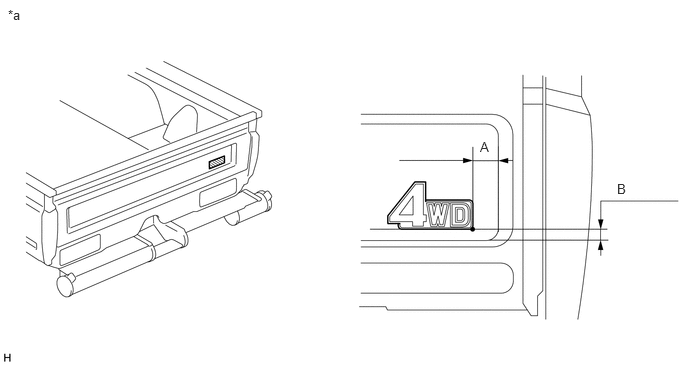
| *a | Reference Values | - | - |
- Standard:
-
Area Specified Condition Area Specified Condition A 33 mm (1.30 in.) B 14 mm (0.551 in.)
75471B 5.INSTALL REAR BODY NO. 1 NAME PLATE
- HINT:
-
When installing the rear body No. 1 name plate, heat the vehicle body and rear body No. 1 name plate using a heat light.
- Standard:
-
Item Temperature Vehicle Body 40 to 60°C (104 to 140°F) Rear Body No. 1 Name Plate 20 to 30°C (68 to 86°F)
- NOTICE:
-
Do not heat the vehicle body or rear body No. 1 name plate excessively.
Clean the vehicle body surface.
Using a heat light, heat the vehicle body surface.
Remove the double-sided tape from the vehicle body.
Wipe off any tape adhesive residue with cleaner.
Install a new rear body No. 1 name plate.
Using a heat light, heat the vehicle body and a new rear body No. 1 name plate.
Remove the peeling paper from the face of the rear body No. 1 name plate.
- HINT:
-
After removing the peeling paper, keep the exposed adhesive free from foreign matter.
Install the rear body No. 1 name plate in the position shown in the installation.
- HINT:
-
Press the rear body No. 1 name plate firmly to install it.
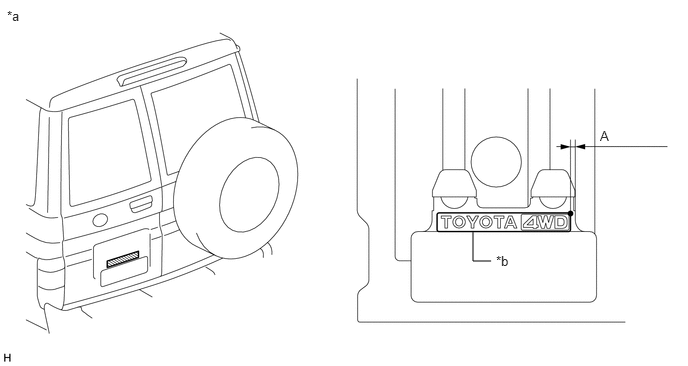
| *a | Reference Values | *b | Align with bottom |
- Standard:
-
Area Specified Condition Area Specified Condition A 11.6 mm (0.457 in.) - -
75445A 6.INSTALL NO. 5 BACK DOOR NAME PLATE
- HINT:
-
When installing the No. 5 back door name plate, heat the vehicle body and No. 5 back door name plate using a heat light.
- Standard:
-
Item Temperature Vehicle Body 40 to 60°C (104 to 140°F) No. 5 Back Door Name Plate 20 to 30°C (68 to 86°F)
- NOTICE:
-
Do not heat the vehicle body or No. 5 back door name plate excessively.
except Model Code #J79 Series, w/o Auxiliary Tank:
Clean the vehicle body surface.
Using a heat light, heat the vehicle body surface.
Remove the double-sided tape from the vehicle body.
Wipe off any tape adhesive residue with cleaner.
Install a new No. 5 back door name plate.
Using a heat light, heat the vehicle body and a new No. 5 back door name plate.
Remove the peeling paper from the face of the No. 5 back door name plate.
- HINT:
-
After removing the peeling paper, keep the exposed adhesive free from foreign matter.
Install the No. 5 back door name plate in the position shown in the installation.
- HINT:
-
Press the No. 5 back door name plate firmly to install it.
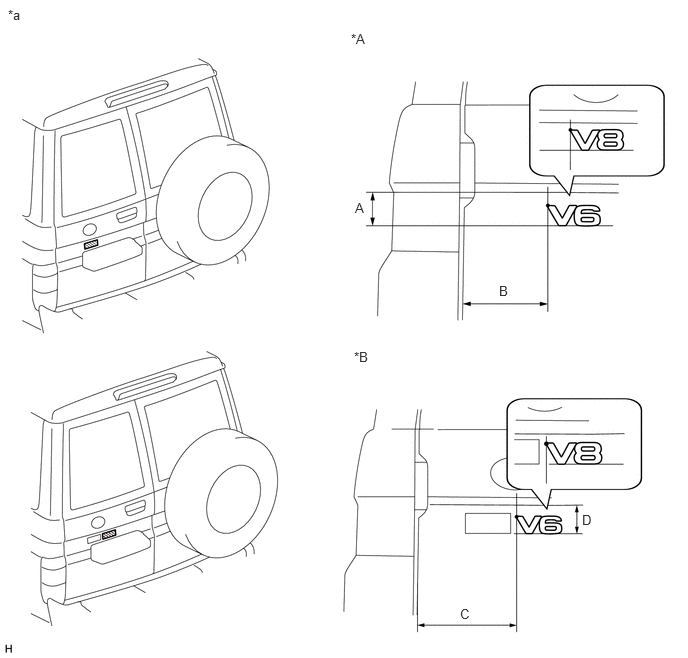
| *A | w/o Rear No. 4 Name Plate | *B | w/ Rear No. 4 Name Plate |
| *a | Reference Values | - | - |
- Standard:
-
Area Specified Condition Area Specified Condition A 52 mm (2.05 in.) B 137 mm (5.39 in.) C 180.5 mm (7.11 in.) D 50.5 mm (1.99 in.)
for Model Code #J79 Series:
Clean the vehicle body surface.
Using a heat light, heat the vehicle body surface.
Remove the double-sided tape from the vehicle body.
Wipe off any tape adhesive residue with cleaner.
Install a new No. 5 back door name plate.
Using a heat light, heat the vehicle body and a new No. 5 back door name plate.
Remove the peeling paper from the face of the No. 5 back door name plate.
- HINT:
-
After removing the peeling paper, keep the exposed adhesive free from foreign matter.
Install the No. 5 back door name plate in the position shown in the installation.
- HINT:
-
Press the No. 5 back door name plate firmly to install it.
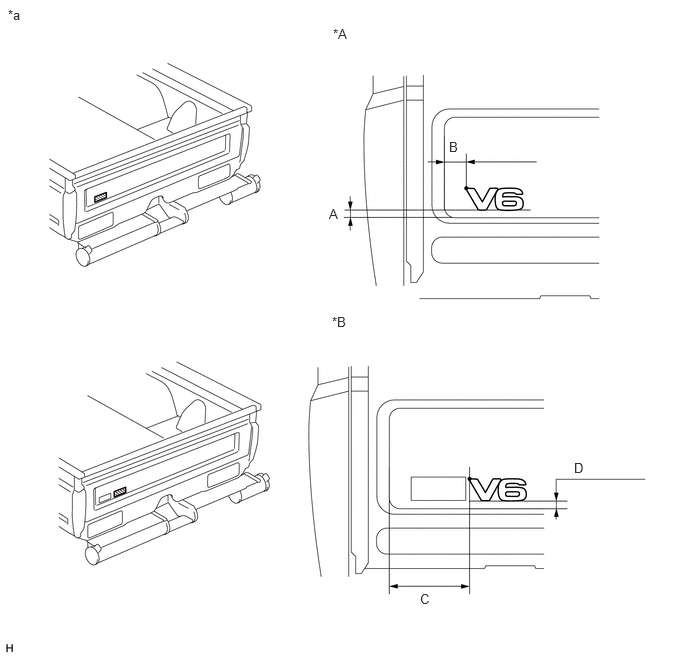
| *A | w/o Rear No. 4 Name Plate | *B | w/ Rear No. 4 Name Plate |
| *a | Reference Values | - | - |
- Standard:
-
Area Specified Condition Area Specified Condition A 14 mm (0.551 in.) B 33 mm (1.30 in.) C 123.5 mm (4.86 in.) D 15.5 mm (0.610 in.)
75365 7.INSTALL FRONT FENDER EMBLEM
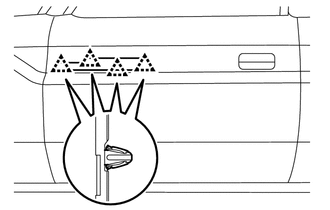
Attach the 4 clips to install the front fender emblem.