EXTERIOR PANELS / TRIM FRONT FENDER WHEEL MOULDING INSTALLATION
CAUTION / NOTICE / HINT
- HINT:
-
·
Use the same procedures for the RH and LH sides.
·The procedures listed below are for the LH side.
PROCEDURE

 53865 1.INSTALL FRONT WHEEL NO. 3 OPENING BRACKET
Install the front wheel No. 3 opening bracket with the 2 screws.
53862 2.INSTALL FRONT WHEEL NO. 2 OPENING BRACKET
Install the front wheel No. 2 opening bracket with the 2 screws.
53861 3.INSTALL FRONT WHEEL NO. 1 OPENING BRACKET
Install the front wheel opening bracket with the 2 screws.
53851C 4.INSTALL FRONT WHEEL NO. 1 OPENING MOULDING PAD
- HINT:
-
When installing the front wheel opening extension sub-assembly LH, heat the front wheel opening extension sub-assembly LH using a heat light.
- Standard:
-
Item Temperature Front Wheel Opening Extension Sub-assembly LH 20 to 30°C (68 to 86°F)
- NOTICE:
-
Do not heat the front wheel opening extension sub-assembly LH excessively.
If reusing the front wheel opening moulding sub-assembly LH:
Using a heat light, front wheel opening extension sub-assembly LH.
Remove the double-sided tape from the front wheel opening extension sub-assembly LH.
Wipe off any tape adhesive residue with cleaner.
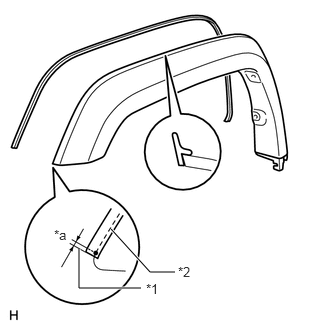
| *1 | Mark-off Line |
| *2 | Cut Line |
| *a | 1.0 mm (0.0394 in.) |
Install a new front wheel No. 1 opening moulding pad.
Remove the peeling paper from the face of a new front wheel No. 1 opening moulding pad.
Attach the moulding pad to the moulding, as shown in the illustration.
Align the front wheel No. 1 opening moulding pad with the mark-off line of the front wheel opening extension sub-assembly LH, and then install it.
- HINT:
-
Press the No. 1 side mudguard protector firmly to install it.
After installing the front wheel No. 1 opening moulding pad, remove the unnecessary part above the perforation.
53088A 5.INSTALL FRONT WHEEL OPENING EXTENSION SUB-ASSEMBLY LH
Install 8 new clips to the front wheel opening extension sub-assembly LH.
Attach the 8 clips to install the front wheel opening extension sub-assembly LH.
Install the 3 screws.
Install a new grommet.
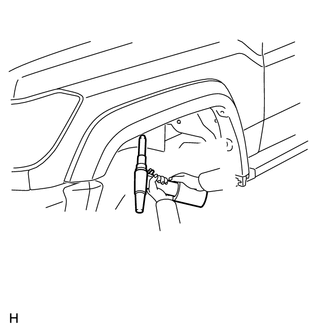
Install 2 new rivets.
Using an air riveter or hand riveter with a nose piece, install the front wheel opening extension sub-assembly LH with 2 new rivets.
- HINT:
-
If the rivet cannot be cut, pull it once and cut it.
- NOTICE:
-
·
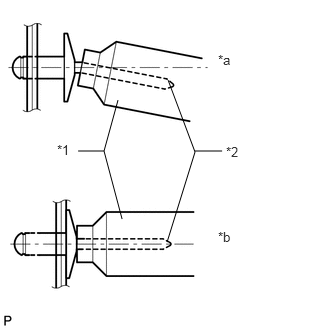 1.229,1.042 1.083,1.573 1.083,1.573 1.271,2.281 false 1.083,1.573 0.813,1.573 false 1.75,0.833 2.031,1.583 2.031,1.583 1.74,2.521 false 2.031,1.573 2.313,1.573 false 2.271,0.542 2.469,0.74 0.198,0.198 10 false *a 2.271,2.385 2.49,2.583 0.219,0.198 10 false *b 0.594,1.479 0.781,1.677 0.188,0.198 10 false *1 2.354,1.5 2.542,1.677 0.188,0.177 10 false *2
*1 Riveter *2 Mandrel *a INCORRECT *b CORRECT
·Do not pry the rivet with the riveter, as this will cause damage to the riveter and mandrel.
·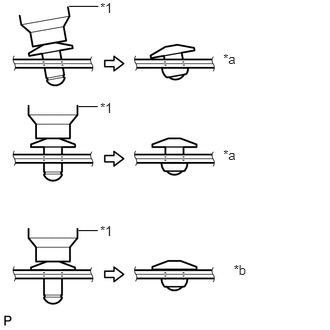 2.325,0.536 2.513,0.713 0.189,0.177 10 *a 2.325,1.527 2.5,1.705 0.175,0.177 10 *a 2.434,2.73 2.634,2.907 0.2,0.177 10 *b 0.72,0.066 1.023,0.066 false 0.818,1.11 1.018,1.11 false 1.043,2.324 1.223,2.477 0.181,0.153 10 *1 1.043,1.044 1.223,1.196 0.181,0.153 10 *1 1.043,0.0040 1.223,0.157 0.181,0.153 10 *1 0.818,2.402 1.018,2.402 false
*1 Riveter *a INCORRECT *b CORRECT
Confirm that the rivets are seated properly against the front wheel opening extension sub-assembly LH.
·Do not tilt the riveter when installing the rivet to the front wheel opening extension sub-assembly LH.
·Do not leave any space between the rivet head and front wheel opening extension sub-assembly LH.
·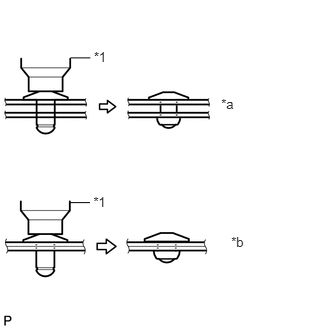 2.304,0.996 2.504,1.173 0.2,0.177 10 *a 2.408,2.434 2.62,2.612 0.211,0.177 10 *b 0.978,0.515 1.173,0.686 0.195,0.171 10 *1 0.735,0.603 0.941,0.603 false 0.973,2.023 1.182,2.194 0.209,0.171 10 *1 0.731,2.111 0.937,2.111 false
*1 Riveter *a INCORRECT *b CORRECT
Do not leave any space between the front wheel opening extension sub-assembly LH and vehicle body. Firmly hold together the 2 items while installing the rivet.
76604 6.INSTALL FRONT FENDER MUDGUARD SUB-ASSEMBLY LH