SLIDING ROOF / CONVERTIBLE SOFT TOP(for Model Code #J71 Series) INSTALLATION
CAUTION / NOTICE / HINT
- HINT:
-
A bolt without a torque specification is shown in the standard bolt chart.
-
Click hereGeneral>SPECIFICATIONS>STANDARD BOLT>SPECIFIED TORQUE FOR STANDARD BOLTS
PROCEDURE

 62403 1.INSTALL ROLL OVER PANEL TRIM SUB-ASSEMBLY
Install the roll over panel trim sub-assembly.
62033C 2.INSTALL NO. 3 FRONT DOOR OPENING TRIM SUB-ASSEMBLY
Install the No. 3 front door opening trim sub-assembly.
66503 3.INSTALL ROLL OVER PANEL SUB-ASSEMBLY
Install the roll over panel sub-assembly with the 12 bolts.
- Torque:
- 10.5 N*m (107 kgf*cm, 8 ft.*lbf)
Connect the shoulder anchor of the front seat outer belt assembly LH with the bolt to the roll over panel sub-assembly.
- Torque:
- 42 N*m (428 kgf*cm, 31 ft.*lbf)
Attach the 2 claws to close the shoulder anchor cover.
81240 4.INSTALL NO. 1 ROOM LIGHT ASSEMBLY
61232 5.INSTALL ROOF SIDE RAIL SUB-ASSEMBLY LH
Install the roof side rail sub-assembly LH with the 5 bolts.
- Torque:
- 17.5 N*m (178 kgf*cm, 13 ft.*lbf)
61203 6.INSTALL ROOF SIDE RAIL SUB-ASSEMBLY RH
- HINT:
-
Use the same procedure described for the LH side.
65809A 7.INSTALL REAR TOP COVER TARPAULIN BOW SUB-ASSEMBLY
Install the rear top cover tarpaulin bow sub-assembly with the 4 bolts.
65806A 8.INSTALL CENTER TOP COVER TARPAULIN BOW SUB-ASSEMBLY LH
Install the center top cover tarpaulin bow sub-assembly LH with the bolt and nut.
65805A 9.INSTALL CENTER TOP COVER TARPAULIN BOW SUB-ASSEMBLY RH
- HINT:
-
Use the same procedure described for the LH side.
65831 10.INSTALL CENTER TOP COVER TARPAULIN BOW
Install the center top cover tarpaulin bow with the 2 nuts.
65821 11.INSTALL FRONT TOP COVER TARPAULIN BOW
Install the front top cover tarpaulin bow with the 2 bolts.
65910A 12.INSTALL TARPAULIN ASSEMBLY
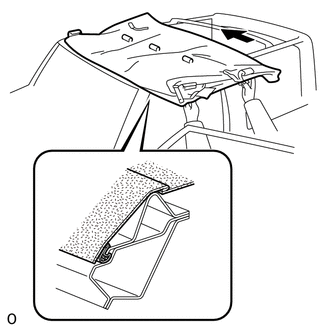
Install the tarpaulin assembly as shown in the illustration.
- HINT:
-
The tarpaulin assembly can be installed to LH or RH side.
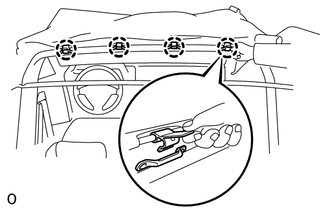
Attach the 4 claws.
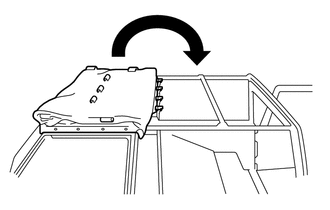
Unfold the tarpaulin assembly to backward.
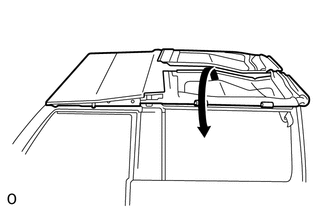
Unfold the tarpaulin assembly to sideward.
- HINT:
-
The illustration shows the LH side. The vertical orientation of the RH side is opposite that of the image shown in the illustration.
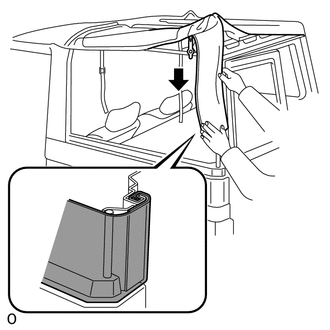
Slide and connect the tarpaulin assembly to the rear top cover tarpaulin bow sub-assembly.
- HINT:
-
The illustration shows the LH side. The vertical orientation of the RH side is opposite that of the image shown in the illustration.
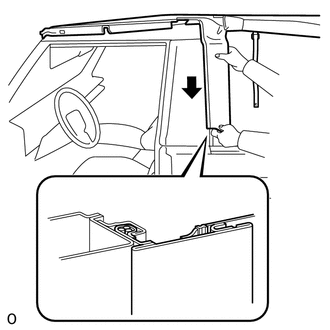
Slide and connect the tarpaulin assembly to the roll over panel sub-assembly.
- HINT:
-
The illustration shows the LH side. The vertical orientation of the RH side is opposite that of the image shown in the illustration.
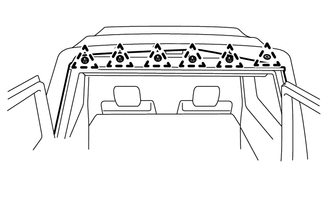
Attach the 6 clips.
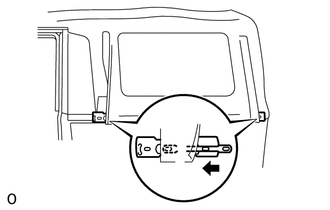
Install the tarpaulin side bar.
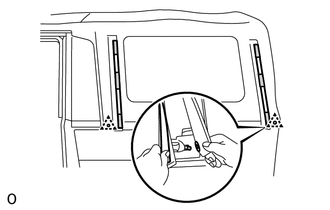

|
Fastening Tape |
Attach the 4 clips and 12 pieces of fastening tape.
- HINT:
-
The illustration shows the LH side. The vertical orientation of the RH side is opposite that of the image shown in the illustration.
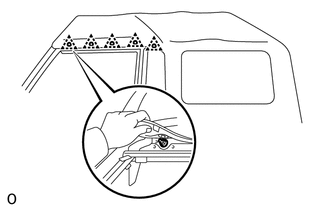
Attach the 10 clips.
- HINT:
-
The illustration shows the LH side. The vertical orientation of the RH side is opposite that of the image shown in the illustration.
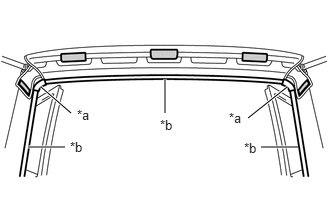
| *a | Corner Joint |
| *b | Opening Trim |
|
|
Fastening Tape |
Attach the 5 pieces of fastening tape.
Install the 3 opening trims.
Install the 2 corner joints.
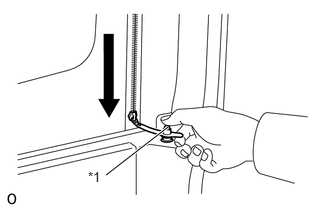
| *1 | Burglary Prevention Cock |
Close the 4 fasteners.
- HINT:
-
Use the same procedure for all fasteners.
Attach the 4 burglary prevention cocks.
- HINT:
-
Use the same procedure for all burglary prevention cocks.
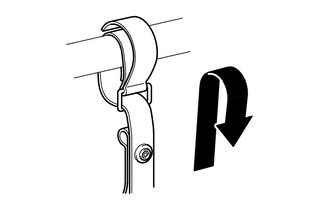
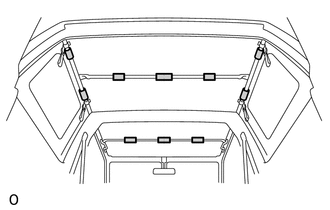
Attach the 4 belts.
- HINT:
-
Use the same procedure for all belts.
|
|
Fastening Tape |
Attach the 10 pieces of fastening tape.