INTERIOR PANELS / TRIM ROOF HEADLINING(for Semi-long Body) INSTALLATION
CAUTION / NOTICE / HINT
- HINT:
-
·
Use the same procedure for RHD and LHD vehicles.
·The procedure listed below is for LHD vehicles.
PROCEDURE

 63310 1.INSTALL ROOF HEADLINING ASSEMBLY
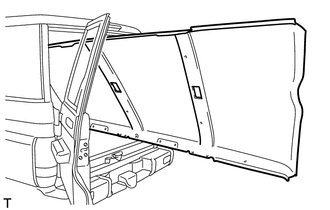
Place the roof headlining assembly into the vehicle through the back door.
- NOTICE:
-
·
Check that the corners of the roof headlining assembly are not folded, twisted or otherwise deformed and that none of the mounted parts have fallen off.
·Make sure that the roof headlining assembly does not get caught on anything as it may become bent or damaged.
·Do not damage the roof headlining assembly or vehicle interior.
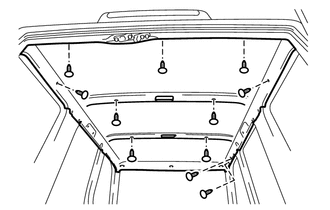
Install the roof headlining assembly with the 11 clips.
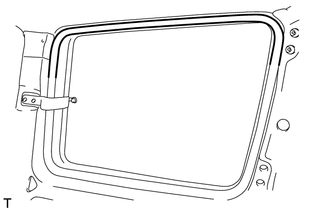
Install the upper part of the quarter window glass weatherstrip.
- HINT:
-
Use the same procedure for the other quarter window glass weatherstrip.
81240 2.INSTALL NO. 1 ROOM LIGHT ASSEMBLY
81241 3.INSTALL NO. 1 ROOM LIGHT LENS
81240D 4.INSTALL NO. 2 ROOM LIGHT ASSEMBLY
81241A 5.INSTALL NO. 2 ROOM LIGHT LENS
87810 6.INSTALL INNER REAR VIEW MIRROR ASSEMBLY
87834 7.INSTALL INNER REAR VIEW MIRROR STAY HOLDER COVER
87827 8.INSTALL INNER REAR VIEW MIRROR ABSORBER
74348 9.INSTALL VISOR HOLDER
- HINT:
-
Use the same procedure for both visor holders.
Attach the clip to install the visor holder.
Install the screw.
74320 10.INSTALL VISOR ASSEMBLY LH
Install the visor assembly LH with the 2 screws.
74310 11.INSTALL VISOR ASSEMBLY RH
- HINT:
-
Use the same procedure described for the LH side.
74620B 12.INSTALL REAR ASSIST GRIP ASSEMBLY
- HINT:
-
Use the same procedure for both rear assist grip assemblies.
for Type A:
Install the rear assist grip assembly with the 2 screws.
for Type B:
Using a T25 "TORX" socket wrench, install the rear assist grip assembly with the 2 screws.
74610A 13.INSTALL ASSIST GRIP SUB-ASSEMBLY
for Type A:
Install the assist grip sub-assembly with the 2 screws.
for Type B:
Using a T25 "TORX" socket wrench, install the assist grip sub-assembly with the 2 screws.
74617C 14.INSTALL ASSIST GRIP PLUG
- HINT:
-
Use the same procedure for all assist grip plugs.
Attach the 2 claws to install the assist grip plug.
64805 15.INSTALL BACK DOOR OPENING TRIM SUB-ASSEMBLY
Install the back door opening trim sub-assembly.
58573A 16.INSTALL REAR FLOOR MAT SUPPORT PLATE
Install the rear floor mat support plate with the 4 screws.
62639A 17.INSTALL QUARTER PILLAR GARNISH LH
Attach the 2 guides and 7 clips to install the quarter pillar garnish LH.
Connect the rear seat belt shoulder anchor with the bolt.
- Torque:
- 42 N*m (428 kgf*cm, 31 ft.*lbf)
Attach the 2 claws to close the rear seat belt shoulder anchor cover.
62638A 18.INSTALL QUARTER PILLAR GARNISH RH
- HINT:
-
Use the same procedure described for the LH side.
62412 19.INSTALL CENTER PILLAR GARNISH LH
Attach the 3 guides and clip to install the center pillar garnish LH.
Connect the front seat belt shoulder anchor with the bolt.
- Torque:
- 42 N*m (428 kgf*cm, 31 ft.*lbf)
Attach the 2 claws to close the front seat belt shoulder anchor cover.
62411 20.INSTALL CENTER PILLAR GARNISH RH
- HINT:
-
Use the same procedure described for the LH side.
74630E 21.INSTALL REAR ASSIST GRIP ASSEMBLY LH
for Type A:
Install the rear assist grip assembly LH with the 2 screws.
for Type B:
Using a T25 "TORX" socket wrench, install the rear assist grip assembly LH with the 2 screws.
74620C 22.INSTALL REAR ASSIST GRIP ASSEMBLY RH
- HINT:
-
Use the same procedure described for the LH side.
62212 23.INSTALL FRONT PILLAR GARNISH LH
Attach the clip and claw to install the front pillar garnish LH.
62211 24.INSTALL FRONT PILLAR GARNISH RH
Attach the clip and claw to install the front pillar garnish RH.
w/o Assist Grip:
Install the 2 clips.
74603 25.INSTALL FRONT ASSIST GRIP SUB-ASSEMBLY
- HINT:
-
Use the same procedure for both front assist grip sub-assemblies.
for Type A:
Install the front assist grip sub-assembly with the 2 screws.
for Type B:
Using a T25 "TORX" socket wrench, install the assist grip sub-assembly with the 2 screws.
74617A 26.INSTALL ASSIST GRIP PLUG
- HINT:
-
Use the same procedure for all assist grip plugs.
Attach the 2 claws to install the assist grip plug.
55356B 27.INSTALL INSTRUMENT PANEL PLATE LH
55355B 28.INSTALL INSTRUMENT PANEL PLATE RH
62332C 29.INSTALL REAR DOOR OPENING TRIM WEATHERSTRIP LH
Install the rear door opening trim weatherstrip LH.
62331C 30.INSTALL REAR DOOR OPENING TRIM WEATHERSTRIP RH
- HINT:
-
Use the same procedure described for the LH side.
62316C 31.INSTALL FRONT DOOR REAR OPENING TRIM WEATHERSTRIP LH
Install the front door rear opening trim weatherstrip LH.
62315E 32.INSTALL FRONT DOOR REAR OPENING TRIM WEATHERSTRIP RH
- HINT:
-
Use the same procedure described for the LH side.
62414A 33.INSTALL LOWER CENTER PILLAR GARNISH LH
Put protective tape around the lower center pillar garnish LH.
Insert the bottom of the lower center pillar garnish LH.
Attach one side of the lower center pillar garnish LH.
Using a clip remover, attach the other side of the lower center pillar garnish LH as shown in the illustration to install the lower center pillar garnish LH.
- HINT:
-
Tape the clip remover tip before use.
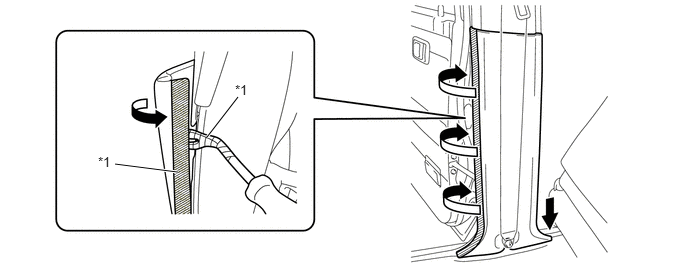
| *1 | Protective Tape | - | - |
62413A 34.INSTALL LOWER CENTER PILLAR GARNISH RH
- HINT:
-
Use the same procedure described for the LH side.
62112A 35.INSTALL COWL SIDE TRIM SUB-ASSEMBLY LH
Attach the clip to install the cowl side trim sub-assembly LH.
Install the cap nut.
62111A 36.INSTALL COWL SIDE TRIM SUB-ASSEMBLY RH
- HINT:
-
Use the same procedure described for the LH side.
67918A 37.INSTALL REAR DOOR SCUFF PLATE LH
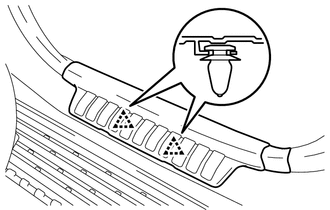
Attach the 2 clips to install the rear door scuff plate LH.
67917A 38.INSTALL REAR DOOR SCUFF PLATE RH
- HINT:
-
Use the same procedure described for the LH side.
67914 39.INSTALL FRONT DOOR SCUFF PLATE LH
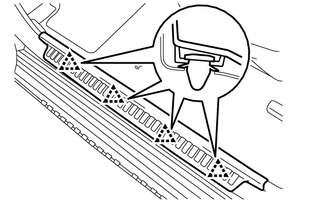
Attach the 4 clips to install the front door scuff plate LH.
67913 40.INSTALL FRONT DOOR SCUFF PLATE RH
- HINT:
-
Use the same procedure described for the LH side.