SEAT BELT REAR SEAT OUTER BELT ASSEMBLY(for Semi-long Body) INSTALLATION
CAUTION / NOTICE / HINT
- HINT:
-
·
Use the same procedure for RHD and LHD vehicles.
·The procedure listed below is for LHD vehicles.
·Use the same procedure for the RH and LH sides.
·The procedure listed below is for the LH side.
PROCEDURE

 73370 1.INSTALL REAR SEAT OUTER 3 POINT TYPE BELT ASSEMBLY LH
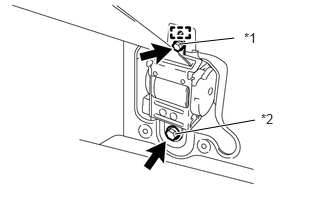
| *1 | Bolt A |
| *2 | Bolt B |
Attach the guide and temporarily install the rear seat outer 3 point type belt assembly LH with the bolt (A) and (B).
Tighten the bolt (A).
- Torque:
- 5.0 N*m (51 kgf*cm, 44 in.*lbf)
Tighten the bolt (B).
- Torque:
- 42 N*m (428 kgf*cm, 31 ft.*lbf)
Connect the shoulder anchor of the rear seat outer 3 point type belt assembly LH with the bolt.
- Torque:
- 42 N*m (428 kgf*cm, 31 ft.*lbf)
Attach the 2 claws to close the rear seat outer 3 point type belt shoulder anchor cover.
Connect the rear seat outer 3 point type belt floor anchor with the bolt.
- Torque:
- 42 N*m (428 kgf*cm, 31 ft.*lbf)
Check that the rear seat outer 3 point type belt is not twisted.
62630P 2.INSTALL QUARTER TRIM PANEL ASSEMBLY RH (for RH Side)
Attach the 12 clips to install the quarter trim panel assembly RH.
62640P 3.INSTALL QUARTER TRIM PANEL ASSEMBLY LH
Attach the 10 clips to install the quarter trim panel assembly LH.
64707D 4.INSTALL QUARTER TRIM JACK COVER SUB-ASSEMBLY
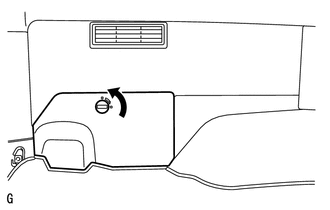
Install the quarter trim jack cover sub-assembly and rotate the knob in the direction of the arrow shown in the illustration.
62552F 5.INSTALL REAR SEAT SIDE GARNISH LH
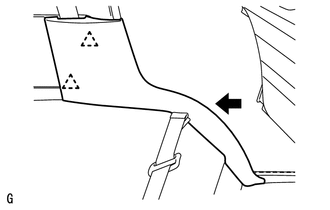
Install the rear seat side garnish LH in the direction of the arrow shown in the illustration.
Attach the 2 clips.
67918A 6.INSTALL REAR DOOR SCUFF PLATE LH
Attach the 2 clips to install the rear door scuff plate LH.