H152F MANUAL TRANSMISSION / TRANSAXLE MANUAL TRANSMISSION UNIT REASSEMBLY
PROCEDURE

 33112C 1.INSTALL TRANSFER ADAPTER STRAIGHT PIN
- NOTICE:
-
It is not necessary to remove the transfer adapter straight pin unless it is being replaced.
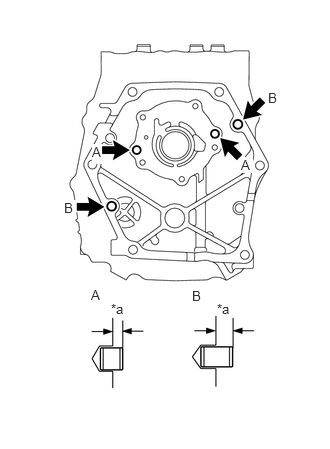
| *a | Protrusion Height |
Using a plastic-faced hammer, tap 4 new transfer adapter straight pins into the transfer adapter sub-assembly.
- Standard Protrusion Height:
-
Item Specified Condition A 4.0 to 6.0 mm (0.1575 to 0.2362 in.) B 7.0 to 9.0 mm (0.2756 to 0.3543 in.)
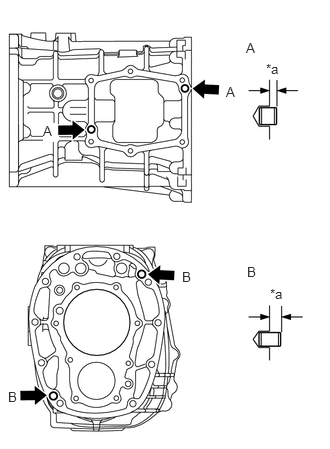
| *a | Protrusion Height |
Using a plastic-faced hammer, tap 4 new transfer adapter straight pins into the transmission case sub-assembly.
- Standard Protrusion Height:
-
Item Specified Condition A 4.0 to 6.0 mm (0.1575 to 0.2362 in.) B 7.0 to 9.0 mm (0.2756 to 0.3543 in.)
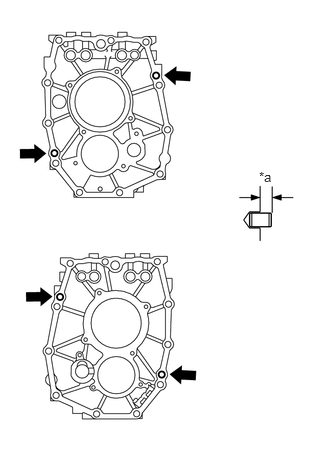
| *a | Protrusion Height |
Using a plastic-faced hammer, tap 4 new transfer adapter straight pins into the transmission intermediate plate.
- Standard Protrusion Height:
-
7.0 to 9.0 mm (0.2756 to 0.3543 in.)
2.INSTALL OUTPUT SHAFT ASSEMBLY
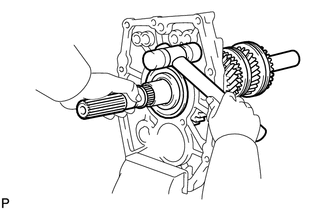
Fix the transmission intermediate plate in a vise between aluminum plates.
- NOTICE:
-
Do not overtighten the vise.
Install the output shaft assembly by lightly tapping on the back side of the transmission intermediate plate with a plastic-faced hammer.
- HINT:
-
Perform the procedure while pulling the output shaft assembly to the rear side by hand.
33321B 3.INSTALL OUTPUT SHAFT BEARING SHAFT SNAP RING
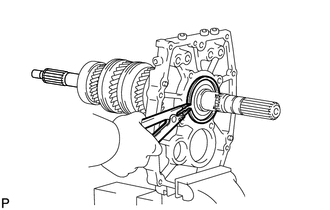
Using a snap ring expander, install the output shaft bearing shaft snap ring to the output shaft bearing.
33311D 4.INSTALL INPUT SHAFT BEARING
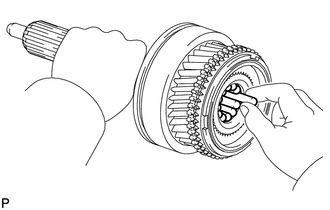
Apply gear oil to the input shaft bearing (12 rollers) and install them to the input shaft.
33368 5.INSPECT NO. 2 SYNCHRONIZER RING
33368 6.INSTALL NO. 2 SYNCHRONIZER RING
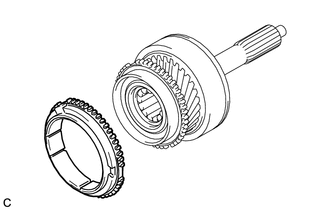
Apply gear oil to the No. 2 synchronizer ring and install it to the input shaft.
33311 7.INSTALL INPUT SHAFT
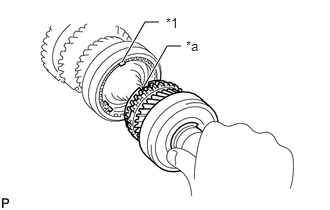
| *1 | Shifting Key |
| *a | Groove |
Apply gear oil to the No. 2 synchronizer ring grooves and shifting key.
- HINT:
-
Align the shifting key of the synchronizer ring with the groove of the clutch hub.
While aligning the key groove of the input shaft with the shifting key position of the output shaft assembly, install the input shaft to the output shaft assembly.
- NOTICE:
-
·
Do not drop the No. 2 synchronizer ring and input shaft bearing.
·The input shaft should be able to rotate smoothly.
33421 8.INSTALL COUNTER GEAR
Temporarily install the counter gear to the transmission intermediate plate.
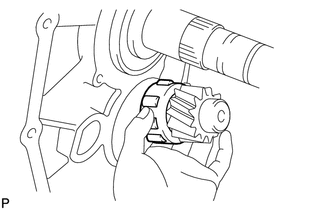
Attach the 2 locations of the center counter shaft bearing to install the counter gear.
Coat the counter shaft center bearing with gear oil.
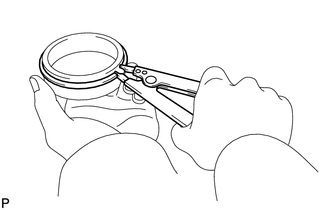
Using a snap ring expander, install the rear counter gear shaft snap ring to the counter shaft center bearing (outer race).
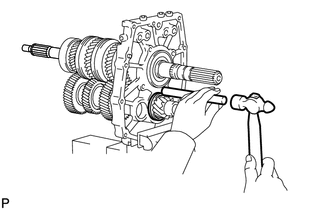
Using a brass bar and hammer, lightly tap the bearing outer race uniformly to install it.
- NOTICE:
-
Do not drop the counter gear. Hold the front side of the counter gear.
- NOTICE:
-
·
Make sure that the counter gear does not fall when tapping the counter shaft center bearing (outer race).
·Make sure that the sliding surfaces of the bearing are not damaged by teeth of the counter gear assembly when inserting the counter shaft center bearing (outer race).
33151 9.INSTALL OUTPUT SHAFT REAR BEARING RETAINER
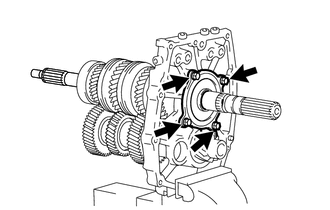
Install the output shaft rear bearing retainer to the transmission intermediate plate with the 4 bolts.
- Torque:
- 18.13 N*m (185 kgf*cm, 13 ft.*lbf)
33331A 10.INSTALL REVERSE GEAR BEARING
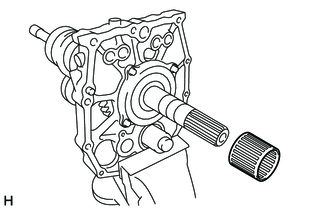
Coat the reverse gear bearing with gear oil, and install it to the output shaft.
33331 11.INSTALL REVERSE GEAR
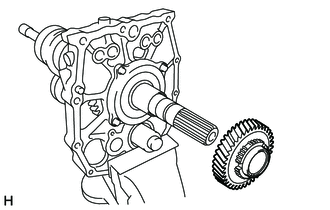
Coat the reverse gear with gear oil, and install it to the output shaft.
- HINT:
-
Apply gear oil to the inner diameter surface and thrust surface of the reverse gear.
33049 12.INSTALL REVERSE SYNCHRONIZER RING SET
Apply gear oil to the reverse synchronizer ring set and tapered cone surface of the reverse gear.
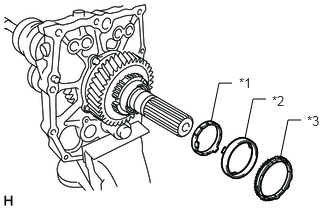
| *1 | Outer Ring |
| *2 | Middle Ring |
| *3 | Inner Ring |
Install the reverse synchronizer ring set to the reverse gear.
- NOTICE:
-
·
Align the claw of the middle ring and the cutout of the reverse gear.
·Align the claw of the inner ring and the key groove of the outer ring.
33352B 13.INSTALL NO. 4 TRANSMISSION CLUTCH HUB
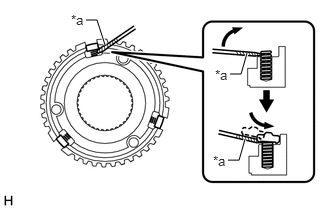
| *a | Protective Tape |
Using a screwdriver, install the 3 shifting keys and 3 springs to the No. 4 transmission clutch hub.
- NOTICE:
-
Lightly move the shifting key with your finger and check that it does not separate from the No. 4 transmission clutch hub.
- HINT:
-
·
Push down the spring as shown in the illustration when installing the shifting key.
·Tape the screwdriver tip before use.
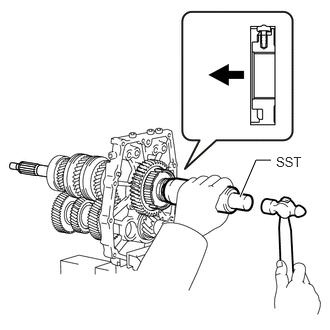

|
Front Side |
Using SST and a hammer, install the No. 4 transmission clutch hub.
- SST
-
09316-60011 (09316-00011)
- NOTICE:
-
·
Install in the correct direction.
·Align the key groove of the reverse synchronizer ring set with the shifting key position when installing.
- HINT:
-
Align the shifting key of the synchronizer ring with the groove of the clutch hub.
Install the clutch hub and confirm that the gear and synchronizer ring move smoothly.
33363 14.INSTALL NO. 1 TRANSMISSION HUB SLEEVE
Apply a light coat of gear oil to the spline of the No. 1 transmission hub sleeve.
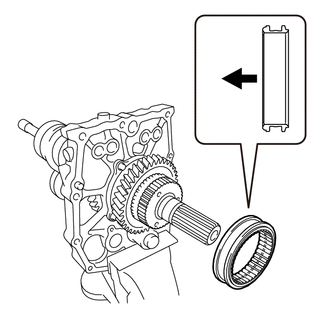
|
|
Front Side |
Install the No. 1 transmission hub sleeve to the No. 4 transmission clutch hub.
- NOTICE:
-
Do not mistake the installation direction of the No. 1 transmission hub sleeve.
33393A 15.INSTALL NO. 3 TRANSMISSION CLUTCH HUB SHAFT SNAP RING
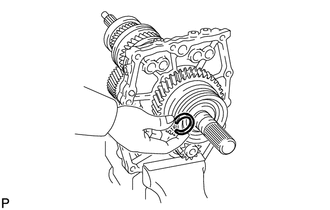
Select a new snap ring that will allow minimum clearance.
- No. 3 Transmission Clutch Hub Shaft Snap Ring Thickness:
-
Mark Specified Condition A 2.40 to 2.45 mm (0.0945 to 0.0964 in.) B 2.45 to 2.50 mm (0.0965 to 0.0984 in.) C 2.50 to 2.55 mm (0.0985 to 0.1003 in.) D 2.55 to 2.60 mm (0.1004 to 0.1023 in.) E 2.60 to 2.65 mm (0.1024 to 0.1043 in.) F 2.65 to 2.70 mm (0.1044 to 0.1062 in.)
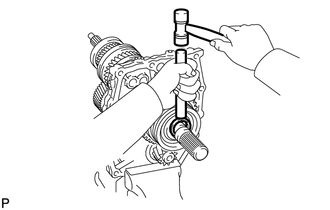
Using a brass bar and hammer, install the No. 3 transmission clutch hub shaft snap ring to the output shaft assembly.
- NOTICE:
-
Do not damage the output shaft assembly and No. 4 transmission clutch hub.
16.INSPECT REVERSE GEAR THRUST CLEARANCE
17.INSPECT REVERSE GEAR RADIAL CLEARANCE
33213G 18.INSTALL NO. 2 GEAR SHIFT FORK
Apply gear oil to the No. 2 gear shift fork shaft and install it to the No. 2 gear shift fork.
- NOTICE:
-
Make sure to install the No. 2 gear shift fork shaft in the correct direction.
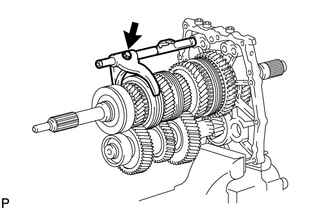
Install the No. 2 gear shift fork together with the No. 2 gear shift fork shaft to the output shaft assembly, and insert the No. 2 gear shift fork shaft into the transmission intermediate plate.
Install the bolt.
- Torque:
- 46.29 N*m (472 kgf*cm, 34 ft.*lbf)
Apply gear oil to the interlock pin.
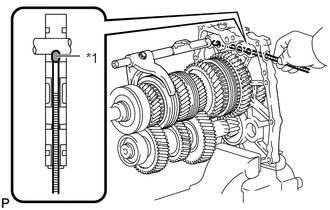
| *1 | Interlock Pin |
Using a magnet hand, install the interlock pin to the intermediate plate.
33212A 19.INSTALL NO. 1 GEAR SHIFT FORK
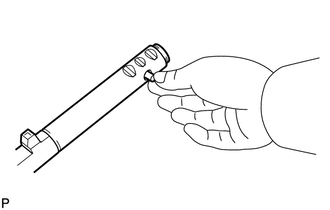
Apply MP grease to the interlock pin.
Install the interlock pin to the No. 1 gear shift fork shaft.
- HINT:
-
Apply MP grease to prevent the interlock pin from falling off.
Apply gear oil to the No. 1 shift fork shaft.
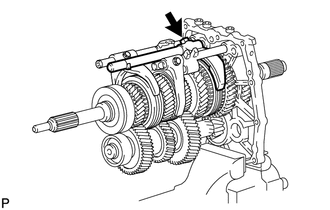
Temporarily install the No. 1 gear shift fork to the output shaft, and insert the No. 1 shift fork shaft into the No. 1 gear shift fork and transmission intermediate plate.
- NOTICE:
-
·
Do not drop the No. 1 gear shift fork.
·Make sure to install the No. 1 gear shift fork in the correct direction.
Install the bolt.
- Torque:
- 46.29 N*m (472 kgf*cm, 34 ft.*lbf)
Apply gear oil to the interlock pin.
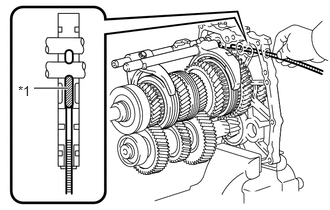
| *1 | Interlock Pin |
Using a magnet hand, install the interlock pin to the transmission intermediate plate.
33214G 20.INSTALL NO. 3 GEAR SHIFT FORK
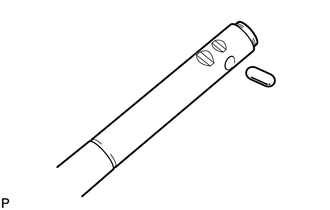
Apply MP grease to the interlock pin.
Install the interlock pin to the No. 3 gear shift fork shaft.
- HINT:
-
Apply MP grease to prevent the interlock pin from falling off.
Apply gear oil to the No. 3 shift fork shaft.
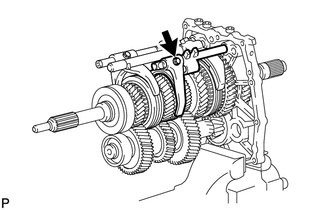
Insert the No. 3 gear shift fork shaft into the transmission intermediate plate.
- NOTICE:
-
Make sure to install the No. 3 gear shift fork shaft in the correct direction.
Install the reverse shift head to the No. 3 gear shift fork shaft.
- NOTICE:
-
Make sure to install the reverse shift head in the correct direction.
Temporarily install the No. 3 gear shift fork to the output shaft, and insert the No. 3 gear shift fork shaft into the No. 3 gear shift fork.
- NOTICE:
-
·
Do not drop the No. 3 gear shift fork.
·Make sure to install the No. 3 gear shift fork in the correct direction.
Install the bolt.
- Torque:
- 46.29 N*m (472 kgf*cm, 34 ft.*lbf)
Apply gear oil to the ball.
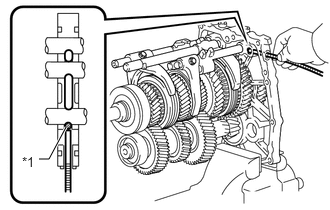
| *1 | Ball |
Using a magnet hand, install the ball to the transmission intermediate plate.
33211 21.INSTALL REVERSE SHIFT FORK
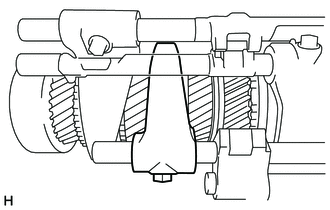
Move the No. 3 gear shift fork to the position shown in the illustration.
Apply gear oil to the No. 4 gear shift fork.
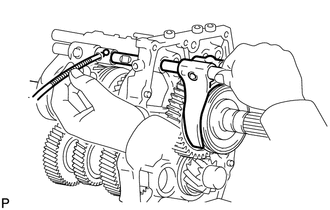
Temporarily install the reverse gear shift fork to the output shaft, and insert the No. 4 gear shift fork shaft into the reverse shift fork and transmission intermediate plate.
- NOTICE:
-
·
Do not drop the reverse shift fork.
·Make sure to install the No. 4 gear shift fork shaft and reverse shift fork in the correct direction.
Apply gear oil to the ball.
Using a magnet hand, install the ball to the reverse shift head, and insert the No. 4 gear shift fork shaft into the reverse shift head.
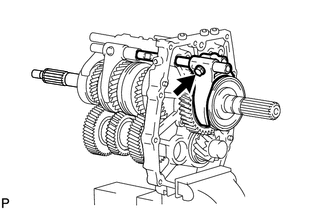
Install the bolt.
- Torque:
- 34.3 N*m (350 kgf*cm, 25 ft.*lbf)
33244B 22.INSTALL SHIFT FORK SHAFT SNAP RING
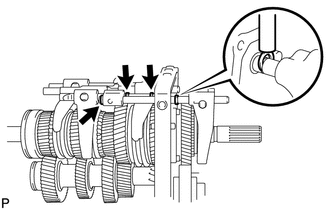
Using a brass bar and hammer, install 4 new shift fork shaft snap rings.
- NOTICE:
-
Make sure to install the shift fork shaft snap ring in the correct direction.
33275F 23.INSTALL SHIFT DETENT BALL PLUG
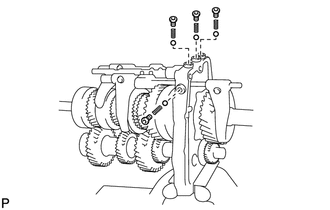
Clean and remove any oil from the 4 shift detent ball plugs and installation holes.
Install the 4 shift detent balls and 4 shift detent ball springs to the intermediate plate.
Apply adhesive to 2 or 3 threads of the 4 shift detent ball plugs.
- Adhesive:
-
Toyota Genuine Adhesive 1324, Three Bond 1324 or equivalent
Using a T40 "TORX" socket wrench, install the 4 shift detent ball plugs.
- Torque:
- 18.62 N*m (190 kgf*cm, 14 ft.*lbf)
33125B 24.INSTALL MANUAL TRANSMISSION CASE RECEIVER
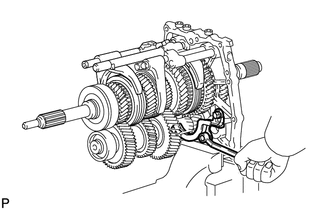
Install the manual transmission case receiver to the intermediate plate with the 3 bolts.
- Torque:
- 18.13 N*m (185 kgf*cm, 13 ft.*lbf)
33124C 25.INSTALL NO. 1 OIL RECEIVER PIPE
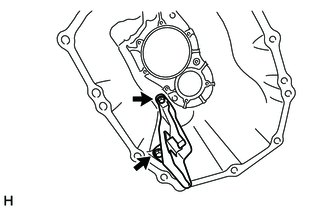
Install the No. 1 oil receiver pipe to the transmission case sub-assembly with the 2 bolts.
- Torque:
- 11.76 N*m (120 kgf*cm, 9 ft.*lbf)
33111 26.INSTALL MANUAL TRANSMISSION CASE SUB-ASSEMBLY
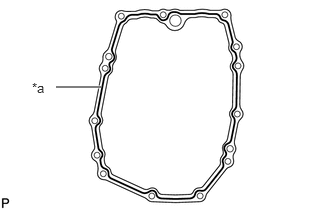
| *a | Seal Packing |
Clean the contact surface of the manual transmission case sub-assembly and transmission intermediate plate with non-residue solvent.
Apply seal packing to the manual transmission case sub-assembly as shown in the illustration.
- Seal Packing:
-
Toyota Genuine Seal Packing 1281, Three Bond 1281 or equivalent
- Seal Diameter:
-
1.2 mm (0.0472 in.)
- NOTICE:
-
·
Assemble the parts within 10 minutes of application. Otherwise, the seal packing material must be removed and reapplied.
·Make sure that foreign matter or oil does not adhere to the application surface.
·Apply seal packing in the middle along the seal surface and inner side around the bolt holes.
·Overlap the seal packing application start and end positions by 1 to 5 mm.
·Apply seal packing in a continuous line (width 1.2 mm (0.0472 in.)) along the sealing surface of the manual transmission case sub-assembly.
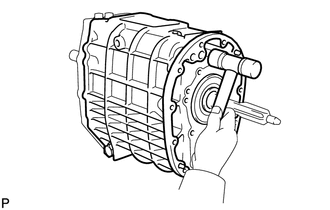
Install the manual transmission case sub-assembly by lightly tapping it into place with a plastic-faced hammer.
- NOTICE:
-
Install the manual transmission case sub-assembly straight so that unnecessary force is not applied to the bearing.
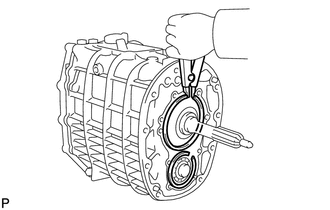
Using a snap ring expander, install the 2 snap rings to the input shaft and counter gear.
33261C 27.INSTALL SHIFT AND SELECT LEVER SHAFT
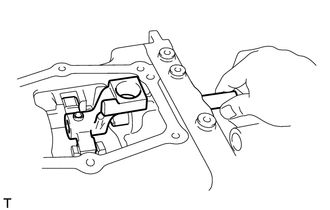
Temporarily install the shift lever housing to the manual transmission case sub-assembly and install the shift and select lever shaft to the transmission intermediate plate and shift lever housing.
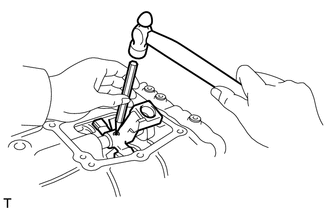
Using a pin punch and hammer, tap in the slotted spring pin.
28.INSPECT REVERSE IDLER GEAR RADIAL CLEARANCE
33451 29.INSTALL REVERSE IDLER GEAR SHAFT
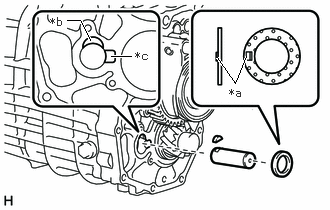
| *a | Protrusion |
| *b | Reverse Idler Gear Shaft Woodruff Alignment Groove |
| *c | Reverse Idler Thrust Washer Protrusion Alignment Groove |
Install the woodruff key to the reverse idler gear shaft.
Align the reverse idler gear shaft woodruff key with the groove of the transmission intermediate plate, and install the reverse idler gear shaft to the transmission intermediate plate.
Install the reverse idler thrust washer to the reverse idler gear shaft.
33402A 30.INSTALL REVERSE IDLER GEAR BUSH OR BEARING
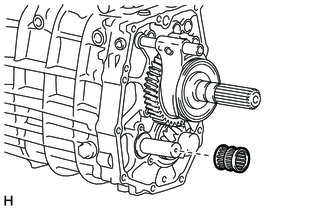
Install the reverse idler gear bush or bearing to the reverse idler gear shaft.
33461 31.INSTALL REVERSE IDLER GEAR
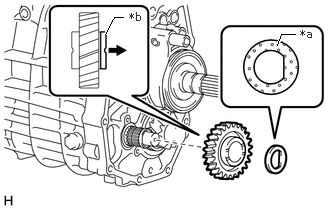
| *a | Dimpled Surface |
| *b | Machined Surface |
|
|
Rear Side |
Install the reverse idler gear to the reverse idler gear shaft.
- NOTICE:
-
Make sure to install the reverse idler gear in the correct direction.
Install the reverse idler gear shaft so that the dimpled surface of the No. 2 reverse idler thrust washer is facing the reverse idler gear side.
- NOTICE:
-
Make sure to install the No. 2 reverse idler thrust washer in the correct direction.
33112E 32.INSTALL TRANSFER ADAPTER WITH HEAD STRAIGHT SCREW PLUG
Clean and remove any oil from the transfer adapter with head straight screw plug and installation holes.
Apply adhesive to 2 or 3 threads of the transfer adapter with head straight screw plug.
- Adhesive:
-
Toyota Genuine Adhesive 1324, Three Bond 1324 or equivalent
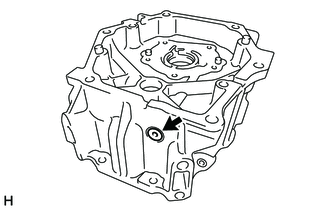
Using a T40 "TORX" socket wrench, install the transfer adapter with head straight screw plug.
- Torque:
- 18.62 N*m (190 kgf*cm, 14 ft.*lbf)
33449B 33.INSTALL TRANSMISSION MAGNET
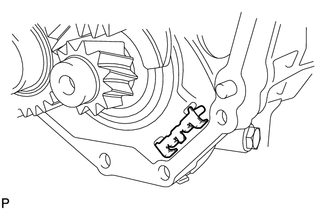
Install the transmission magnet to the transmission intermediate plate.
- NOTICE:
-
Make sure to install the transmission magnet in the correct direction.
33408 34.INSTALL MANUAL TRANSMISSION OIL STRAINER SUB-ASSEMBLY
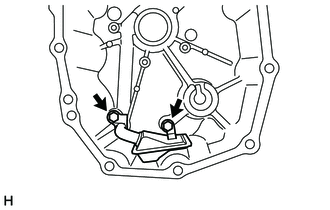
Apply a light coat of gear oil to a new O-ring.
Install the O-ring to the manual transmission oil strainer sub-assembly.
Install the manual transmission oil strainer sub-assembly to the transfer adapter sub-assembly with the 2 bolts.
- Torque:
- 11.76 N*m (120 kgf*cm, 9 ft.*lbf)
36117 35.INSTALL TRANSFER ADAPTER SUB-ASSEMBLY
Clean the contact surface of the transfer adapter sub-assembly and transmission intermediate plate with non-residue solvent.
Clean and degrease the 11 bolts and the installation holes in the transmission intermediate plate.
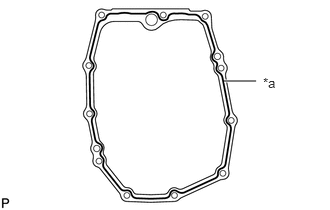
| *a | Seal Packing |
Apply seal packing to the transfer adapter sub-assembly as shown in the illustration.
- Seal Packing:
-
Toyota Genuine Seal Packing 1281, Three Bond 1281 or equivalent
- Seal Diameter:
-
1.2 mm (0.0472 in.)
- NOTICE:
-
·
Assemble parts within 10 minutes of application. Otherwise, the seal packing must be removed and reapplied.
·Make sure that foreign matter or oil does not adhere to the application surface.
·Apply seal packing in the middle along the seal surface and inner side around the bolt holes.
·Overlap the seal packing application start and end positions by 1 to 5 mm (0.0394 to 0.196 in.).
Using a plastic-faced hammer, lightly tap the transfer adapter sub-assembly so that it fully contacts the transmission intermediate plate.
Apply adhesive to 2 or 3 threads of the bolts labeled B only.
- Adhesive:
-
Toyota Genuine Adhesive 1324, Three Bond 1324 or equivalent
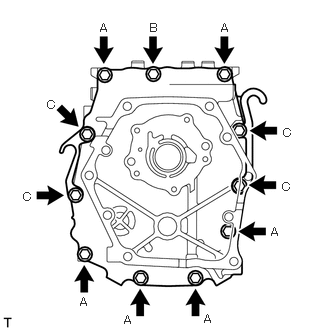
Install the transfer adapter sub-assembly, No. 1 transmission case hanger and No. 2 transmission case hanger to the transmission case with the 11 bolts.
- Torque:
- 37.24 N*m (380 kgf*cm, 27 ft.*lbf)
- Standard Bolt:
-
Item Specified Condition Bolt A and B 70 mm (2.75 in.) Bolt C 75 mm (2.95 in.)
- NOTICE:
-
Uniformly tighten the bolts in several steps.
36.INSPECT OIL PUMP RELIEF VALVE
33130N 37.INSTALL MANUAL TRANSMISSION OIL PUMP COVER O-RING
Clean the installation hole of the oil pump cover with non-residue solvent.
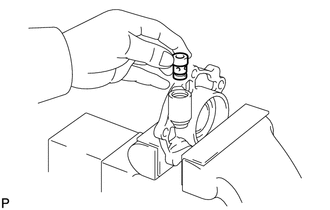
Secure the transmission oil pump cover in a vise between aluminum plates.
- NOTICE:
-
Do not overtighten the vise.
Apply a light coat of gear oil to a new manual transmission oil pump cover O-ring.
Install the manual transmission oil pump cover O-ring to the oil pump relief valve seat.
Apply gear oil to the oil pump relief valve seat and install it to the oil pump cover.
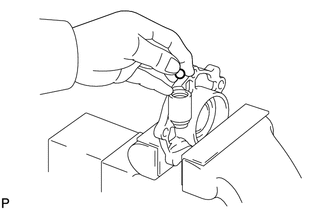
Install the transmission oil pump cover ball to the transmission oil pump cover.
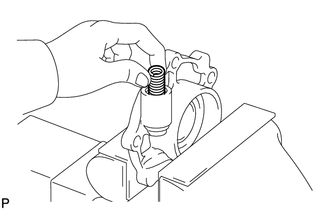
Install the transmission oil pump cover compression spring to the transmission oil pump cover.
Clean and degrease the transmission oil pump cover plug.
Apply adhesive to 2 or 3 threads of the transmission oil pump cover plug.
- Adhesive:
-
Toyota Genuine Adhesive 1324, Three Bond 1324 or equivalent
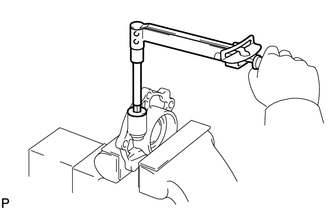
Using a 10 mm hexagon socket wrench, install the transmission oil pump cover plug to the transmission oil pump cover.
- Torque:
- 18.13 N*m (185 kgf*cm, 13 ft.*lbf)
33130H 38.INSTALL TRANSMISSION OIL PUMP COVER OIL SEAL
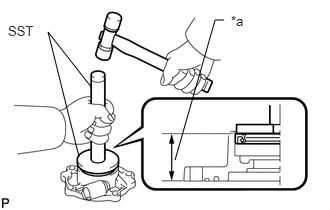
| *a | Dimension A |
Using SST and a hammer, install the transmission oil pump cover oil seal to the transmission oil pump cover.
- SST
-
09950-60010 (09951-00640)
09950-70010 (09951-07150)
- Dimension A:
-
35.3 to 35.9 mm (1.390 to 1.413 in.)
- NOTICE:
-
Install the transmission oil pump cover oil seal in the correct direction.
Apply MP grease to the lip of the transmission oil pump cover oil seal.
33468A 39.INSTALL MANUAL TRANSMISSION OIL PUMP DRIVEN ROTOR
Coat the manual transmission oil pump driven rotor with gear oil.
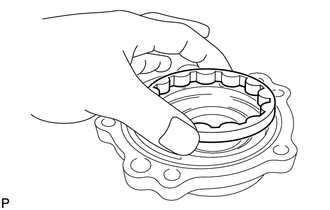
Install the manual transmission oil pump driven rotor into the oil pump cover.
33467A 40.INSTALL MANUAL TRANSMISSION OIL PUMP DRIVE ROTOR
Coat the manual transmission oil pump drive rotor with gear oil.
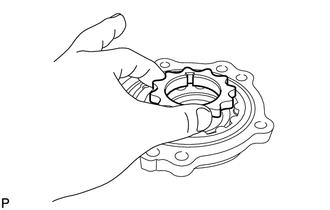
Install the manual transmission oil pump drive rotor into the oil pump cover.
- NOTICE:
-
Install the manual transmission oil pump driven rotor in the correct direction.
41.INSPECT OIL PUMP ROTOR SET
33130G 42.INSTALL TRANSMISSION OIL PUMP COVER
Clean the 5 bolts and installation holes with a non-residue solvent.
Apply MP grease to the 2 pins.
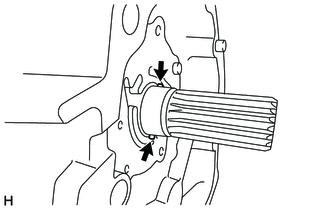
Install the 2 pins to the output shaft.
- HINT:
-
Apply MP grease to prevent the pin from falling off.
Apply MP grease to a new O-ring, and install the O-ring to the transmission oil pump cover.
Apply adhesive to 2 or 3 threads of the 5 bolts.
- Adhesive:
-
Toyota Genuine Adhesive 1324, Three Bond 1324 or equivalent
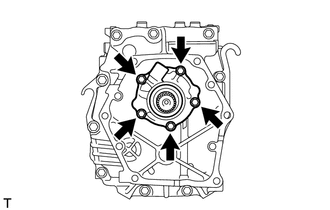
Install the oil pump cover to the transfer adapter sub-assembly with the 5 bolts.
- Torque:
- 16.66 N*m (170 kgf*cm, 12 ft.*lbf)
- NOTICE:
-
·
Align the groove of the transmission oil pump driven rotor with the pin position.
·Uniformly tighten the bolts in several steps.
33283 43.INSTALL NO. 1 REVERSE RESTRICT PIN
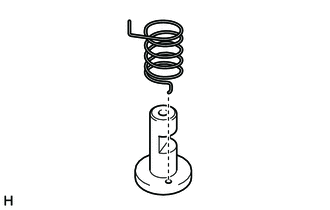
Install the spring to the No. 1 reverse restrict pin.
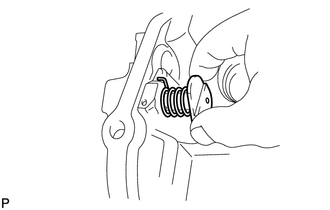
Install the No. 1 reverse restrict pin and spring to the floor shift control shift lever retainer sub-assembly.
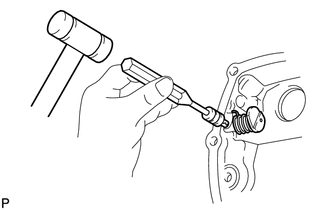
Using a 5 mm pin punch and hammer, tap a new slotted pin into the shift lever retainer.
33506F 44.INSTALL FLOOR SHIFT CONTROL SHIFT LEVER RETAINER SUB-ASSEMBLY
Clean and degrease the 6 bolts and the installation holes in the manual transmission case sub-assembly.
Apply adhesive to 2 or 3 threads of the bolts.
- Adhesive:
-
Toyota Genuine Adhesive 1324, Three Bond 1324 or equivalent
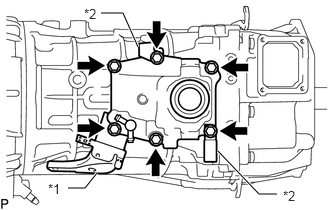
| *1 | Wire Harness Clamp Bracket |
| *2 | Wire Harness Clamp |
Install the floor shift control shift lever retainer sub-assembly, wire harness clamp bracket, 2 wire harness clamps and new extension housing oil deflector to the manual transmission case sub-assembly with the 6 bolts.
- Torque:
- 16.66 N*m (170 kgf*cm, 12 ft.*lbf)
- NOTICE:
-
Uniformly tighten the bolts in several steps.
33131A 45.INSTALL FRONT TRANSMISSION BEARING RETAINER OIL SEAL
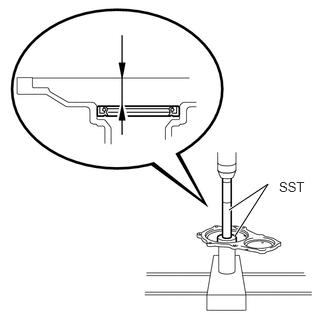
Using SST and a press, drive in a new front transmission bearing retainer oil seal.
- SST
-
09950-60010 (09951-00460)
09950-70010 (09951-07150)
- Standard Drive in Depth:
-
15.4 to 16.2 mm (0.6063 to 0.6377 in.)
- NOTICE:
-
Install the front transmission bearing retainer oil seal in the correct direction.
Apply MP grease to the lip of the front transmission bearing retainer oil seal.
33131 46.INSTALL FRONT BEARING RETAINER
Remove any seal packing from the contact surfaces of the front bearing retainer and manual transmission case sub-assembly and clean the surfaces with a non-residue solvent.
Clean the 8 bolts and installation holes with a non-residue solvent.
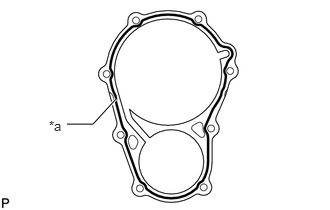
| *a | Seal Packing |
Apply seal packing to the front bearing retainer as shown in the illustration.
- Seal Packing:
-
Toyota Genuine Seal Packing 1281, Three Bond 1281 or equivalent
- NOTICE:
-
·
Install the front bearing retainer within 10 minutes of application
·Make sure that foreign matter or oil does not adhere to the application surface.
·Apply seal packing in the middle along the seal surface and inner side around the bolt holes.
·Overlap the seal packing application start and end positions by 1.0 to 5.0 mm (0.0394 to 0.196 in.).
Using a plastic-faced hammer, lightly tap the front bearing retainer so that it fully contacts the manual transmission case sub-assembly.
Apply adhesive to 2 or 3 threads of the 8 bolts.
- Adhesive:
-
Toyota Genuine Adhesive 1324, Three Bond 1324 or equivalent
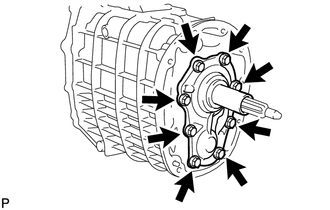
Install the front bearing retainer to the manual transmission case sub-assembly with the 8 bolts.
- Torque:
- 16.66 N*m (170 kgf*cm, 12 ft.*lbf)
- NOTICE:
-
Uniformly tighten the bolts in several steps.
31111 47.INSTALL CLUTCH HOUSING
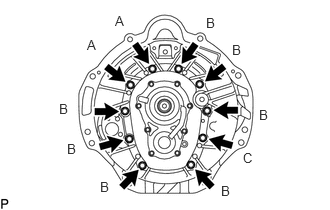
Clean and degrease the 2 bolts (labeled A) and the installation holes in the manual transmission case sub-assembly.
Temporarily install the clutch housing to the manual transmission case sub-assembly.
Apply adhesive to 2 or 3 threads of the bolts labeled A only.
- Adhesive:
-
Toyota Genuine Adhesive 1324, Three Bond 1324 or equivalent
Install the clutch housing with the 10 bolts.
- Torque:
- 37.24 N*m (380 kgf*cm, 27 ft.*lbf)
- Standard Bolt:
-
Item Length Bolt A, B 45 mm (1.77 in.) Bolt C 35 mm (1.38 in.)
33104 48.INSTALL DRAIN PLUG SUB-ASSEMBLY
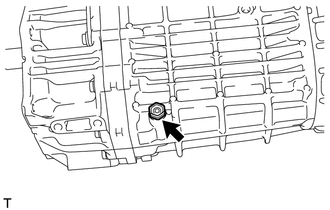
Install a new gasket and the drain plug sub-assembly to the manual transmission.
- Torque:
- 37.24 N*m (380 kgf*cm, 27 ft.*lbf)
33111A 49.TEMPORARILY INSTALL MANUAL TRANSMISSION CASE PLUG
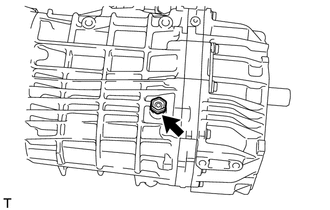
Temporarily install a new gasket and the manual transmission case plug to the manual transmission.
- Torque:
- 37.24 N*m (380 kgf*cm, 27 ft.*lbf)
- HINT:
-
The filler plug will be tightened to a torque specification in the "Inspect Transmission Oil" procedure.
33280 50.INSTALL REVERSE RESTRICT PIN ASSEMBLY
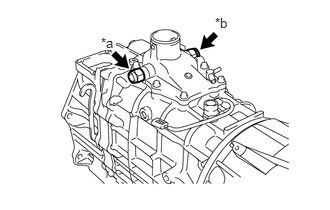
| *a | Red |
| *b | Green |
Clean and degrease the 2 reverse restrict pin assemblies and the installation holes in the floor shift control shift lever retainer sub-assembly.
Apply adhesive to 2 or 3 threads of the 2 reverse restrict pin assemblies.
- Adhesive:
-
Toyota Genuine Adhesive 1324, Three Bond 1324 or equivalent
Install the 2 reverse restrict pin assemblies to the floor shift control shift lever retainer sub-assembly as shown in the illustration.
- Torque:
- 37.24 N*m (380 kgf*cm, 27 ft.*lbf)
84210 51.INSTALL BACK-UP LIGHT SWITCH ASSEMBLY
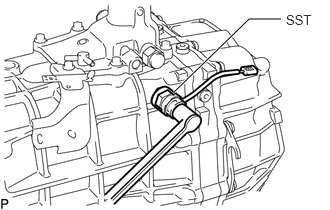
Using SST, install a new gasket and the back-up light switch assembly to the manual transmission.
- SST
-
09817-16011
- Torque:
- 44.1 N*m (450 kgf*cm, 33 ft.*lbf)
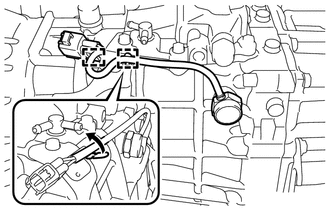
Connect the back-up light switch connector clamp to the wire harness clamp bracket.
Set the wire harness to the wire harness clamp bracket and close the clamp to secure it as shown in the illustration.
- NOTICE:
-
Lightly pull the wire harness toward the wire harness clamp bracket side and after placing the wire harness slack at the connector side, secure it by bending the clamp of the wire harness clamp bracket.
84225A 52.INSTALL SHIFT POSITION SWITCH
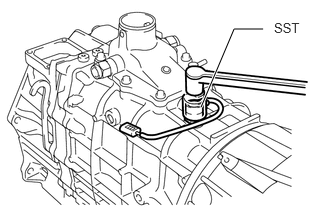
Using SST, install a new gasket and the shift position switch to the manual transmission.
- SST
-
09817-16011
- Torque:
- 44.1 N*m (450 kgf*cm, 33 ft.*lbf)
33101J 53.INSTALL BREATHER PLUG
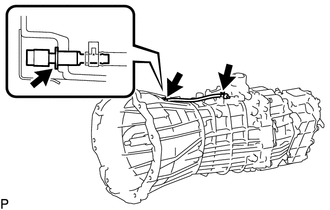
Install the breather plug to the clutch housing.
Connect the transmission breather hose to the floor shift control shift lever retainer sub-assembly and breather plug, and slide the 2 clips to secure the hose.
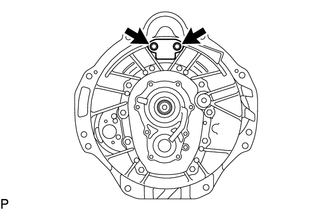
Install the transmission oil baffle with the 2 bolts.
- Torque:
- 11.8 N*m (120 kgf*cm, 9 ft.*lbf)