1VD-FTV EMISSION CONTROL EXHAUST GAS TEMPERATURE SENSOR(for DPF) INSTALLATION
PROCEDURE

 89425B 1.INSTALL NO. 3 EXHAUST GAS TEMPERATURE SENSOR
w/o Insulator:
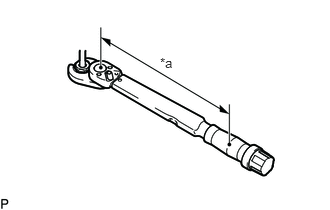
| *a | Torque Wrench Fulcrum Length |
Using a 14 mm union nut wrench, install the No. 3 exhaust gas temperature sensor.
- Torque:
- Specified tightening torque : 30 N*m (306 kgf*cm, 22 ft.*lbf)
- NOTICE:
-
If the No. 3 exhaust gas temperature sensor is dropped, replace it with a new one.
- HINT:
-
·
Identification paint on the exhaust gas temperature sensor is three lines.
·Calculate the torque wrench reading when changing the fulcrum length of the torque wrench.
Click hereGeneral>INTRODUCTION>REPAIR INSTRUCTION>PRECAUTION
·When using a union nut wrench (fulcrum length of 25 mm (0.984 in.)) + torque wrench (fulcrum length of 180 mm (7.09 in.)): 26.3 N*m (268 kgf*cm, 19 ft.*lbf)
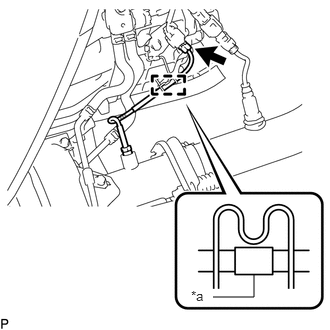
| *a | Tape |
Connect the connector and clamp.
- HINT:
-
Make sure that the tape is in the position shown in the illustration.
w/ Insulator:
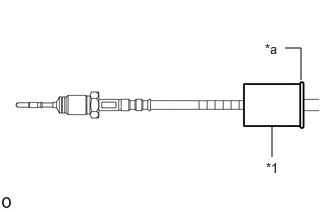
| *1 | Exhaust Gas Sensor Insulator |
| *a | Plate |
Slide the plate and set the exhaust gas sensor insulator.
| *a | Torque Wrench Fulcrum Length |
Using a 14 mm union nut wrench, install the No. 3 exhaust gas temperature sensor.
- Torque:
- Specified tightening torque : 30 N*m (306 kgf*cm, 22 ft.*lbf)
- NOTICE:
-
If the No. 3 exhaust gas temperature sensor is dropped, replace it with a new one.
- HINT:
-
·
Identification paint on the exhaust gas temperature sensor is three lines.
·Calculate the torque wrench reading when changing the fulcrum length of the torque wrench.
Click hereGeneral>INTRODUCTION>REPAIR INSTRUCTION>PRECAUTION
·When using a union nut wrench (fulcrum length of 25 mm (0.984 in.)) + torque wrench (fulcrum length of 180 mm (7.09 in.)): 26.3 N*m (268 kgf*cm, 19 ft.*lbf)
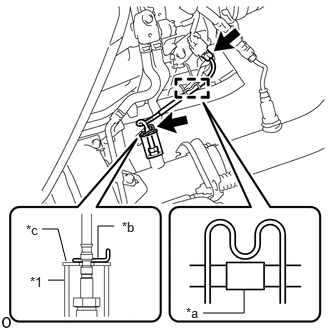
| *1 | Exhaust Gas Sensor Insulator |
| *a | Tape |
| *b | Clip |
| *c | Plate |
Connect the connector and clamp.
- HINT:
-
Make sure that the tape is in the position shown in the illustration.
Slide the plate and exhaust gas sensor insulator.
Install the clip.
- HINT:
-
Make sure that the clip is in the position shown in the illustration.
89425A 2.INSTALL NO. 2 EXHAUST GAS TEMPERATURE SENSOR
w/o Insulator:
| *a | Torque Wrench Fulcrum Length |
Using a 14 mm union nut wrench, install the No. 2 exhaust gas temperature sensor.
- Torque:
- Specified tightening torque : 30 N*m (306 kgf*cm, 22 ft.*lbf)
- NOTICE:
-
If the No. 2 exhaust gas temperature sensor is dropped, replace it with a new one.
- HINT:
-
·
Identification paint on the exhaust gas temperature sensor is two lines.
·Calculate the torque wrench reading when changing the fulcrum length of the torque wrench.
Click hereGeneral>INTRODUCTION>REPAIR INSTRUCTION>PRECAUTION
·When using a union nut wrench (fulcrum length of 25 mm (0.984 in.)) + torque wrench (fulcrum length of 180 mm (7.09 in.)): 26.3 N*m (268 kgf*cm, 19 ft.*lbf)
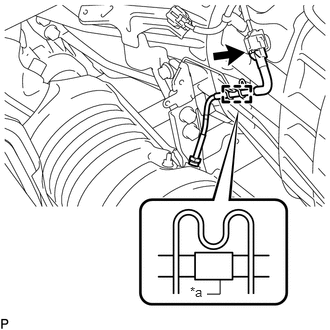
| *a | Tape |
Connect the connector and clamp.
- HINT:
-
Make sure that the tape is in the position shown in the illustration.
w/ Insulator:
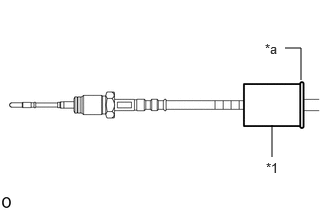
| *1 | Exhaust Gas Sensor Insulator |
| *a | Plate |
Slide the plate and set the exhaust gas sensor insulator.
Using a 14 mm union nut wrench, install the No. 2 exhaust gas temperature sensor.
- Torque:
- Specified tightening torque : 30 N*m (306 kgf*cm, 22 ft.*lbf)
- NOTICE:
-
If the No. 2 exhaust gas temperature sensor is dropped, replace it with a new one.
- HINT:
-
·
Identification paint on the exhaust gas temperature sensor is two lines.
·Calculate the torque wrench reading when changing the fulcrum length of the torque wrench.
Click hereGeneral>INTRODUCTION>REPAIR INSTRUCTION>PRECAUTION
·When using a union nut wrench (fulcrum length of 25 mm (0.984 in.)) + torque wrench (fulcrum length of 180 mm (7.09 in.)): 26.3 N*m (268 kgf*cm, 19 ft.*lbf)
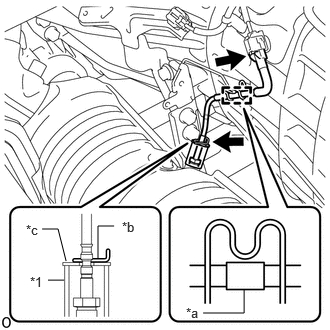
| *1 | Exhaust Gas Sensor Insulator |
| *a | Tape |
| *b | Clip |
| *c | Plate |
Connect the connector and clamp.
- HINT:
-
Make sure that the tape is in the position shown in the illustration.
Slide the plate and exhaust gas sensor insulator.
Install the clip.
- HINT:
-
Make sure that the clip is in the position shown in the illustration.
89425 3.INSTALL EXHAUST GAS TEMPERATURE SENSOR
| *a | Torque Wrench Fulcrum Length |
Using a 14 mm union nut wrench, install the 2 exhaust gas temperature sensors.
- Torque:
- Specified tightening torque : 30 N*m (306 kgf*cm, 22 ft.*lbf)
- NOTICE:
-
If the exhaust gas temperature sensor is dropped, replace it with a new one.
- HINT:
-
·
Identification paint on the exhaust gas temperature sensor is one line.
·Calculate the torque wrench reading when changing the fulcrum length of the torque wrench.
Click hereGeneral>INTRODUCTION>REPAIR INSTRUCTION>PRECAUTION
·When using a union nut wrench (fulcrum length of 25 mm (0.984 in.)) + torque wrench (fulcrum length of 180 mm (7.09 in.)): 26.3 N*m (268 kgf*cm, 19 ft.*lbf)
Connect the connector and clamp.