LIGHTING (EXT) AUTOMATIC LIGHT CONTROL SENSOR ON-VEHICLE INSPECTION
PROCEDURE

 89120A
1.INSPECT AUTOMATIC LIGHT CONTROL SENSOR
Disconnect the automatic light control sensor connector.
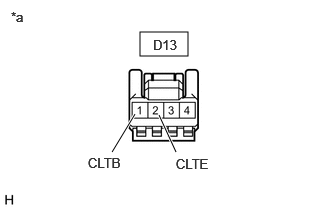
| *a | Front view of wire harness connector
(to Automatic Light Control Sensor) |
Measure the voltage according to the value(s) in the table below.
- Standard Voltage:
Tester Connection Condition Specified Condition Click Location & Routing(D13)Location & Routingewd_type=routing;type=c;code=D13
Click Connector(D13)Instrument Panel>Instrument Panel Wire>Automatic Light Control Sensorewd_type=component;type=c;code=D13;pinno=1,2
D13-1(CLTB) - D13-2(CLTE) Power switch on (IG) 11 to 14 V
- HINT:
-
If the result is not as specified, repair or replace the wire harness.
Measure the resistance according to the value(s) in the table below.
- Standard Resistance:
Tester Connection Condition Specified Condition Click Location & Routing(D13)Location & Routingewd_type=routing;type=c;code=D13
Click Connector(D13)Instrument Panel>Instrument Panel Wire>Automatic Light Control Sensorewd_type=component;type=c;code=D13;pinno=2
D13-2 (CLTE) - Body ground Always Below 1 Ω
- HINT:
-
If the result is not as specified, repair or replace the wire harness.
Reconnect the automatic light control sensor connector.
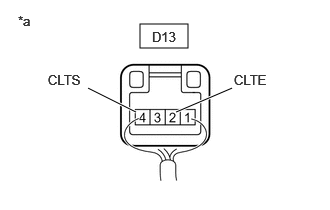
| *a | Component with harness connected
(Automatic Light Control Sensor) |
Connect an oscilloscope to the automatic light control sensor connector.
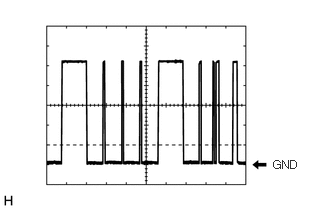
Check the waveform.
- OK:
Tester Connection Tool Setting Condition Specified Condition Click Location & Routing(D13)Location & Routingewd_type=routing;type=c;code=D13
Click Connector(D13)Instrument Panel>Instrument Panel Wire>Automatic Light Control Sensorewd_type=component;type=c;code=D13;pinno=4,2
D13-4(CLTS) - D13-2(CLTE) 2 V/DIV., 10 ms./DIV. Power switch on (IG), light control switch in AUTO position Correct waveform is as shown
- HINT:
- ·
The communication waveform changes according to the surrounding brightness.
·If the result is not as specified, replace the automatic light control sensor.