NAVIGATION / MULTI INFO DISPLAY NAVIGATION SYSTEM AVC-LAN Circuit
DESCRIPTION
Each unit of the navigation system connected to the AVC-LAN (communication bus) transmits switch signals via AVC-LAN communication.
If a short to +B or short to ground occurs in the AVC-LAN, the navigation system will not function normally because communication is not possible.
WIRING DIAGRAM
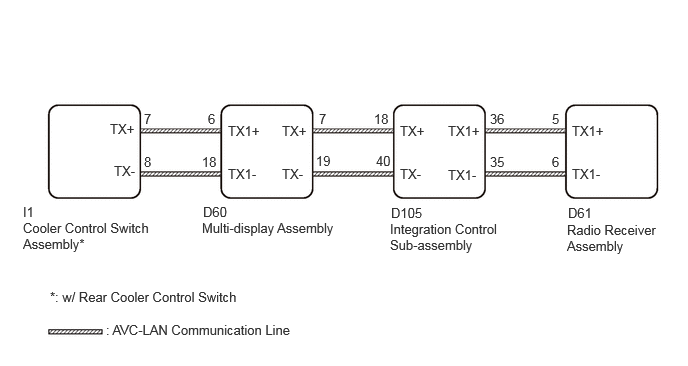
CAUTION / NOTICE / HINT
- NOTICE:
-
Depending on the parts that are replaced during vehicle inspection or maintenance, performing initialization, registration or calibration may be needed. Refer to Precaution for Navigation System.
-
Click hereAudio / Visual / Telematics>NAVIGATION / MULTI INFO DISPLAY>NAVIGATION SYSTEM>PRECAUTION
- HINT:
-
The radio receiver assembly is the master unit.
PROCEDURE
Remove the radio receiver assembly.
Click hereAudio / Visual / Telematics>AUDIO / VIDEO>RADIO RECEIVER>REMOVAL
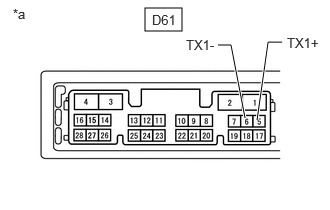
| *a | Component without harness connected
(Radio Receiver Assembly) |
Measure the resistance according to the value(s) in the table below.
- Standard Resistance:
Tester Connection Condition Specified Condition Click Location & Routing(D61)Location & Routingewd_type=routing;type=c;code=D61
Click Connector(D61)Instrument Panel>Instrument Panel Wire>Radio Receiver Assemblyewd_type=component;type=c;code=D61;pinno=5,6
D61-5 (TX1+) - D61-6 (TX1-) Always 60 to 80 Ω
- Result:
Proceed to OK NG
OK
NG
*: w/ Rear Cooler Control Switch
Disconnect the D61 radio receiver assembly connector.
Disconnect the D105 integration control sub-assembly connector.
Disconnect the D60 multi-display assembly connector.
Disconnect the I1 cooler control switch assembly connector.*
Measure the resistance according to the value(s) in the table below.
- Standard Resistance:
Tester Connection Condition Specified Condition Click Location & Routing(D61,D105,D60,I1)Location & Routingewd_type=routing;type=c,c,c,c;code=D61,D105,D60,I1
Click Connector(D61)Instrument Panel>Instrument Panel Wire>Radio Receiver Assemblyewd_type=component;type=c;code=D61;pinno=5,6
Click Connector(D105)Instrument Panel>Instrument Panel Wire>Integration Control Sub-Assemblyewd_type=component;type=c;code=D105;pinno=36,35,18,40
Click Connector(D60)Instrument Panel>Instrument Panel Wire>Multi-Display Assemblyewd_type=component;type=c;code=D60;pinno=7,19,6,18
Click Connector(I1)Seat>Rear Console Box Wire>Cooler Control Switch Assemblyewd_type=component;type=c;code=I1;pinno=7,8
D61-5 (TX1+) - D105-36 (TX1+) Always Below 1 Ω D61-6 (TX1-) - D105-35 (TX1-) Always Below 1 Ω D61-5 (TX1+) or D105-36 (TX1+) - Body ground Always 10 kΩ or higher D61-6 (TX1-) or D105-35 (TX1-) - Body ground Always 10 kΩ or higher D105-18 (TX+) - D60-7 (TX+) Always Below 1 Ω D105-40 (TX-) - D60-19 (TX-) Always Below 1 Ω D105-18 (TX+) or D60-7 (TX+) - Body ground Always 10 kΩ or higher D105-40 (TX-) or D60-19 (TX-) - Body ground Always 10 kΩ or higher D60-6 (TX1+) - I1-7 (TX+)* Always Below 1 Ω D60-18 (TX1-) - I1-8 (TX-)* Always Below 1 Ω D60-6 (TX1+) or I1-7 (TX+) - Body ground* Always 10 kΩ or higher D60-18 (TX1-) or I1-8 (TX-) - Body ground* Always 10 kΩ or higher
- Result:
Proceed to OK NG
OK
NG
Disconnect and reconnect each slave unit one by one until the master unit returns to normal.
- HINT:
- ·
Check all slave units.
·If disconnecting a slave unit causes the master unit to return to normal, the slave unit is defective and should be replaced.
- OK:
Master unit return to normal.
- Result:
Proceed to OK NG
OK
NG