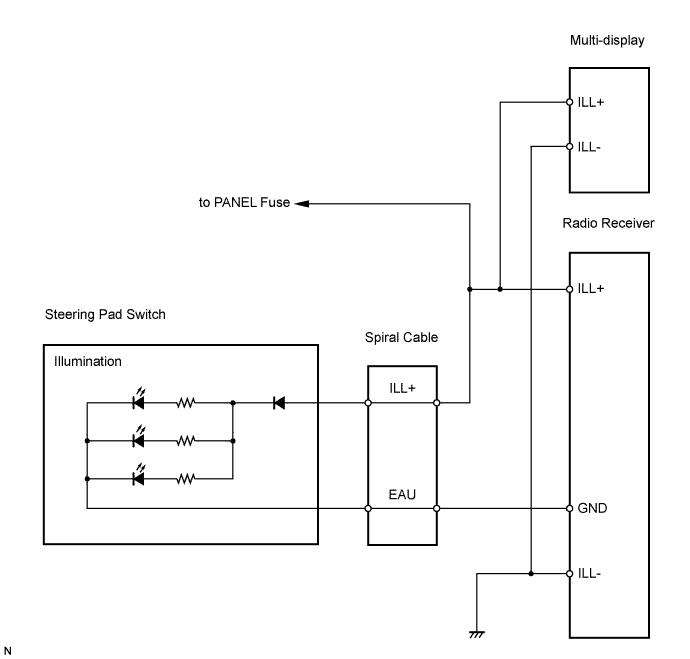
AUDIO AND VISUAL SYSTEM > Illumination Circuit |
| 1.CHECK ILLUMINATION |
Check if the illumination for the radio receiver, steering pad switch, multi-display and other illuminations (hazard switch, etc.) come on when the light control switch is turned to the HEAD or TAIL position.
| Result | Proceed to |
| Illumination comes on for all components except steering pad switch. | A |
| Illumination comes on for all components except radio receiver. | B |
| Illumination comes on for all components except multi-display. | C |
| No illumination comes on (radio receiver, hazard switch, multi-display, etc.). | D |
|
| ||||
|
| ||||
|
| ||||
| A | |
 |
| 2.CHECK WIRE HARNESS (BATTERY - SPIRAL CABLE) |
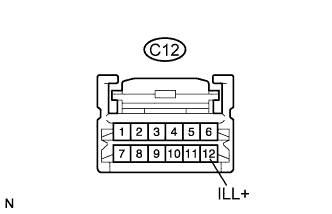 |
Disconnect the C12 cable connector.
Measure the voltage of the wire harness side connector.
| Tester Connection | Condition | Specified Condition |
| C12-12 (ILL+) - Body ground | Light control switch TAIL or HEAD | 10 to 14 V |
|
| ||||
| OK | |
|
| 3.INSPECT STEERING PAD SWITCH |
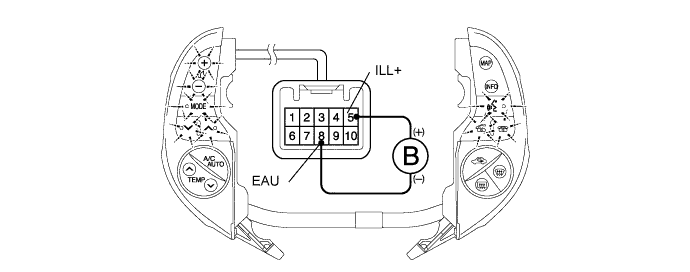
Disconnect the steering pad switch connector.
Connect the battery's positive (+) lead to terminal 5 (ILL+) and the negative (-) lead to terminal 8 (EAU) of the steering pad switch connector.
Check if the illumination for the steering pad switch comes on.
|
| ||||
| OK | |
|
| 4.INSPECT SPIRAL CABLE |
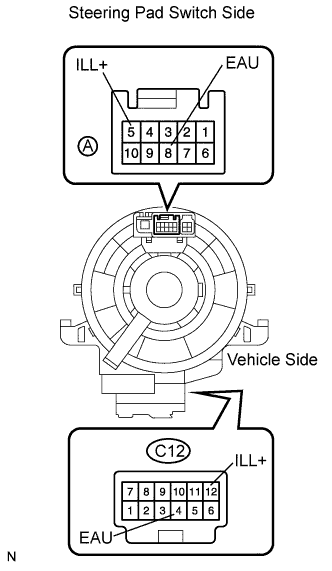 |
Disconnect the steering pad switch connector.
Disconnect the spiral cable connector.
Measure the resistance of the cable.
| Tester Connection | Spiral Cable Position | Specified Condition |
| C12-4 (EAU) - A-8 (EAU) | Center | Below 1 Ω |
| 2.5 rotations to the left | ||
| 2.5 rotations to the right | ||
| C12-12 (ILL+) - A-5 (ILL+) | Center | Below 1 Ω |
| 2.5 rotations to the left | ||
| 2.5 rotations to the right |
|
| ||||
| OK | |
|
| 5.CHECK WIRE HARNESS (SPIRAL CABLE - RADIO RECEIVER) |
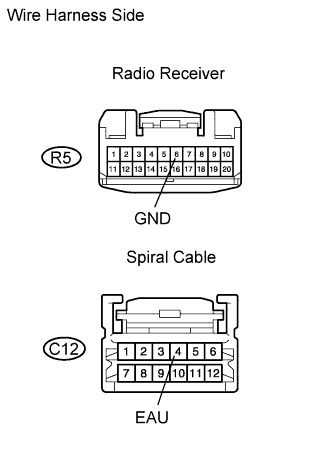 |
Disconnect the R5 receiver connector.
Disconnect the C12 cable connector.
Measure the resistance of the wire harness side connectors.
| Tester Connection | Specified Condition |
| R5-6 (GND) - C12-4 (EAU) | Below 1 Ω |
| R5-6 (GND) - Body ground | 10 kΩ or higher |
|
| ||||
| OK | ||
 | ||
| ||
| 6.CHECK WIRE HARNESS (BATTERY - RADIO RECEIVER) |
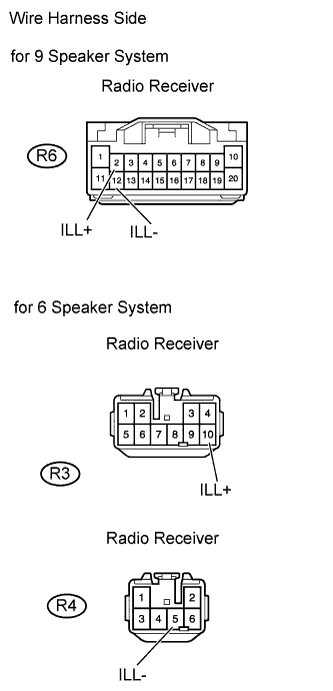 |
Disconnect the R3*1 or R6*2 receiver connector.
Measure the voltage of the wire harness side connector.
| Tester Connection | Condition | Specified Condition |
| R3-10 (ILL+) - Body ground*1 | Light control switch TAIL or HEAD | 10 to 14 V |
| R6-2 (ILL+) - B0dy ground*2 | Light control switch TAIL or HEAD | 10 to 14 V |
Measure the resistance of the wire harness side connectors.
| Tester Connection | Specified Condition |
| R4-5 (ILL-) - Body ground*1 | Below 1 Ω |
| R6-12 (ILL-) - Body ground*2 | Below 1 Ω |
|
| ||||
| OK | ||
| ||
| ||
| 7.CHECK WIRE HARNESS (BATTERY - MULTI-DISPLAY) |
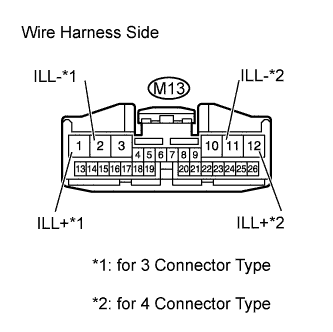 |
Disconnect the M13 display connector.
Measure the voltage of the wire harness side connector.
| Tester Connection | Condition | Specified Condition |
| M13-1 (ILL+) - Body ground*1 | Light control switch TAIL or HEAD | 10 to 14 V |
| M13-12 (ILL+) - Body ground*2 | Light control switch TAIL or HEAD | 10 to 14 V |
Measure the resistance of the wire harness side connector.
| Tester Connection | Specified Condition |
| M13-2 (ILL-) - Body ground*1 | Below 1 Ω |
| M13-11 (ILL-) - Body ground*2 | Below 1 Ω |
|
| ||||
| OK | ||
| ||
| ||

