Home › BODY › WINDSHIELD / WINDOWGLASS › QUARTER WINDOW GLASS

QUARTER WINDOW GLASS > REMOVAL

for Preparation Click here


HINT:
  1. Use the same procedures for the LH side and RH side.
  2. The procedures listed below are for the LH side.


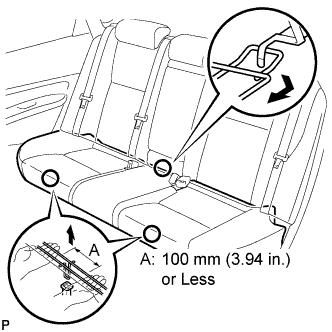
1. REMOVE REAR SEAT CUSHION ASSEMBLY


    B132600E01
  1. Detach the seat cushion's 2 front hooks from the vehicle body.

    NOTICE:
    Follow the instructions below carefully as the cushion frame deforms easily.


    1. Choose a hook to detach first. Place your hands near the hook as shown in the illustration. Then lift the seat cushion to detach the hook.

    2. Repeat for the other hook.

  1. Detach the seat cushion's rear hook.

  1. Remove the seat cushion.


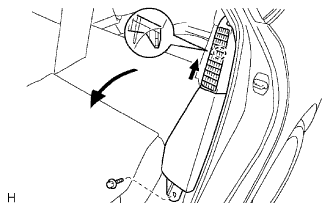
2. REMOVE REAR SIDE SEATBACK FRAME LH


    B076393E02
  1. Remove the bolt.

  1. Detach the claw and remove the frame.


3. REMOVE REAR DOOR OPENING TRIM WEATHERSTRIP LH


4. REMOVE BACK DOOR WEATHERSTRIP


5. REMOVE TONNEAU COVER ASSEMBLY


6. REMOVE REAR NO. 2 FLOOR BOARD


7. REMOVE REAR NO. 3 FLOOR BOARD


8. REMOVE REAR NO. 4 FLOOR BOARD


9. REMOVE REAR DECK FLOOR BOX


10. REMOVE DECK FLOOR BOX LH


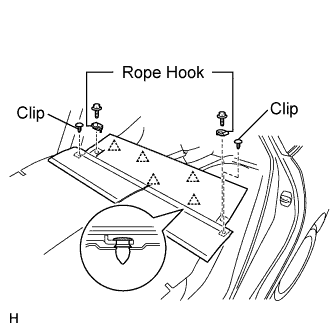
11. REMOVE REAR NO. 1 FLOOR BOARD


    B132619E01
  1. Remove the 2 bolts and the 2 rope hooks.

  1. Using a clip remover, remove the 2 clips.

  1. Using a screwdriver, detach the 5 clips and remove the floor board.

    HINT:
    Tape the screwdriver tip before use.


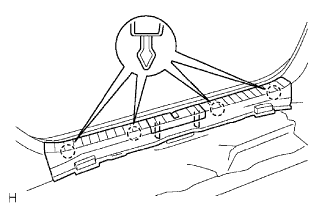
12. REMOVE REAR DECK TRIM COVER


    B076395E02
  1. Using a screwdriver, detach the 4 claws and remove the trim cover.

    HINT:
    Tape the screwdriver tip before use.


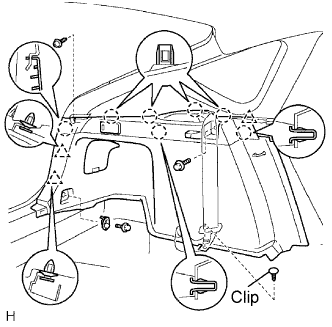
13. REMOVE DECK TRIM SIDE PANEL ASSEMBLY LH


    B073591E02
  1. Remove the screw and 2 bolts.

  1. Using a clip remover, remove the clip.

  1. Using a screwdriver, detach the 7 claws and 3 clips, and remove the side panel.

    HINT:
    Tape the screwdriver tip before use.


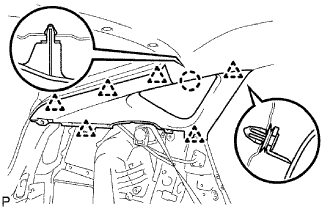
14. REMOVE ROOF SIDE INNER GARNISH ASSEMBLY LH


    B073592E03
  1. Using a screwdriver, detach the 6 clips and claw, and remove the inner garnish.

    HINT:
    Tape the screwdriver tip before use.


15. REMOVE QUARTER WINDOW ASSEMBLY LH


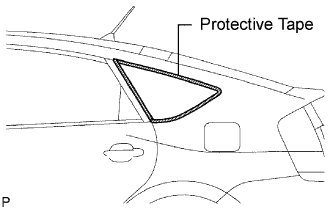
B073865E01
  1. Apply protective tape to the outer surface of the vehicle body to prevent scratches.

    NOTICE:
    When removing the quarter window glass from the vehicle, be careful not to damage the vehicle's paint or interior/exterior ornaments.


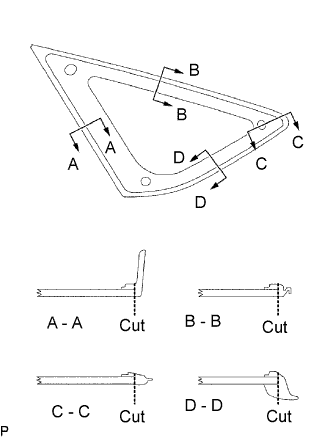
    B073863E02
  1. Using a knife, cut off the moulding as shown in the illustration.

    NOTICE:
    Be careful not to damage the vehicle body with the knife.

  1. Remove the remaining moulding.

    HINT:
    Make a partial cut in the moulding. Then pull and remove it by hand.


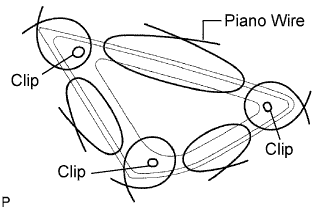
    B073864E01
  1. From the interior, insert a piano wire between the vehicle body and the quarter window glass as shown in the illustration.

  1. Tie objects that can serve as handles (for example, wooden blocks) to both wire ends.

  1. Cut through the adhesive by pulling the piano wire around the quarter window glass.

    NOTICE:
    Leave as much adhesive on the vehicle body as possible when removing the quarter window glass.

  1. Using suction cups, remove the quarter window glass.


16. CLEAN VEHICLE BODY


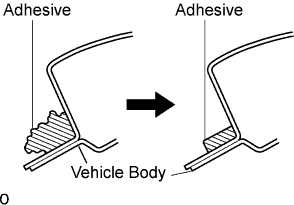
B106081E09
  1. Clean and shape the contact surface of the vehicle body.

    1. On the contact surface of the vehicle body, use a knife to cut away excess adhesive as shown in the illustration.

      HINT:
      Leave as much adhesive on the vehicle body as possible.

      NOTICE:
      Be careful not to damage the vehicle body.

    2. Clean the contact surface of the vehicle body with cleaner.

      HINT:
      Even if all the adhesive has been removed, clean the vehicle body.